Tuesday, September 25, 2012
Wednesday, September 19, 2012
Bolt Hole Family in Columns

1. Make a family using the Generic Model-Face Based template.
2. Make Reference Planes and Parameters as needed.
3. Extrude the voids into the host and then use the cut geometry tool to cut the voids out of the host.
Friday, August 03, 2012
Reference Tags for Renderings
I've always been annoyed that there is no tag for camera views. That fact remains but there is technique that can help. It's referencing a saved rendering view through an Elevation Tag. Here's how to do it...
Elevation Tag
Options Bar-check Reference other View
Choose a saved Rendering View


Elevation Tag
Options Bar-check Reference other View
Choose a saved Rendering View

Make sure to choose Reference Other View before clicking in the drawing area...
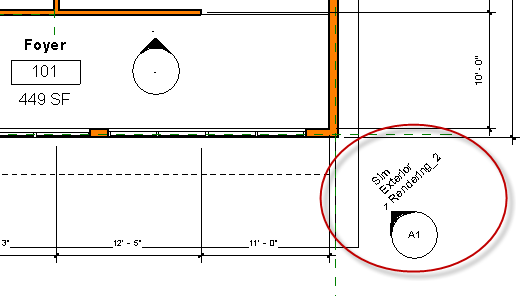
Then click...the Elevation marker will show...

When you double left click on the Elevation View you will be taken to the Rendering view
Monday, July 16, 2012
Revit Architecture 2013 Fundamentals Video Released

I'm pleased to announce my latest video for learning Revit Architecture 2013 Fundamentals. A real wall was built in the making of this video. If you hear a distant high pitched giggling, that's just my toddler sending joyful sound waves (and the occasional sippycup) though the new insulated office wall. As with all of my videos we focus on one project from start to finish with no 'off-camera magic'. Everything I do, you will do. You'll start with a basic sketch as illustrated below and end up with a set of documents including lots of colour renderings, plans, sections and details. Hope you enjoy and your feedback is always appreciated.


Wednesday, July 04, 2012
Revit 2013 NWC Exporter not Installing
Thanks to Dwayne Lindsey for this post. It's a little old but still applies when a Navisworks NWC Exporter is not installed by default.
http://navis-infocenter.blogspot.ca/2009/07/navisworks-exporters-not-installing.html
http://navis-infocenter.blogspot.ca/2009/07/navisworks-exporters-not-installing.html
Tuesday, May 15, 2012
Italian Revit Architecture

Nice to see how Revit is being used around the world. A brand new edition of Revit Architecture 2013 guide has just been published. Even if you don't speak italian, the sample files may be worth a look. I will be doing a review in upcoming weeks. The full name is "Revit Architecture 2013 - La grande guida" published by Mondadori. Some of its main features of the book are:
- 380 pages with beautiful examples of italian architecture
- 600+ images
- 450MB examples and exercises
Books can be found on every online bookstore or ordered directly by sending an email request to: 4mshop@4mgroup.it
Friday, May 04, 2012
Caution: Filled Regions Move with Datums
Filled Regions move with Datums. If you were to draw a Filled Region at a Grid or Level, it will be locked to that Level and move with it. Detail Components and Detail Lines do not move with Datums so this can be a little unexpected and strange.
Workaround: Group your Filled Regions and they will no longer move with Datums. It's a good idea to group 2D items anyway.
Friday, April 27, 2012

Thursday, April 12, 2012
orug: ORUG Meeting April 26th
orug: ORUG Meeting April 26th: New Season; New Ideas. ORUG's Spring Meeting is April 26th ...
Monday, March 19, 2012
Dangers of Importing CAD into Revit
Importing and Linking CAD should be avoided. But why? And if it is unavoidable, how can I do it safely?
Here are some answers:
Potential Issus with Importing/Linking dwg (CAD) files into Revit
More Issues...
What Can be Done
In AutoCAD:
Wblock only necessary information
Purge
Audit
In Revit:
Always link, don't import
Current View Only (for 2D dwgs)
Detailed explanation here for Survey drawings
Importing and Linking CAD Best Practices part 1
Importing and Linking CAD Best Practices part 2
Imported 3D AutoCAD not Sectioning
Here are some answers:
Potential Issus with Importing/Linking dwg (CAD) files into Revit
- Corrupt dwg
- Large file size and extraneous information
- Linked CAD can become unlinked but will still display. This can cause confusion as to what the latest file is.
- Possibility of someone exploding, causing up to 10,000 extra elements.
- Many AutoCAD layers and linetypes are brought in after an explode
- Size of CAD needs to be under 20miles in diameter. There can be items which are not part of the primary drawing that are very far away from 0.
- Visual clutter
- dwg files from programs like AutoCAD Architecture and Civil 3D may need special plugins to see all of the data.
More Issues...
What Can be Done
In AutoCAD:
Wblock only necessary information
Purge
Audit
In Revit:
Always link, don't import
Current View Only (for 2D dwgs)
Detailed explanation here for Survey drawings
Importing and Linking CAD Best Practices part 1
Importing and Linking CAD Best Practices part 2
Imported 3D AutoCAD not Sectioning
Wednesday, February 22, 2012
Canadian Consulting Engineer BIM Article
Here's an article that Bill Wright (Revit MEP Implementation Specialist) and I recently co-authored for Canadian Consulting Engineer, February 2012 Issue page.26.
True Tales of BIM
Consultants share their insights into what it takes to successfully implement building information modeling. As it turns out, managing and understanding people is as important as being familiar with the actual technology...

True Tales of BIM
Consultants share their insights into what it takes to successfully implement building information modeling. As it turns out, managing and understanding people is as important as being familiar with the actual technology...
Revit Structure 2012 Intermediate Training Videos Released
Introducing video training for Revit Structure 2012 Intermediate. This 7.5hr
course completes the workflow of a project focusing on industry best practices
along the way. Picking up where the fundamental course left off, this course covers intermediate and advanced topics like Phasing, Families and Collaboration. Watch some free sample videos here. The Revit Structure Bundle contains 14 hours of project specific training.


Tuesday, February 14, 2012
Video: Splitting Columns
Here is a video showing the workarounds for splitting columns.
The workarounds demonstrated are changing Vertical Columns to Slanted and/or using the Coordination Monitor.
The workarounds demonstrated are changing Vertical Columns to Slanted and/or using the Coordination Monitor.
Monday, February 13, 2012
Video: How to Fillet in Revit
Back in 2006 I did a simple post on how to Fillet. Now we have a video...
I can trim, offset and align but where's fillet?
Fillet is used with a 'draw' tool like line or wall. Here's how to put a radius on the corner of walls;
Start the wall tool and choose fillet arc from the dropdown list.
Pick the two corner walls and draw a preliminary arc.
Pick the arc and adjust the radius by typing the number in the dimension.
I can trim, offset and align but where's fillet?
Fillet is used with a 'draw' tool like line or wall. Here's how to put a radius on the corner of walls;
Start the wall tool and choose fillet arc from the dropdown list.
Pick the two corner walls and draw a preliminary arc.
Pick the arc and adjust the radius by typing the number in the dimension.
Revit Fill Patterns (Hatch Patterns): Part 1
Revit Hatch Patterns: Part 1
Hatch patterns in Revit are referred to as 'Fill Patterns'.
When applied to a Revit material they can be either 'Surface Patterns' or 'Cut Patterns'.
Surface Patterns: Fill Patterns on an element in projection.
Cut Patterns: Fill Patterns on an element when cut.
Revit further divides them into 'Model' and 'Drafting'.
Model: Is always real world size (for instance 8"x4"x2.5"). Useful for measuring brick coursing.
Drafting: Is always a printed size (for instance measured off the sheet as 1/16"). Useful for representing diagonal masonry hatch no matter the scale.
Fill Patterns start life as a .pat file. The same file used in AutoCAD and other programs for hatches.
Here's a site with some free .pat files. As an example, you could download the Brickpat.zip file. This contains a bunch of sample brick hatches in .pat form. Take a look at the thirdrun.pat. These .pat files can be opened and edited in Notepad. Here's an AutoCAD dwg file made by Chirag Mistry which explains how to write and edit a .pat file for Revit. Most .pat files are 'Drafting' patterns according to Revit. In order to make them 'Model' patterns you need to add ";%TYPE=MODEL" to the second line of the pat file (without the quotations). You can do that to the thirdrun.pat file.
Once your .pat file is ready you can import it into Revit. This can be done under Manage-Additional Settings-Fill Patterns. You can then choose 'Drafting' or 'Model'.
Here are the steps for importing a .pat file:
Model
New
Custom
Import
Choose the .pat file. (thirdrun.pat)
Scale (this can only be changed on import)
You can also make simple crosshatch patterns within Revit (no need for a .pat file) . Just follow these steps:
Manage-Additional Settings-Fill Patterns. You can then choose 'Drafting' or 'Model'.
Drafting or Model
New
Simple
Name
Line Angle
Line Spacing
Parallel Lines or Crosshatch
These Fill Patterns can now be applied to Filled Regions and Revit Materials.
Please read this AUGI thread for additional reference:
http://forums.augi.com/showthread.php?t=57164
Hatch patterns in Revit are referred to as 'Fill Patterns'.
When applied to a Revit material they can be either 'Surface Patterns' or 'Cut Patterns'.
Surface Patterns: Fill Patterns on an element in projection.
Cut Patterns: Fill Patterns on an element when cut.
Revit further divides them into 'Model' and 'Drafting'.
Model: Is always real world size (for instance 8"x4"x2.5"). Useful for measuring brick coursing.
Drafting: Is always a printed size (for instance measured off the sheet as 1/16"). Useful for representing diagonal masonry hatch no matter the scale.
Fill Patterns start life as a .pat file. The same file used in AutoCAD and other programs for hatches.
Here's a site with some free .pat files. As an example, you could download the Brickpat.zip file. This contains a bunch of sample brick hatches in .pat form. Take a look at the thirdrun.pat. These .pat files can be opened and edited in Notepad. Here's an AutoCAD dwg file made by Chirag Mistry which explains how to write and edit a .pat file for Revit. Most .pat files are 'Drafting' patterns according to Revit. In order to make them 'Model' patterns you need to add ";%TYPE=MODEL" to the second line of the pat file (without the quotations). You can do that to the thirdrun.pat file.
Once your .pat file is ready you can import it into Revit. This can be done under Manage-Additional Settings-Fill Patterns. You can then choose 'Drafting' or 'Model'.
Here are the steps for importing a .pat file:
Model
New
Custom
Import
Choose the .pat file. (thirdrun.pat)
Scale (this can only be changed on import)
You can also make simple crosshatch patterns within Revit (no need for a .pat file) . Just follow these steps:
Manage-Additional Settings-Fill Patterns. You can then choose 'Drafting' or 'Model'.
Drafting or Model
New
Simple
Name
Line Angle
Line Spacing
Parallel Lines or Crosshatch
These Fill Patterns can now be applied to Filled Regions and Revit Materials.
Please read this AUGI thread for additional reference:
http://forums.augi.com/showthread.php?t=57164
Wednesday, February 01, 2012
BIM & BEAM: Autodesk ForceEffect Version 2.0 Now Available!
BIM & BEAM: Autodesk ForceEffect Version 2.0 Now Available!
Autodesk ForceEffect is a free app available for Apple iPad and iPhone from the iTunes App Store that allows engineers including structural engineers to model and simulate concepts.
Autodesk ForceEffect is a free app available for Apple iPad and iPhone from the iTunes App Store that allows engineers including structural engineers to model and simulate concepts.
AutoCAD in Plain English: Getting License on Same Computer as LMTools
AutoCAD in Plain English: Getting License on Same Computer as LMTools: This may help you to get a license if your AutoCAD (or Revit) is on the same machine as your LMTools. C:/ Window/System32/driver/etc/hosts(open with ...
Monday, January 30, 2012
Video: Object Visibility Using Detail Level and Subcategories Between Views
In this video we will be learning how to control the visibility of a drop panel between views. We will be exploring Detail Level control as well as Subcategories.
Wednesday, January 04, 2012
View Filter Walls by Function
I've noticed some Revit users making Worksets in order to manage visibility. While this can be done it's not really necessary or advisable. Worksets can create more work for the user if they are used like layers in AutoCAD. One such example I've seen is a Workset for interior and exterior walls. View filters can be used to filter walls based upon the 'function' parameter in the wall's Type Properties. Walls Types can be defined as Interior, Exterior etc. Then you can make a View Filter based upon the wall's function which is selected automatically.
How to make a View Filter:
Visibility/Graphics
Filters
Edit/New
New Filter, call it 'Interior Walls'
Select 'Walls' as the Category
Filter by: Function
Equals: Interior
OK
Add-Interior Walls
Turn on/off the visibility or override the graphics
How to make a View Filter:
Visibility/Graphics
Filters
Edit/New
New Filter, call it 'Interior Walls'
Select 'Walls' as the Category
Filter by: Function
Equals: Interior
OK
Add-Interior Walls
Turn on/off the visibility or override the graphics
Subscribe to:
Posts (Atom)

 Posts
Posts


