Please join us at the next Ontario Revit User's Group meeting September 29th. Come and meet James Vandezande, a co-author of the top selling 'Mastering Autodesk Revit Architecture 2011'. James will be talking about his varied experiences with Revit and other BIM software in 'My Journey with BIM'.
Click Here for ORUG Invitation
Wednesday, September 08, 2010
Thursday, August 12, 2010
Pre 2011 Link Draw Order Workaround
Issue:
You are working in Revit MEP 2010 or lower.
You link in an architectural background Revit link.
When you look at the view on the screen, your lights are on top of the greyed out architectural t-bar ceiling.
When you print, the grey ceiling lines are on top of your lights (black lines).
There is no draw order control for linked Revit files.
Workaround:
Try changing your printing setting to Raster. Print-Setup Button-Hidden Line Views-Raster Processing.
Note: Looks like this has been fixed in 2011.
You are working in Revit MEP 2010 or lower.
You link in an architectural background Revit link.
When you look at the view on the screen, your lights are on top of the greyed out architectural t-bar ceiling.
When you print, the grey ceiling lines are on top of your lights (black lines).
There is no draw order control for linked Revit files.
Workaround:
Try changing your printing setting to Raster. Print-Setup Button-Hidden Line Views-Raster Processing.
Note: Looks like this has been fixed in 2011.
Friday, August 06, 2010
AEC Edge - Latest Issue

Steve Stafford and Co. at AUGI worked hard to get this issue out. I was happy to be able to contribute an article. It's on p.8 called "Design Your Own Sustainable Adventure: Combining Energy and Cost Analysis with Revit". Please let me know thoughts.
Revit Annotations- Video Explanations
Annotations work great in Revit but are a little confusing to set up. I would love to see Autodesk simplify the making and editing of annotations, maybe with some kind of consolidated interface.
Text Style: Controlled in the PROJECT FILE.
This is only for the notes and titles. You do this by editing an existing instance into your new style.
Dimension Style: Controlled in the PROJECT FILE.
These are made from the Settings-Annotation drop down menu. You can also duplicate and edit an existing dimension. The text style for the dimensions is controlled from the dimension style editor.
Text and Dimension Video
Level Head: Controlled in a FAMILY FILE and the PROJECT FILE.
This is an Annotation Family. You have to open it and edit the text inside the family. To find the file name of the family you want to edit; click on a level-properties-Edit/New-Other-Level Head (you just have to write it down or memorize it). The level linetype is controlled in the PROJECT FILE by clicking Properties-Edit/New-Line Pattern.
Grid Head: Controlled in a FAMILY FILE and the PROJECT FILE.
The same as Level Head. The grid linetype is controlled in the PROJECT FILE by clicking Properties-Edit/New-Line Pattern.
Levels and Grids Video
Section Bubble: Controlled in a FAMILY FILE and the PROJECT FILE.
Again, these are an Annotation Family. They consist of two families which have to be edited separately. One would be the bubble and one would be the tick mark at the other end. The section linetype is controlled in the PROJECT FILE through Object Styles-Annotation-Section Line.
Callout Bubble: Controlled in a FAMILY FILE and the PROJECT FILE.
These are similar to Section tags but only have one family. The callout boundary line is controlled in the PROJECT FILE through Object Styles-Annotation-Callout Boundary.
Elevation Bubble: Controlled in the PROJECT FILE.
The Settings dropdown menu-Elevation Tags and edit away.
Section, Elevation and Callout Video
Schedule Text
How could I forget? The schedule text style is controlled in the PROJECT (.rvt) and more specifically in the view properties of the individual schedule. Right click in the schedule view and choose ‘view properties’ then ‘appearance’. You can select the fonts, sizes etc. You’ll see the changes only when the schedule is dropped onto a sheet. (The font’s etc will not show in the schedule view only on a sheet.)
Titleblock Text
Titleblocks are a FAMILY. The text inside of a family is controlled within that family. Its styles do not automatically get imported into the project.
Tags
Tags are a Family. These are made externally of the project file and loaded in. You can click directly on them and choose to 'Edit Family' and load them right back in. Don't forget to
Text In Annotation Families
Text in Annotation Families are only editable in the individual family. As an example, if you were to decide to change all your text from Arial to RomanS you would have to go into each Annotation Family, including Titleblocks, and change the Text in those.
Schedule, Titleblock and Tag Video
Text Style: Controlled in the PROJECT FILE.
This is only for the notes and titles. You do this by editing an existing instance into your new style.
Dimension Style: Controlled in the PROJECT FILE.
These are made from the Settings-Annotation drop down menu. You can also duplicate and edit an existing dimension. The text style for the dimensions is controlled from the dimension style editor.
Text and Dimension Video
Level Head: Controlled in a FAMILY FILE and the PROJECT FILE.
This is an Annotation Family. You have to open it and edit the text inside the family. To find the file name of the family you want to edit; click on a level-properties-Edit/New-Other-Level Head (you just have to write it down or memorize it). The level linetype is controlled in the PROJECT FILE by clicking Properties-Edit/New-Line Pattern.
Grid Head: Controlled in a FAMILY FILE and the PROJECT FILE.
The same as Level Head. The grid linetype is controlled in the PROJECT FILE by clicking Properties-Edit/New-Line Pattern.
Levels and Grids Video
Section Bubble: Controlled in a FAMILY FILE and the PROJECT FILE.
Again, these are an Annotation Family. They consist of two families which have to be edited separately. One would be the bubble and one would be the tick mark at the other end. The section linetype is controlled in the PROJECT FILE through Object Styles-Annotation-Section Line.
Callout Bubble: Controlled in a FAMILY FILE and the PROJECT FILE.
These are similar to Section tags but only have one family. The callout boundary line is controlled in the PROJECT FILE through Object Styles-Annotation-Callout Boundary.
Elevation Bubble: Controlled in the PROJECT FILE.
The Settings dropdown menu-Elevation Tags and edit away.
Section, Elevation and Callout Video
Schedule Text
How could I forget? The schedule text style is controlled in the PROJECT (.rvt) and more specifically in the view properties of the individual schedule. Right click in the schedule view and choose ‘view properties’ then ‘appearance’. You can select the fonts, sizes etc. You’ll see the changes only when the schedule is dropped onto a sheet. (The font’s etc will not show in the schedule view only on a sheet.)
Titleblock Text
Titleblocks are a FAMILY. The text inside of a family is controlled within that family. Its styles do not automatically get imported into the project.
Tags
Tags are a Family. These are made externally of the project file and loaded in. You can click directly on them and choose to 'Edit Family' and load them right back in. Don't forget to
Text In Annotation Families
Text in Annotation Families are only editable in the individual family. As an example, if you were to decide to change all your text from Arial to RomanS you would have to go into each Annotation Family, including Titleblocks, and change the Text in those.
Schedule, Titleblock and Tag Video
Thursday, August 05, 2010
Better Way of Importing CAD into Revit-Continued
Here's a valued opinion to my previous post.
Andre from BIMSolutions....
Yes, this is the best approach so far. The reason I have been using this method initially was not even related to speed but to end with a problem that I faced back in 2007. At that time I had a team using Revit and another using CAD in a sort of hybrid project. I had CAD files linked directly into the Revit central file. As the CAD users kept updating their CAD files, the central file would see the changes exactly as if someone was working directly in the central file. When a local file tried to save to central, a warning would pop up saying that the central file had changes in more than shared coordinates and could invalidate the local file... To solve that, I first use this method: Xref the CAD files into a blank CAD file which was then linked into the central file. This worked well because the changes were now being done in the CAD file A which was Xref'd into CAD file B. Because no one opened or saved CAD file B, the central file wouldn't be affected and still show the changes.
Then later, with improvements on how to manage Revit linked files, I started to use this option you are suggesting and I'm happy with it so far. Just more management since before I could control layers of the CAD files directly in the main model and now I have to unload the linked file, open it to do the changes and then load it back... Also, letting the team know that trying to delete one line of the CAD files will delete all CAD files, since it is all one link... (Another tip is to create a design option and put your Revit link there. People won't even be able to select it and accidentally move or delete it, unless they know how to edit design options or realize they have to uncheck that option "Exclude Options" at the bottom of the screen...)
Anyway, the same approach can be used with elements like furniture: link your main Revit file into a blank file and add the furniture there. Then link the furniture file back into your main model. No need to carry furniture in your main model...
By the way, for the linked CAD files, the only way to make this work is to show the link by linked view. Also, all this works with 2D CAD files. I tried once with a 3D CAD file and wasn't successful making it to work.
Andre Carvalho
Vice President - Implementation Strategies
b i m s o l u t i o n s inc.
Building Information Modeling · Integrated Project Delivery
15 Polson Street · Toronto, ON · M5A 1A4
Phone: 1 (800) 413.7992 · Cell: 1 (647) 378.2728
Better Way of Importing CAD into Revit
As most experienced Revit users know, importing CAD files into Revit can sometimes cause problems. Why? Because many CAD files are not properly made and contain errors, extra info, links of their own etc. While doing some prep work on the CAD files is good, it doesn't eliminate the problems.
I extracted the following nugget from the new Mastering Autodesk Revit Architecture 2011, known lovingly as MARA to some. Paraphrasing 'One way to manage many CAD references in larger projects is to create a separate Revit project containing only the linked data.' You will probably need to use the Visibility/Graphics override in order to see the CAD file in question but still, awesome. I can admit that I haven't done this in practice so let me know what you think...
I extracted the following nugget from the new Mastering Autodesk Revit Architecture 2011, known lovingly as MARA to some. Paraphrasing 'One way to manage many CAD references in larger projects is to create a separate Revit project containing only the linked data.' You will probably need to use the Visibility/Graphics override in order to see the CAD file in question but still, awesome. I can admit that I haven't done this in practice so let me know what you think...
Tuesday, July 27, 2010
Revit 2010 Crashing on Startup
I found another thread about Revit Crashing on Startup which can be found below.
http://forums.autodesk.com/t5/Autodesk-Revit-Structure/Random-Crashes-in-Revit-2010/m-p/2582907
Is Revit crashing on startup?
If so, you may want to look at this thread:
http://discussion.autodesk.com/forums/thread.jspa?threadID=774015
You could try two things:
UI State.dat may be corrupt- More information on this is here:
http://revitclinic.typepad.com/my_weblog/2009/04/revit-2010-ui.html
or here:
http://dorevit.blogspot.com/2010/04/revit-10-crashing-uistatedat.html
Short answer:
To reset the ribbon and Quick Access toolbar, rename or delete the UIState.dat file located in the following folders:
For Windows XP:
%USERPROFILE%\Local Settings\Application Data\Autodesk\Revit\Autodesk Revit Structure 2010
For Windows Vista/ Windows 7:
%LOCALAPPDATA%\Autodesk\Revit\Autodesk Revit Structure 2010
Or a CommCenter file may be corrupt: From the information here:
http://usa.autodesk.com/adsk/servlet/ps/dl/item?siteID=123112&id=15145616&linkID=9243099
This can occur because of a conflict with a Communication Center file. Delete the following file, if present on the workstation at the following location:
Windows XP
Autodesk Revit Structure 2010
c:\Documents and Settings\%USERNAME%\Local Settings\Application Data\Autodesk\Revit\Autodesk Revit Structure 2010\ENU\Components\WebServices\WSCommCntrData.xml
Windows Vista \ Windows 7
Autodesk Revit Structure 2010
C:\Users\%username%\AppData\Local\Autodesk\Revit\Autodesk Revit Structure 2010\ENU\Components\WebServices\WSCommCntrData.xml
http://forums.autodesk.com/t5/Autodesk-Revit-Structure/Random-Crashes-in-Revit-2010/m-p/2582907
Is Revit crashing on startup?
If so, you may want to look at this thread:
http://discussion.autodesk.com/forums/thread.jspa?threadID=774015
You could try two things:
UI State.dat may be corrupt- More information on this is here:
http://revitclinic.typepad.com/my_weblog/2009/04/revit-2010-ui.html
or here:
http://dorevit.blogspot.com/2010/04/revit-10-crashing-uistatedat.html
Short answer:
To reset the ribbon and Quick Access toolbar, rename or delete the UIState.dat file located in the following folders:
For Windows XP:
%USERPROFILE%\Local Settings\Application Data\Autodesk\Revit\Autodesk Revit Structure 2010
For Windows Vista/ Windows 7:
%LOCALAPPDATA%\Autodesk\Revit\Autodesk Revit Structure 2010
Or a CommCenter file may be corrupt: From the information here:
http://usa.autodesk.com/adsk/servlet/ps/dl/item?siteID=123112&id=15145616&linkID=9243099
This can occur because of a conflict with a Communication Center file. Delete the following file, if present on the workstation at the following location:
Windows XP
Autodesk Revit Structure 2010
c:\Documents and Settings\%USERNAME%\Local Settings\Application Data\Autodesk\Revit\Autodesk Revit Structure 2010\ENU\Components\WebServices\WSCommCntrData.xml
Windows Vista \ Windows 7
Autodesk Revit Structure 2010
C:\Users\%username%\AppData\Local\Autodesk\Revit\Autodesk Revit Structure 2010\ENU\Components\WebServices\WSCommCntrData.xml
Monday, July 26, 2010
Revit Architecture 2011 Certification
Simplicity is great! The official Autodesk Revit Architecture 2011 training guide and exam prep guide is now available in one book:
Mastering Autodesk Revit Architecture 2011 [Paperback]
Eddy Krygiel (Author), Phil Read (Author), James Vandezande (Author)
Here's the Autodesk Exam Preparation Road map pdf.
The book is not yet available in Canada but I have mine on pre-order. Knowing the authors, I'm absolutely sure of their level of skill, detail and commitment. Here's their blog, it's a great read.
Update: Just got mine in the mail, looks good!

Mastering Autodesk Revit Architecture 2011 [Paperback]
Eddy Krygiel (Author), Phil Read (Author), James Vandezande (Author)
Here's the Autodesk Exam Preparation Road map pdf.
The book is not yet available in Canada but I have mine on pre-order. Knowing the authors, I'm absolutely sure of their level of skill, detail and commitment. Here's their blog, it's a great read.
Update: Just got mine in the mail, looks good!

Point Known - Laser Measurements into Revit (Revit OPED)
Point the laser, draw a wall in Revit...
This seems like a great solution for building surveying, on-site measuring, as-built measuring or whatever you may call it. I saw this on Steve Stafford's blog http://revitoped.blogspot.com/.
Worth a watch:
This seems like a great solution for building surveying, on-site measuring, as-built measuring or whatever you may call it. I saw this on Steve Stafford's blog http://revitoped.blogspot.com/.
Worth a watch:
Thursday, July 22, 2010
Can't Get Network License Error 15.370.?
Just encountered this issue for a Maya install but it applies to Revit etc. Plus the error was just 15.370.00 not 15.370.36. The fix still worked.
You configured a machine to be a network license server and then installed an Autodesk product on the same machine. When you launch the product, it tries to check out a network license and fails.
On Windows, the FLEXnet Finder dialog displays and, when dismissed, is followed by a license error dialog displaying the error code [-15.570.36]. In the Mac OS, a license error dialog displays the same error code but it does not display a FLEXnet Finder dialog.
This happens on all operating systems where an IPv6 stack is installed.
Solution
The following steps should allow the client to find the server and check out a license file:
Windows:
1. Get the IP address of the machine (by typing “ipconfig” command in a CMD window or by getting it from the LMTOOLS “System setting” tab).
2. Open the hosts file located in C:\Windows\System32\drivers\etc.
3. Add the IP address and hostname to the hosts file, e.g., “111.222.333.444 machine_name”.
4. Save and close the hosts file.
Full Autodesk Doc:
http://usa.autodesk.com/adsk/servlet/ps/dl/item?siteID=123112&id=14077688&linkID=9240697
You configured a machine to be a network license server and then installed an Autodesk product on the same machine. When you launch the product, it tries to check out a network license and fails.
On Windows, the FLEXnet Finder dialog displays and, when dismissed, is followed by a license error dialog displaying the error code [-15.570.36]. In the Mac OS, a license error dialog displays the same error code but it does not display a FLEXnet Finder dialog.
This happens on all operating systems where an IPv6 stack is installed.
Solution
The following steps should allow the client to find the server and check out a license file:
Windows:
1. Get the IP address of the machine (by typing “ipconfig” command in a CMD window or by getting it from the LMTOOLS “System setting” tab).
2. Open the hosts file located in C:\Windows\System32\drivers\etc.
3. Add the IP address and hostname to the hosts file, e.g., “111.222.333.444 machine_name”.
4. Save and close the hosts file.
Full Autodesk Doc:
http://usa.autodesk.com/adsk/servlet/ps/dl/item?siteID=123112&id=14077688&linkID=9240697

Wednesday, July 21, 2010
Revit 2010 and 2011 Not Getting License
All of the Autodesk 2010 and 2011 products have a propensity of corrupting the cascadeinfo.cas file. This file is directly related to the obtaining of a license from LMTools. We have found that when Revit can't find a license from the server you need to do the following:
WorkAround
The current workaround it to rename/remove the corrupt CascadeInfo.cas file following these steps.
1.
Return any borrowed licenses
2.
Check in any checked out licenses and exit all Autodesk products
3.
Rename or delete the corrupt CascadeInfo.cas
The CascadeInfo.cas file can be found in the following locations:
Windows XP:
C:\Documents and Settings\All Users\Application Data\Autodesk\Adlm
Windows Vista and Windows 7:
C:\ProgramData\Autodesk\Adlm
Mac:
/Library/Application Support/Autodesk/Adlm/.config
Here's the full Autodesk technical document:
http://usa.autodesk.com/adsk/servlet/ps/dl/item?siteID=123112&id=13894457&linkID=9240817
other links:
http://forums.autodesk.com/t5/AutoCAD-2010/autocad-2010-crashes-at-startup/m-p/2523880
http://forums.autodesk.com/t5/Installation-Licensing/Error-5-412-0-Error-4-132-0/m-p/2521683
One word of caution. This may cause your corresponding AutoCAD product to crash on startup. We are looking into this and I will post when I get an answer for this.
WorkAround
The current workaround it to rename/remove the corrupt CascadeInfo.cas file following these steps.
1.
Return any borrowed licenses
2.
Check in any checked out licenses and exit all Autodesk products
3.
Rename or delete the corrupt CascadeInfo.cas
The CascadeInfo.cas file can be found in the following locations:
Windows XP:
C:\Documents and Settings\All Users\Application Data\Autodesk\Adlm
Windows Vista and Windows 7:
C:\ProgramData\Autodesk\Adlm
Mac:
/Library/Application Support/Autodesk/Adlm/.config
Here's the full Autodesk technical document:
http://usa.autodesk.com/adsk/servlet/ps/dl/item?siteID=123112&id=13894457&linkID=9240817
other links:
http://forums.autodesk.com/t5/AutoCAD-2010/autocad-2010-crashes-at-startup/m-p/2523880
http://forums.autodesk.com/t5/Installation-Licensing/Error-5-412-0-Error-4-132-0/m-p/2521683
One word of caution. This may cause your corresponding AutoCAD product to crash on startup. We are looking into this and I will post when I get an answer for this.
Friday, June 04, 2010
IESVE Approved for LEED Canada
This is a good press release from IES. IESVE is a good, solid and trustworthy energy modeler...
IESVE is approved energy simulation software for LEED Canada
Integrated Environmental Solutions (IES) is pleased to let you know that the Virtual Environment (VE) is now an approved energy simulation software for LEED Canada to demonstrate compliance for Energy and Atmosphere (EA) Prerequisite 2 and EA Credit 1.
Take a look at the Canada Green Building Council web site to find out more.
For LEED Canada the energy simulation software program must also meet the requirements for Qualified Software per IRS Notice 2006-52 as amplified by IRS Notice 2008-40, Section 4.
You can access the approved software list which the VE is on at:
http://www1.eere.energy.gov/buildings/qualified_software.html
You can also access the pdf providing details on the VE compliance with the requirements at:
http://apps1.eere.energy.gov/buildings/publications/pdfs/corporate/ns/qs_iesve_v6_1.pdf
IES can review and approve your VE models for LEED Canada
Are you looking for an independent assessor to review and approve your energy models created in the VE? IES can help you.
As an approved Experienced Modeller, Luc Delestrade (Senior Project Consultant at IES) can review energy models prepared in the VE. Based in Vancouver, Luc is a highly experienced energy modeller and building simulation consultant with significant experience in assisting design teams to achieve their low energy targets.
Contact Luc to find out how he can help.
Email luc.delestrade@iesve.com
Call+1 (604) 561 4842
IESVE is approved energy simulation software for LEED Canada
Integrated Environmental Solutions (IES) is pleased to let you know that the Virtual Environment (VE) is now an approved energy simulation software for LEED Canada to demonstrate compliance for Energy and Atmosphere (EA) Prerequisite 2 and EA Credit 1.
Take a look at the Canada Green Building Council web site to find out more.
For LEED Canada the energy simulation software program must also meet the requirements for Qualified Software per IRS Notice 2006-52 as amplified by IRS Notice 2008-40, Section 4.
You can access the approved software list which the VE is on at:
http://www1.eere.energy.gov/buildings/qualified_software.html
You can also access the pdf providing details on the VE compliance with the requirements at:
http://apps1.eere.energy.gov/buildings/publications/pdfs/corporate/ns/qs_iesve_v6_1.pdf
IES can review and approve your VE models for LEED Canada
Are you looking for an independent assessor to review and approve your energy models created in the VE? IES can help you.
As an approved Experienced Modeller, Luc Delestrade (Senior Project Consultant at IES) can review energy models prepared in the VE. Based in Vancouver, Luc is a highly experienced energy modeller and building simulation consultant with significant experience in assisting design teams to achieve their low energy targets.
Contact Luc to find out how he can help.
Email luc.delestrade@iesve.com
Call+1 (604) 561 4842
Template Change
Just wanted to let my reader know that I changed my blog template. If http://www.architecture-tech.com/ can do it, so can I.
Thanks for reading, Bob. See you at darts.
Thanks for reading, Bob. See you at darts.
Monday, May 31, 2010
Revit PCP Files
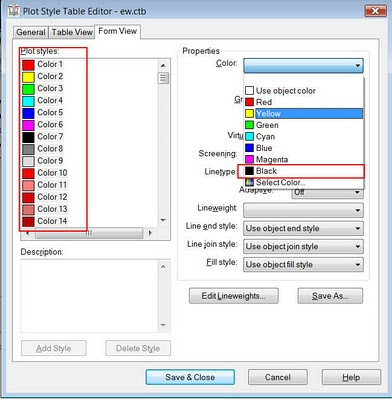
When converted to a ctb, pcp files do NOT involve the colour. You will need to set this to black. Here's an explanation...
When exporting a Revit file to AutoCAD a 'pcp' file is created in the same folder of the 'dwg'. This file is intended to duplicate the lineweight of the Revit file in the AutoCAD file. You will need to convert the pcp file to a ctb file in AutoCAD.
-You can do this by using the Print-Manage Plot Styles-Add a Plot Style Wizard.
-The Wizard will prompt you for a pcp file as you go.
-Before you finish click on the Plot Style Table Editor button.
-Then go to Form View. Select all of the colours (listed as Plot styles). Then change their property colour to black.
When exporting a Revit file to AutoCAD a 'pcp' file is created in the same folder of the 'dwg'. This file is intended to duplicate the lineweight of the Revit file in the AutoCAD file. You will need to convert the pcp file to a ctb file in AutoCAD.
-You can do this by using the Print-Manage Plot Styles-Add a Plot Style Wizard.
-The Wizard will prompt you for a pcp file as you go.
-Before you finish click on the Plot Style Table Editor button.
-Then go to Form View. Select all of the colours (listed as Plot styles). Then change their property colour to black.

Tuesday, May 18, 2010
AU2010 Presentation Voting
Autodesk University Class Voting
Go to Architecture Power Track
I have submitted two presentations for this year:
2840
Revit Residential Survival Guide
Lecture
Polding, Jay
8173
Design Your Own Adventure: Integrating Energy and Cost Analysis into Revit
Lecture
Polding, Jay
Go to Architecture Power Track
I have submitted two presentations for this year:
2840
Revit Residential Survival Guide
Lecture
Polding, Jay
8173
Design Your Own Adventure: Integrating Energy and Cost Analysis into Revit
Lecture
Polding, Jay
Walls Disappearing
Here's the scenario...You have a wall which can be seen in 3D, section and elevation but not in plan. You have confirmed the usual visibility issues are not to blame.
It could be a corrupt Plan Region. Look around the wall in question, find the Plan Region and delete it. How do you know which one is corrupt...trial and error. Autodesk development is aware of this bug and is working on it.
It could be a corrupt Plan Region. Look around the wall in question, find the Plan Region and delete it. How do you know which one is corrupt...trial and error. Autodesk development is aware of this bug and is working on it.
Thursday, May 13, 2010
Common Installation and Licensing Troubleshooting
Video: Troubleshooting Revit Install and Licensing Issues
http://usa.autodesk.com/adsk/servlet/ps/dl/item?siteID=123112&id=14878060&linkID=9243182
Video: Troubleshooting Common Install Problems
http://usa.autodesk.com/adsk/servlet/ps/dl/item?siteID=123112&id=14868637&linkID=9240697
Video: Network Installation (doesn't include LMTools or license file acquisition)
http://www.youtube.com/watch?v=QDOwkw4VMU0
http://usa.autodesk.com/adsk/servlet/ps/dl/item?siteID=123112&id=14878060&linkID=9243182
Video: Troubleshooting Common Install Problems
http://usa.autodesk.com/adsk/servlet/ps/dl/item?siteID=123112&id=14868637&linkID=9240697
Video: Network Installation (doesn't include LMTools or license file acquisition)
http://www.youtube.com/watch?v=QDOwkw4VMU0
Divisions
Note to self...
PROCUREMENT AND CONTRACTING REQUIREMENTS GROUP:
Division 00 — Procurement and Contracting Requirements
SPECIFICATIONS GROUP
General Requirements Subgroup
Division 01 — General Requirements
Facility Construction Subgroup
Division 02 — Existing Conditions
Division 03 — Concrete
Division 04 — Masonry
Division 05 — Metals
Division 06 — Wood, Plastics, and Composites
Division 07 — Thermal and Moisture Protection
Division 08 — Openings
Division 09 — Finishes
Division 10 — Specialties
Division 11 — Equipment
Division 12 — Furnishings
Division 13 — Special Construction
Division 14 — Conveying Equipment
Division 15 — RESERVED FOR FUTURE EXPANSION
Division 16 — RESERVED FOR FUTURE EXPANSION
Facility Services Subgroup:
Division 20 — RESERVED FOR FUTURE EXPANSION
Division 21 — Fire Suppression
Division 22 — Plumbing
Division 23 — Heating Ventilating and Air Conditioning
Division 24 — RESERVED FOR FUTURE EXPANSION
Division 25 — Integrated Automation
Division 26 — Electrical
Division 27 — Communications
Division 28 — Electronic Safety and Security
Division 29 — RESERVED FOR FUTURE EXPANSION
Site and Infrastructure Subgroup:
Division 30 — RESERVED FOR FUTURE EXPANSION
Division 31 — Earthwork
Division 32 — Exterior Improvements
Division 33 — Utilities
Division 34 — Transportation
Division 35 — Waterway and Marine
Division 36 — RESERVED FOR FUTURE EXPANSION
Division 37 — RESERVED FOR FUTURE EXPANSION
Division 38 — RESERVED FOR FUTURE EXPANSION
Division 39 — RESERVED FOR FUTURE EXPANSION
Process Equipment Subgroup:
Division 40 — Process Integration
Division 41 — Material Processing and Handling Equipment
Division 42 — Process Heating, Cooling, and Drying Equipment
Division 43 — Process Gas and Liquid Handling, Purification and Storage Equipment
Division 44 — Pollution Control Equipment
Division 45 — Industry-Specific Manufacturing Equipment
Division 46 — RESERVED FOR FUTURE EXPANSION
Division 47 — RESERVED FOR FUTURE EXPANSION
Division 48 — Electrical Power Generation
Division 49 — RESERVED FOR FUTURE EXPANSION
PROCUREMENT AND CONTRACTING REQUIREMENTS GROUP:
Division 00 — Procurement and Contracting Requirements
SPECIFICATIONS GROUP
General Requirements Subgroup
Division 01 — General Requirements
Facility Construction Subgroup
Division 02 — Existing Conditions
Division 03 — Concrete
Division 04 — Masonry
Division 05 — Metals
Division 06 — Wood, Plastics, and Composites
Division 07 — Thermal and Moisture Protection
Division 08 — Openings
Division 09 — Finishes
Division 10 — Specialties
Division 11 — Equipment
Division 12 — Furnishings
Division 13 — Special Construction
Division 14 — Conveying Equipment
Division 15 — RESERVED FOR FUTURE EXPANSION
Division 16 — RESERVED FOR FUTURE EXPANSION
Facility Services Subgroup:
Division 20 — RESERVED FOR FUTURE EXPANSION
Division 21 — Fire Suppression
Division 22 — Plumbing
Division 23 — Heating Ventilating and Air Conditioning
Division 24 — RESERVED FOR FUTURE EXPANSION
Division 25 — Integrated Automation
Division 26 — Electrical
Division 27 — Communications
Division 28 — Electronic Safety and Security
Division 29 — RESERVED FOR FUTURE EXPANSION
Site and Infrastructure Subgroup:
Division 30 — RESERVED FOR FUTURE EXPANSION
Division 31 — Earthwork
Division 32 — Exterior Improvements
Division 33 — Utilities
Division 34 — Transportation
Division 35 — Waterway and Marine
Division 36 — RESERVED FOR FUTURE EXPANSION
Division 37 — RESERVED FOR FUTURE EXPANSION
Division 38 — RESERVED FOR FUTURE EXPANSION
Division 39 — RESERVED FOR FUTURE EXPANSION
Process Equipment Subgroup:
Division 40 — Process Integration
Division 41 — Material Processing and Handling Equipment
Division 42 — Process Heating, Cooling, and Drying Equipment
Division 43 — Process Gas and Liquid Handling, Purification and Storage Equipment
Division 44 — Pollution Control Equipment
Division 45 — Industry-Specific Manufacturing Equipment
Division 46 — RESERVED FOR FUTURE EXPANSION
Division 47 — RESERVED FOR FUTURE EXPANSION
Division 48 — Electrical Power Generation
Division 49 — RESERVED FOR FUTURE EXPANSION
Tuesday, May 11, 2010
Revit Suite Network License Bumped
This is one of the many possible things that can cause you to not get a network license for a Revit Suite product.
If the CascadeInfo.cas file is corrupt due to a power failure or any reason, cascading functionality will not be available. This issue only applies to network licensed products and does not affect stand-alone licensed products.
WorkAround
The current workaround it to rename/remove the corrupt CascadeInfo.cas file following these steps.
Return any borrowed licenses
Check in any checked out licenses and exit all Autodesk products
Rename or delete the corrupt CascadeInfo.cas
more...
http://usa.autodesk.com/adsk/servlet/ps/dl/item?siteID=123112&id=13894457&linkID=9240617
If the CascadeInfo.cas file is corrupt due to a power failure or any reason, cascading functionality will not be available. This issue only applies to network licensed products and does not affect stand-alone licensed products.
WorkAround
The current workaround it to rename/remove the corrupt CascadeInfo.cas file following these steps.
Return any borrowed licenses
Check in any checked out licenses and exit all Autodesk products
Rename or delete the corrupt CascadeInfo.cas
more...
http://usa.autodesk.com/adsk/servlet/ps/dl/item?siteID=123112&id=13894457&linkID=9240617
Subscribe to:
Posts (Atom)

 Posts
Posts


