This is a good press release from IES. IESVE is a good, solid and trustworthy energy modeler...
IESVE is approved energy simulation software for LEED Canada
Integrated Environmental Solutions (IES) is pleased to let you know that the Virtual Environment (VE) is now an approved energy simulation software for LEED Canada to demonstrate compliance for Energy and Atmosphere (EA) Prerequisite 2 and EA Credit 1.
Take a look at the Canada Green Building Council web site to find out more.
For LEED Canada the energy simulation software program must also meet the requirements for Qualified Software per IRS Notice 2006-52 as amplified by IRS Notice 2008-40, Section 4.
You can access the approved software list which the VE is on at:
http://www1.eere.energy.gov/buildings/qualified_software.html
You can also access the pdf providing details on the VE compliance with the requirements at:
http://apps1.eere.energy.gov/buildings/publications/pdfs/corporate/ns/qs_iesve_v6_1.pdf
IES can review and approve your VE models for LEED Canada
Are you looking for an independent assessor to review and approve your energy models created in the VE? IES can help you.
As an approved Experienced Modeller, Luc Delestrade (Senior Project Consultant at IES) can review energy models prepared in the VE. Based in Vancouver, Luc is a highly experienced energy modeller and building simulation consultant with significant experience in assisting design teams to achieve their low energy targets.
Contact Luc to find out how he can help.
Email luc.delestrade@iesve.com
Call+1 (604) 561 4842
Friday, June 04, 2010
Template Change
Just wanted to let my reader know that I changed my blog template. If http://www.architecture-tech.com/ can do it, so can I.
Thanks for reading, Bob. See you at darts.
Thanks for reading, Bob. See you at darts.
Monday, May 31, 2010
Revit PCP Files
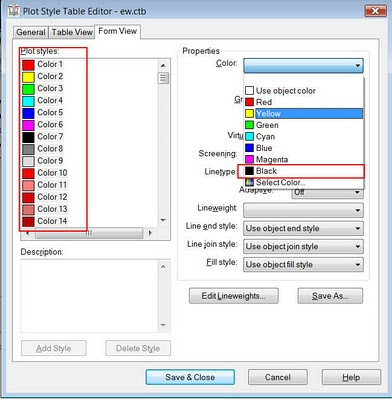
When converted to a ctb, pcp files do NOT involve the colour. You will need to set this to black. Here's an explanation...
When exporting a Revit file to AutoCAD a 'pcp' file is created in the same folder of the 'dwg'. This file is intended to duplicate the lineweight of the Revit file in the AutoCAD file. You will need to convert the pcp file to a ctb file in AutoCAD.
-You can do this by using the Print-Manage Plot Styles-Add a Plot Style Wizard.
-The Wizard will prompt you for a pcp file as you go.
-Before you finish click on the Plot Style Table Editor button.
-Then go to Form View. Select all of the colours (listed as Plot styles). Then change their property colour to black.
When exporting a Revit file to AutoCAD a 'pcp' file is created in the same folder of the 'dwg'. This file is intended to duplicate the lineweight of the Revit file in the AutoCAD file. You will need to convert the pcp file to a ctb file in AutoCAD.
-You can do this by using the Print-Manage Plot Styles-Add a Plot Style Wizard.
-The Wizard will prompt you for a pcp file as you go.
-Before you finish click on the Plot Style Table Editor button.
-Then go to Form View. Select all of the colours (listed as Plot styles). Then change their property colour to black.

Tuesday, May 18, 2010
AU2010 Presentation Voting
Autodesk University Class Voting
Go to Architecture Power Track
I have submitted two presentations for this year:
2840
Revit Residential Survival Guide
Lecture
Polding, Jay
8173
Design Your Own Adventure: Integrating Energy and Cost Analysis into Revit
Lecture
Polding, Jay
Go to Architecture Power Track
I have submitted two presentations for this year:
2840
Revit Residential Survival Guide
Lecture
Polding, Jay
8173
Design Your Own Adventure: Integrating Energy and Cost Analysis into Revit
Lecture
Polding, Jay
Walls Disappearing
Here's the scenario...You have a wall which can be seen in 3D, section and elevation but not in plan. You have confirmed the usual visibility issues are not to blame.
It could be a corrupt Plan Region. Look around the wall in question, find the Plan Region and delete it. How do you know which one is corrupt...trial and error. Autodesk development is aware of this bug and is working on it.
It could be a corrupt Plan Region. Look around the wall in question, find the Plan Region and delete it. How do you know which one is corrupt...trial and error. Autodesk development is aware of this bug and is working on it.
Thursday, May 13, 2010
Common Installation and Licensing Troubleshooting
Video: Troubleshooting Revit Install and Licensing Issues
http://usa.autodesk.com/adsk/servlet/ps/dl/item?siteID=123112&id=14878060&linkID=9243182
Video: Troubleshooting Common Install Problems
http://usa.autodesk.com/adsk/servlet/ps/dl/item?siteID=123112&id=14868637&linkID=9240697
Video: Network Installation (doesn't include LMTools or license file acquisition)
http://www.youtube.com/watch?v=QDOwkw4VMU0
http://usa.autodesk.com/adsk/servlet/ps/dl/item?siteID=123112&id=14878060&linkID=9243182
Video: Troubleshooting Common Install Problems
http://usa.autodesk.com/adsk/servlet/ps/dl/item?siteID=123112&id=14868637&linkID=9240697
Video: Network Installation (doesn't include LMTools or license file acquisition)
http://www.youtube.com/watch?v=QDOwkw4VMU0
Divisions
Note to self...
PROCUREMENT AND CONTRACTING REQUIREMENTS GROUP:
Division 00 — Procurement and Contracting Requirements
SPECIFICATIONS GROUP
General Requirements Subgroup
Division 01 — General Requirements
Facility Construction Subgroup
Division 02 — Existing Conditions
Division 03 — Concrete
Division 04 — Masonry
Division 05 — Metals
Division 06 — Wood, Plastics, and Composites
Division 07 — Thermal and Moisture Protection
Division 08 — Openings
Division 09 — Finishes
Division 10 — Specialties
Division 11 — Equipment
Division 12 — Furnishings
Division 13 — Special Construction
Division 14 — Conveying Equipment
Division 15 — RESERVED FOR FUTURE EXPANSION
Division 16 — RESERVED FOR FUTURE EXPANSION
Facility Services Subgroup:
Division 20 — RESERVED FOR FUTURE EXPANSION
Division 21 — Fire Suppression
Division 22 — Plumbing
Division 23 — Heating Ventilating and Air Conditioning
Division 24 — RESERVED FOR FUTURE EXPANSION
Division 25 — Integrated Automation
Division 26 — Electrical
Division 27 — Communications
Division 28 — Electronic Safety and Security
Division 29 — RESERVED FOR FUTURE EXPANSION
Site and Infrastructure Subgroup:
Division 30 — RESERVED FOR FUTURE EXPANSION
Division 31 — Earthwork
Division 32 — Exterior Improvements
Division 33 — Utilities
Division 34 — Transportation
Division 35 — Waterway and Marine
Division 36 — RESERVED FOR FUTURE EXPANSION
Division 37 — RESERVED FOR FUTURE EXPANSION
Division 38 — RESERVED FOR FUTURE EXPANSION
Division 39 — RESERVED FOR FUTURE EXPANSION
Process Equipment Subgroup:
Division 40 — Process Integration
Division 41 — Material Processing and Handling Equipment
Division 42 — Process Heating, Cooling, and Drying Equipment
Division 43 — Process Gas and Liquid Handling, Purification and Storage Equipment
Division 44 — Pollution Control Equipment
Division 45 — Industry-Specific Manufacturing Equipment
Division 46 — RESERVED FOR FUTURE EXPANSION
Division 47 — RESERVED FOR FUTURE EXPANSION
Division 48 — Electrical Power Generation
Division 49 — RESERVED FOR FUTURE EXPANSION
PROCUREMENT AND CONTRACTING REQUIREMENTS GROUP:
Division 00 — Procurement and Contracting Requirements
SPECIFICATIONS GROUP
General Requirements Subgroup
Division 01 — General Requirements
Facility Construction Subgroup
Division 02 — Existing Conditions
Division 03 — Concrete
Division 04 — Masonry
Division 05 — Metals
Division 06 — Wood, Plastics, and Composites
Division 07 — Thermal and Moisture Protection
Division 08 — Openings
Division 09 — Finishes
Division 10 — Specialties
Division 11 — Equipment
Division 12 — Furnishings
Division 13 — Special Construction
Division 14 — Conveying Equipment
Division 15 — RESERVED FOR FUTURE EXPANSION
Division 16 — RESERVED FOR FUTURE EXPANSION
Facility Services Subgroup:
Division 20 — RESERVED FOR FUTURE EXPANSION
Division 21 — Fire Suppression
Division 22 — Plumbing
Division 23 — Heating Ventilating and Air Conditioning
Division 24 — RESERVED FOR FUTURE EXPANSION
Division 25 — Integrated Automation
Division 26 — Electrical
Division 27 — Communications
Division 28 — Electronic Safety and Security
Division 29 — RESERVED FOR FUTURE EXPANSION
Site and Infrastructure Subgroup:
Division 30 — RESERVED FOR FUTURE EXPANSION
Division 31 — Earthwork
Division 32 — Exterior Improvements
Division 33 — Utilities
Division 34 — Transportation
Division 35 — Waterway and Marine
Division 36 — RESERVED FOR FUTURE EXPANSION
Division 37 — RESERVED FOR FUTURE EXPANSION
Division 38 — RESERVED FOR FUTURE EXPANSION
Division 39 — RESERVED FOR FUTURE EXPANSION
Process Equipment Subgroup:
Division 40 — Process Integration
Division 41 — Material Processing and Handling Equipment
Division 42 — Process Heating, Cooling, and Drying Equipment
Division 43 — Process Gas and Liquid Handling, Purification and Storage Equipment
Division 44 — Pollution Control Equipment
Division 45 — Industry-Specific Manufacturing Equipment
Division 46 — RESERVED FOR FUTURE EXPANSION
Division 47 — RESERVED FOR FUTURE EXPANSION
Division 48 — Electrical Power Generation
Division 49 — RESERVED FOR FUTURE EXPANSION
Tuesday, May 11, 2010
Revit Suite Network License Bumped
This is one of the many possible things that can cause you to not get a network license for a Revit Suite product.
If the CascadeInfo.cas file is corrupt due to a power failure or any reason, cascading functionality will not be available. This issue only applies to network licensed products and does not affect stand-alone licensed products.
WorkAround
The current workaround it to rename/remove the corrupt CascadeInfo.cas file following these steps.
Return any borrowed licenses
Check in any checked out licenses and exit all Autodesk products
Rename or delete the corrupt CascadeInfo.cas
more...
http://usa.autodesk.com/adsk/servlet/ps/dl/item?siteID=123112&id=13894457&linkID=9240617
If the CascadeInfo.cas file is corrupt due to a power failure or any reason, cascading functionality will not be available. This issue only applies to network licensed products and does not affect stand-alone licensed products.
WorkAround
The current workaround it to rename/remove the corrupt CascadeInfo.cas file following these steps.
Return any borrowed licenses
Check in any checked out licenses and exit all Autodesk products
Rename or delete the corrupt CascadeInfo.cas
more...
http://usa.autodesk.com/adsk/servlet/ps/dl/item?siteID=123112&id=13894457&linkID=9240617
Monday, May 10, 2010
Hatches and Materials on Blends in Families
Let's say that you have a tapered brick column family. When you apply the brick material, one side is horizontal but the other side is vertical. There are a couple of things that affect this.


Although we would like be able to create a material parameter for this scenario we can't. This is because we cannot rotate hatch which is applied to a family in a project file. Also, when you apply materials/hatches to blends it tends to rotate the model hatch in strange ways.
This means that we need to apply the material to the blend in the family editor and rotate it right there. You will also be able to adjust the coursing. You can pick directly on the hatch line by using the TAB key, then you can use the rotate and move commands as needed.

Families have limited material choices by default. I'm planning on making another post to explain the best way of importing materials into your custom family.
Thursday, May 06, 2010
Revit Wishlist - Just Do it!
There are some really practical suggestions on this year's wishlist. Make sure you vote...
http://www.augi.com/revit/ballot.asp
Lack of site tools wishes makes me wonder if/when Revit Civil will be revealed?
http://www.augi.com/revit/ballot.asp
Lack of site tools wishes makes me wonder if/when Revit Civil will be revealed?
Wednesday, April 21, 2010
Autodesk 2011 Product Launch Event
Hopefully you will be able to attend our May 7th launch event where I will be delivering two presentations. Here's a description of one of them:
Design Your Own Adventure:
Combining Energy and Cost Analysis with Autodesk® Revit® Architecture
Design can be like a ‘Choose Your Own Adventure® ’ book. Wouldn’t it be nice to flip to the ending instead of heading out on a long design detour? When it comes to sustainable design decisions, the earlier they are made, the better. Make informed decisions based on good information. Along with best practices, we need to be armed with accurate data about the building; price, energy usage, appearance etc. One way we can get this information is by using Autodesk® Revit® Architecture, along with programs like Autodesk® Green Building Studio®, the IES Toolkit and SmartBIM QTO. We will examine a scenario where the designer and client are trying to understand the implications of design decisions on price, LEED credits including the LEED Daylight credit, and overall energy usage. We will document the process and provide best practices in using these analysis solutions. Go ahead, flip to the end of the book and design your own adventure!
Autodesk® 2011 Solutions Event
Date & Time: Friday, May 7, 20108:30am - 2:00pm
LocationToronto Congress Centre 650 Dixon RoadToronto, ON M9W 1J1
Click here for the fancy invitation loaded with information...
Design Your Own Adventure:
Combining Energy and Cost Analysis with Autodesk® Revit® Architecture
Design can be like a ‘Choose Your Own Adventure® ’ book. Wouldn’t it be nice to flip to the ending instead of heading out on a long design detour? When it comes to sustainable design decisions, the earlier they are made, the better. Make informed decisions based on good information. Along with best practices, we need to be armed with accurate data about the building; price, energy usage, appearance etc. One way we can get this information is by using Autodesk® Revit® Architecture, along with programs like Autodesk® Green Building Studio®, the IES Toolkit and SmartBIM QTO. We will examine a scenario where the designer and client are trying to understand the implications of design decisions on price, LEED credits including the LEED Daylight credit, and overall energy usage. We will document the process and provide best practices in using these analysis solutions. Go ahead, flip to the end of the book and design your own adventure!
Autodesk® 2011 Solutions Event
Date & Time: Friday, May 7, 20108:30am - 2:00pm
LocationToronto Congress Centre 650 Dixon RoadToronto, ON M9W 1J1
Click here for the fancy invitation loaded with information...
Autodesk 2011 Product Keys - Revit3D
Thanks to Gregory Arkin for posting this...
2011 Product Keys
Product Key
License Description
237C1 AutoCAD Civil 3D 2011 English, International
240C1 Revit Architecture 2011 English, International
255C1 Revit Structure 2011 English, International
001C1 AutoCAD 2011 English, International
057C1 AutoCAD LT 2011 English, International
129C1 AutoCAD Map 3D 2011 English, International
240C1 Revit Architecture 2011 English, International
507C1 Autodesk Navisworks Manage 2011 English, International
235C1 AutoCAD MEP 2011 English, International
185C1 AutoCAD Architecture 2011 English, International
057C1 AutoCAD LT 2011 Multi-Lang 11
001C1 AutoCAD 2011 Multi-Lang AMER 1
129C1 AutoCAD Map 3D 2011 English, International
128C1 Autodesk 3ds Max 2011 English, International
661C1 Autodesk 3ds Max Entertainment Creation Suite 2011 English, International
661C1 Autodesk 3ds Max Entertainment Creation Suite 2011 English, International
660C1 Autodesk Maya Entertainment Creation Suite 2011 English, International
256C1 AutoCAD Revit Structure Suite 2011 English, International
241C1 AutoCAD Revit Architecture Suite 2011 English, International
257C1 AutoCAD Revit MEP Suite 2011 English, International
593C1 Autodesk Ecotect Analysis 2011 English, International
237C1 AutoCAD Civil 3D 2011 English, International
Orbiting and Camera Views
This is a 'heads up' to you if you're working with Revit cameras. If you are doing multiple renderings of the same view I would highly recommend duplicating the camera view for each version. You should also make a duplicate if you plan on orbiting. If you orbit (shift-middle mouse roller-button) while in a camera view it is very difficult to get back to your original vantage point. Undo will not get you back.
Friday, April 16, 2010
Revit Architecture 2011
This looks like a good release. Many wishlist and workaround items were addressed. Thank you, to the Revit team at Autodesk.
Here are a few goodies...
Interface is more consistent and faster
Better control of linked files
Control of Temporary Dimensions size
Align works on Wall tops in 3D
Select All, View or Project
Bullets, Text Box and Leader placement controls
Placeholder sheets and grids for lining up views on sheets
Custom elevation tag
List sheets not in a project on drawing list
Background images in renderings
Repeat last command
Removal of 4 core rendering limit
Here's a comprehensive list...
Here are a few goodies...
Interface is more consistent and faster
Better control of linked files
Control of Temporary Dimensions size
Align works on Wall tops in 3D
Select All, View or Project
Bullets, Text Box and Leader placement controls
Placeholder sheets and grids for lining up views on sheets
Custom elevation tag
List sheets not in a project on drawing list
Background images in renderings
Repeat last command
Removal of 4 core rendering limit
Here's a comprehensive list...
Thursday, March 11, 2010
Accessing Project Parameters in Multiple Schedules
Thank you Domenic Serravite from IBI Group for discovering this undocumented feature!


You can access Project Information parameters in any schedule. For instance if you want to have a factor(coefficient) that is used in many different schedules and formulas this is the way. We will use unit planning as an example. You will want a Mass object with floor faces to start.
Manage-Project Settings-Project Parameters-Add
Name: Average Unit Size
Group Under: Identity Data
Type of Parameter: Number
Category: Project Information
Manage-Project Settings-Project Information
Fill out the new parameter Average Unit Size to a factor like 1000. This represents 1000 square feet.
Make a Mass Schedule
Include Gross Floor Area
Check the Include Elements in Linked Files box

Drop the list down to display Project Information

Average Unit Size will now be available
Make a calculated value called Number of Units
Put this formula in: Gross Floor Area / 1 SF / Average Unit Size
Now you can control centrally important information from one place. This can be done in Room and Area schedules as well.
Autodesk is aware that this is confusing and will sumbit it to the development team.
Wednesday, March 03, 2010
Coordinates, Base Points, Surveys, Linking and Other Confusing Things - Part 1
If you browse through the forums, blogs, how-to videos and books you will find a wealth of information on the above titled subject. And it's all conflicting. It's just about the most confusing subject you will encounter in Revit. I will now add my voice to the many others. The method I'm proposing can be boiled down to a common point which is graphically represented in all files. You will then line everything else up based upon that.
The architect must set this up BEFORE anything is done in Revit. No modelling, importing, linking, not anything.
Step 1. Set up the AutoCAD
AutoCAD survey drawings usually have 3D contours and 2D drafted information. The 2D stuff is at 0 Z elevation, the 3D is at it's actual height off of Sea Level. The 0,0,0 or Origin can be anywhere and sometimes it relates to something but sometimes not. We will be changing this.
Save as.
Give new name.
Move everything so the 0,0 is at the bottom left (don't adjust the Z). This could be at the property line intersection.
Make sure there is nothing outside of a 10 mile radius sphere from the 0,0,0. That means you will need to take a look in the Z.
Draw a circle on an individual layer at 0,0,0.
Rotate these to Project North. Make sure there is a North Arrow visible.
Break this file into two files, one with 2D plan info and the other with contours. You can use the wblock command or saveas.
Of course, you should audit and purge the AutoCAD file as well.
Step 2. Not in Revit yet...
Get the longitude/latitude information relating to the AutoCAD site file.
Open Google Earth and go to the address. Find the longitude/latitude of the corner of the site that corresponds with the 0,0, write it down.
The Google Plugin also works great as well. It will import the location to Revit's 0,0,0 as well as draw some Reference Planes and bring in a flat image. It will also give you the true north.
Step 3. Revit Architecture
Revit has a 10 mile diameter of where you can draw or even import. You cannot have anything outside of that.
Manage Place and Locations will assign the Longitude/Latitude numbers to your Revit 0,0 (Origin)
Revit 0,0,0 is found by default at the centre of the elevation markers. It's also the default location of the Project Base Point and Survey Base Point. The Revit origin can not be moved.
Make a view called AutoCAD Site Plan.
Import the 2D AutoCAD. Origin to Origin. Current View Only turned on. You cannot change Revit's origin. The origin can be found at the nexus of the elevation markers in plan. This point is dead centre on your screen when you start from a standard Revit Template.
Then Import the 3D AutoCAD Contours, Origin to Origin. Current View Only turned off. You won't see this file yet, it's above your view.
Go to elevation, move the contours down to level 1.
Go to the site plan view.
Confirm that your Survey Base Point(triangle with an x) is at the centre of the circle you drew in AutoCAD.
Click on the Project Base Point (a blue circle with an x). Click in the 'Angle to True North' and type the difference between your project north and the true north. You may have to type a negative in front of the degrees to get the expected results.
The Project Base Point and Survey Base Point will be in the same place. That's fine.
You may also want to draw two Reference Planes based on the centre of the AutoCAD circle which is also the origin. Name them something logical.
Adjust your elevation markers and datums to focus on where your building will be.
Start drawing grids and modelling etc.
Step 4. Other Linked Revit Files...
Start your new Revit Structure or MEP file.Very first thing you do is link the Revit Architecture file (which we just setup) Origin to Origin.
Check that the Z has come in correctly.
Adjust your elevation markers and datums to focus on where your building will be.
Draw Grids and Levels over top of the linked Revit Architecture as needed.
Start drawing grids and modelling etc.
About Exporting back to CAD...
When exporting back to AutoCAD the origins of both AutoCAD and Revit will line up as long as you have used the default location of the Project Base Point.
The architect must set this up BEFORE anything is done in Revit. No modelling, importing, linking, not anything.
Step 1. Set up the AutoCAD
AutoCAD survey drawings usually have 3D contours and 2D drafted information. The 2D stuff is at 0 Z elevation, the 3D is at it's actual height off of Sea Level. The 0,0,0 or Origin can be anywhere and sometimes it relates to something but sometimes not. We will be changing this.
Save as.
Give new name.
Move everything so the 0,0 is at the bottom left (don't adjust the Z). This could be at the property line intersection.
Make sure there is nothing outside of a 10 mile radius sphere from the 0,0,0. That means you will need to take a look in the Z.
Draw a circle on an individual layer at 0,0,0.
Rotate these to Project North. Make sure there is a North Arrow visible.
Break this file into two files, one with 2D plan info and the other with contours. You can use the wblock command or saveas.
Of course, you should audit and purge the AutoCAD file as well.
Step 2. Not in Revit yet...
Get the longitude/latitude information relating to the AutoCAD site file.
Open Google Earth and go to the address. Find the longitude/latitude of the corner of the site that corresponds with the 0,0, write it down.
The Google Plugin also works great as well. It will import the location to Revit's 0,0,0 as well as draw some Reference Planes and bring in a flat image. It will also give you the true north.
Step 3. Revit Architecture
Revit has a 10 mile diameter of where you can draw or even import. You cannot have anything outside of that.
Manage Place and Locations will assign the Longitude/Latitude numbers to your Revit 0,0 (Origin)
Revit 0,0,0 is found by default at the centre of the elevation markers. It's also the default location of the Project Base Point and Survey Base Point. The Revit origin can not be moved.
Make a view called AutoCAD Site Plan.
Import the 2D AutoCAD. Origin to Origin. Current View Only turned on. You cannot change Revit's origin. The origin can be found at the nexus of the elevation markers in plan. This point is dead centre on your screen when you start from a standard Revit Template.
Then Import the 3D AutoCAD Contours, Origin to Origin. Current View Only turned off. You won't see this file yet, it's above your view.
Go to elevation, move the contours down to level 1.
Go to the site plan view.
Confirm that your Survey Base Point(triangle with an x) is at the centre of the circle you drew in AutoCAD.
Click on the Project Base Point (a blue circle with an x). Click in the 'Angle to True North' and type the difference between your project north and the true north. You may have to type a negative in front of the degrees to get the expected results.
The Project Base Point and Survey Base Point will be in the same place. That's fine.
You may also want to draw two Reference Planes based on the centre of the AutoCAD circle which is also the origin. Name them something logical.
Adjust your elevation markers and datums to focus on where your building will be.
Start drawing grids and modelling etc.
Step 4. Other Linked Revit Files...
Start your new Revit Structure or MEP file.Very first thing you do is link the Revit Architecture file (which we just setup) Origin to Origin.
Check that the Z has come in correctly.
Adjust your elevation markers and datums to focus on where your building will be.
Draw Grids and Levels over top of the linked Revit Architecture as needed.
Start drawing grids and modelling etc.
About Exporting back to CAD...
When exporting back to AutoCAD the origins of both AutoCAD and Revit will line up as long as you have used the default location of the Project Base Point.
Monday, March 01, 2010
Book Review: Revit 2010 Family Standards and Best Practices

Revit 2010 Family Standards and Best Practices (Take the Dysfunction Out of Your Families)
By Shawn Zirbes & Integrated Content Solutions, Inc.
205 pages
$79.99
Right on the front cover the book states that ICS is a Premier member for Autodesk Seek. I don't want to start off negative but as of today the content on Autodesk Seek is not something to brag about. http://forums.augi.com/showthread.php?t=108569&highlight=Autodesk+Seek
Autodesk Seek is a good framework for the distribution of content. That's why it's so disappointing that many of the families are useless. But this isn't a review of Autodesk Seek.
This book has lots of good tips, tricks and best practices. The more unique tips are highlighted in red. The MEP connectors section is quite well developed. There are good naming conventions proposed throughout. Family testing methods are explained (makes me wonder if they're used at Autodesk Seek?). In the beginning of the book there are some nice graphic scenarios on Sketch Mode and Masking Regions. It seems that this tales off and some chapters are very sparse. I was looking forward to the formulas chapter but was disappointed to find that it was virtually just cut and pasted from the Revit Families Guide with no extra examples, tips or otherwise. Overall I would say that this book takes the best segments from the Revit Families Guide and Revit Model Content Guide, adds a few extra tips and organizes them into a tidy little pocket guide.
Here's a link to the Amazon page:
Wednesday, February 24, 2010
AntiVirus Software and Revit Worksets
Some people have seen the situation where they can save a file to the server but as soon as they try to make a Central file Revit says 'File Not Saved'. This can be the AntiVirus software blocking it. You will want to make sure that the following file extensions are allowed:
*.rvt
*.rfa
*.rte
*.dat
*.rws
*.slog
When you make a Central File Revit will make a sub-folder with the above listed file extensions. Of course you will always want to make sure full read/write permissions are given to the user.
*.rvt
*.rfa
*.rte
*.dat
*.rws
*.slog
When you make a Central File Revit will make a sub-folder with the above listed file extensions. Of course you will always want to make sure full read/write permissions are given to the user.
Tuesday, February 23, 2010
Upcoming BIM Webcast to Explore Integrated Project Delivery
FYI
On Feb. 25, 2010, at 2p.m. (EST), Reed Construction Data will present “Lessons in BIM Adoption: How Integrated Project Delivery Can Work”; a free webcast exploring the benefits and challenges of a collaborative approach to design and construction....
http://www.reedconstructiondata.com/press-releases/press-release/2010/02/upcoming-bim-webcast-to-explore-integrated-project-delivery
On Feb. 25, 2010, at 2p.m. (EST), Reed Construction Data will present “Lessons in BIM Adoption: How Integrated Project Delivery Can Work”; a free webcast exploring the benefits and challenges of a collaborative approach to design and construction....
http://www.reedconstructiondata.com/press-releases/press-release/2010/02/upcoming-bim-webcast-to-explore-integrated-project-delivery
Tuesday, February 16, 2010
Sending CAD Files to Background
Sometimes imported CAD files appear in the foreground and you just can't move them back. This can be addressed by the following method:


1. Import the CAD file and make sure that 'Current View Only' is checked.

2. Click on the CAD file. In the Options Bar you will see 'Foreground' or 'Background'.

Monday, February 08, 2010
Pinned Storefront Door Disappears
Make a Storefront Curtain Wall.
'Unpin' a panel.
Replace the unpinned panel with a Curtain Wall Door Panel.
If you try to 'pin' the new Curtain Wall Door Panel it will be changed back into a standard panel.
'Unpin' a panel.
Replace the unpinned panel with a Curtain Wall Door Panel.
If you try to 'pin' the new Curtain Wall Door Panel it will be changed back into a standard panel.
Friday, February 05, 2010
Revit 2010 License Timeout Workaround
Issue
Revit 2010 is not able to recover a lost network license when Revit is running. The program switches to Demo mode and any open data files will not be saved.
Solution (well, kind of...)
The files attached will allow Revit 2010 to recover a network license while running. If, after a 2 hour grace period, a network license is not found, Revit 2010 will display a dialog with the options to Save As & Exit or Exit. The user will not encounter Demo mode at anytime during this process.
more...
http://usa.autodesk.com/adsk/servlet/ps/dl/item?siteID=123112&id=14309812&linkID=9243099
Revit 2010 is not able to recover a lost network license when Revit is running. The program switches to Demo mode and any open data files will not be saved.
Solution (well, kind of...)
The files attached will allow Revit 2010 to recover a network license while running. If, after a 2 hour grace period, a network license is not found, Revit 2010 will display a dialog with the options to Save As & Exit or Exit. The user will not encounter Demo mode at anytime during this process.
more...
http://usa.autodesk.com/adsk/servlet/ps/dl/item?siteID=123112&id=14309812&linkID=9243099
BIM Cloud Computing
Steve Staffords blog referred to this great article on cloud computing with Revit....
http://www.aecbytes.com/feature/2010/BIM_Cloud.html
http://www.aecbytes.com/feature/2010/BIM_Cloud.html
Tuesday, February 02, 2010
Ontario Revit Users Group Feb.3, 2010
We are really excited about 2010 at the Ontario Revit Users Group. Response to the 2010 Syllabus has been overwhelming.
John Peterson, a project architect with KPMB, has designed an exciting ORUG syllabus based on the design process and leveraging the information inherent to a Revit model. This series will consist of four meetings that will take us on a journey through the ups and downs of idealized proposals and real Revit projects
We will travel from the initial sketches to a robust, coordinated BIM model. Along the way we will cover important side ventures into Green Model analysis, cost estimating, Revit Structure and MEP coordination, Family creation, hardware optimization and Worksets.
Invitation:
http://ontariorevit.blogspot.com/2010/01/orug-meeting-feb-3-2010-new-syllabus.html
Keep an eye on the ORUG.ca blog for the post-meeting article.
John Peterson, a project architect with KPMB, has designed an exciting ORUG syllabus based on the design process and leveraging the information inherent to a Revit model. This series will consist of four meetings that will take us on a journey through the ups and downs of idealized proposals and real Revit projects
We will travel from the initial sketches to a robust, coordinated BIM model. Along the way we will cover important side ventures into Green Model analysis, cost estimating, Revit Structure and MEP coordination, Family creation, hardware optimization and Worksets.
Invitation:
http://ontariorevit.blogspot.com/2010/01/orug-meeting-feb-3-2010-new-syllabus.html
Keep an eye on the ORUG.ca blog for the post-meeting article.
Monday, February 01, 2010
AutoCAD File 2 Miles Across
If you're getting this error check the following:
In AutoCAD:
-zoom extents, delete any extraneous points or objects. Do this in plan and elevation views. Objects in the Z plane which are 2 miles away can also cause problems.
-confirm what the units are (we will need this when importing into Revit)
-make sure the that the entire drawing is not too far from the origin-0,0,0. You can move the drawing to 0,0,0 if needed with the move command.
In Revit:
Before you import make sure that you choose the correct import units.
As a side note. When importing site plans it may be a good idea to import the contours separate from the site plan lines. This is because the contours are usually at a proper sea elevation and site elevation while the the other site lines are at 0. You can isolate the contours layer and wblock it.
Here's some additional info and links on Steve Stafford's blog...
http://revitoped.blogspot.com/2010/02/revit-and-2-mile-limit.html
In AutoCAD:
-zoom extents, delete any extraneous points or objects. Do this in plan and elevation views. Objects in the Z plane which are 2 miles away can also cause problems.
-confirm what the units are (we will need this when importing into Revit)
-make sure the that the entire drawing is not too far from the origin-0,0,0. You can move the drawing to 0,0,0 if needed with the move command.
In Revit:
Before you import make sure that you choose the correct import units.
As a side note. When importing site plans it may be a good idea to import the contours separate from the site plan lines. This is because the contours are usually at a proper sea elevation and site elevation while the the other site lines are at 0. You can isolate the contours layer and wblock it.
Here's some additional info and links on Steve Stafford's blog...
http://revitoped.blogspot.com/2010/02/revit-and-2-mile-limit.html
Thursday, January 28, 2010
Revit FAQ
Here's a great post by Chris Price on the most asked questions of Revit. It's a few years old but most of the questions still remain relavent...
http://blog.cadway.com.au/2005/11/frequently-asked-questions.html
http://blog.cadway.com.au/2005/11/frequently-asked-questions.html
Curtain Wall Glass Corner - No Corner Mullion

You may have noticed that Revit curtain wall corners don't trim or clean up very well. While you are able to replace the end mullions with one of the corner mullions there is still no option for a glass butt-joint panel. So there's a workaround...
Make a Wall Type called 'Glass Panel'
Make a Wall Type called 'Glass Panel'
Edit the structure to be the desired thickness of your glass.
Set the material to 'Glass'.

On the Curtain Wall:

On the Curtain Wall:
Tab to select the corner panels and replace them with the wall type 'Glass Panel'. (You may need to unpin them first.)
Delete the vertical mullions on the corner. (You may need to unpin them first.)

Wednesday, December 09, 2009
Grid Bubble with Other Information
Let's say that your would like a Grid Bubble to show both the grid name and something else. Here's how to do it...
You will need to make a custom Grid Head family with the lines and circles desired using the grid family template.
You can add two labels, the Grid Number and a custom parameter. You will also have to make a ‘Shared Parameter’ for year or phase, or both.
Then you will load that family into the project and apply it to the System Grid family.
You will also need to add the Shared Parameter to the Project Parameters. Then you will be able to type the year or phase into the grid.
You will need to make a custom Grid Head family with the lines and circles desired using the grid family template.
You can add two labels, the Grid Number and a custom parameter. You will also have to make a ‘Shared Parameter’ for year or phase, or both.
Then you will load that family into the project and apply it to the System Grid family.
You will also need to add the Shared Parameter to the Project Parameters. Then you will be able to type the year or phase into the grid.
Monday, November 09, 2009
Revit Structure - Missing Columns - Graphical Column Schedule
Thank You Steve Stafford, Revit OPED for documenting this:
If columns are not showing on your column schedules make sure the columns are intersecting with grids and Levels.
http://revitoped.blogspot.com/2009/05/revit-structure-missing-columns.html
If columns are not showing on your column schedules make sure the columns are intersecting with grids and Levels.
http://revitoped.blogspot.com/2009/05/revit-structure-missing-columns.html
Thursday, November 05, 2009
Revit Wish List
'Wishes will be collected three times per year; the top 10 wishes from each cycle will be sent on to the development teams at Autodesk. After each cycle the wish list starts anew to ensure that the wishes are current. The top wishes from the year will be presented to Autodesk in person at Autodesk University.'
'These wishes can only be considered for Revit 2012 and beyond...'
Here's the link...
http://augi.com/revit/ballot.asp
'These wishes can only be considered for Revit 2012 and beyond...'
Here's the link...
http://augi.com/revit/ballot.asp
Wednesday, October 28, 2009
Visibility issues, Volume 1
Visibility Issues are among the most common issues with Revit. These can usually be chalked up to the following...
Category is turned off in the view
Object Graphics or Visibility overridden (ie., set as transparent, turned off)
View Range
Plan Regions
Worksets (turned off in Visibility Overrides)
Design Options
Phases
Object being blocked by another (like a floor slab)
View Properties-Discipline(21-May-10)
Worksharing:
Keep in mind that when working in a team environment (Worksharing) others may be editing your settings without you knowing. One way to mitigate this is by making some initialed views, especially when it comes to the overall 3D and Section Box views. Another common solution is to yell at the people who are doing this.
Wednesday, October 21, 2009
New Revit Release Now...
Subscription Advantage Pack for Autodesk Revit Architecture 2010
The Autodesk® Subscription Advantage Pack for Autodesk® Revit® Architecture 2010 extends the capabilities of Autodesk® Revit® Architecture 2010 software. Productivity-enhancing functionality and features better support modeling, coordination, and documentation, while improved tools help you work more efficiently within the software.
Watch this to see what it's all about...
http://www.subscriptionvideos.com/subscription_rac_video.html
The Autodesk® Subscription Advantage Pack for Autodesk® Revit® Architecture 2010 extends the capabilities of Autodesk® Revit® Architecture 2010 software. Productivity-enhancing functionality and features better support modeling, coordination, and documentation, while improved tools help you work more efficiently within the software.
Watch this to see what it's all about...
http://www.subscriptionvideos.com/subscription_rac_video.html
Monday, October 19, 2009
Revit Standards - File Path Locations
You can set up standard locations for file paths to standard Families and Templates in the following way. You will need to do this at each workstation if Revit has been installed.
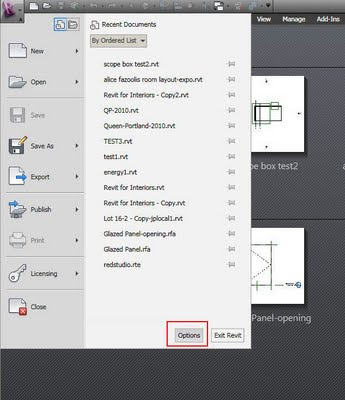
-Go to: Application 'R' menu
-Options
-File Locations
-Places
-Add the name of the location and then browse.
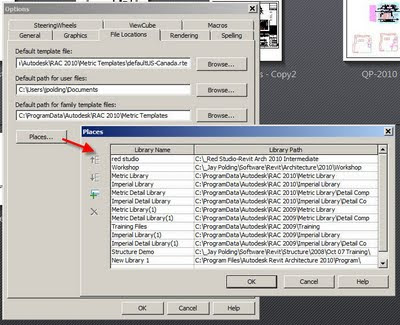
I don't recommend pointing your rendering library off the local machines. This will cause a serious slowdown in rendering times.
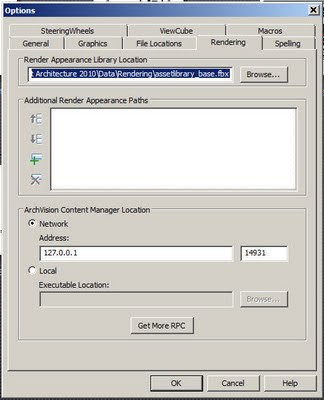
The locations will then be available on the left-hand side of 'load' and 'open' dialog boxes.
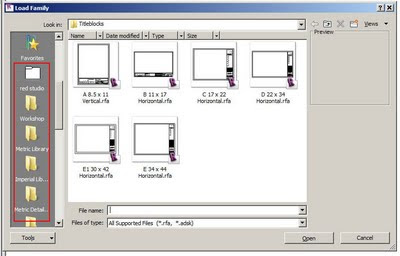
-Go to: Application 'R' menu
-Options

-File Locations
-Places
-Add the name of the location and then browse.

I don't recommend pointing your rendering library off the local machines. This will cause a serious slowdown in rendering times.

The locations will then be available on the left-hand side of 'load' and 'open' dialog boxes.

Monday, October 05, 2009
Revit Arch 2010 Structural Slab Span Symbol
The Revit Architecture 2010 Help files describe how a Structural Slab can be added along with a Span Direction Symbol. Autodesk has confirmed that this is an error in both the Help file and Structural Slab tool. Some Revit Structure files got into the Revit Arch Help files. They said that this will be addressed in the 2011 version. Although they didn't elaborate they will probably remove the reference out of the help files and removing the Structural Slab tool altogether from RAC.
Showing Beams Above in Revit Architecture
Here are some facts that may help in explaining how to show beams which are above:
Floorlan views only look down.
Ceiling Plan views only look up.
The linetype called Overheadis just a standard linetype like 'Hidden' or 'Thin Lines'. Revit will not detect things overhead.
The 'Top Range' of the View Range dialog box is only there to establish how high the 'Cut Plan' can go. Again, Revit will not detect things overhead.
The 'Structural' View Templates set the View Range a little lower but still will not show overhead lines automatically. It will also change the look of the beam lines.
So, here's one workaround:
1. Make a Beam Line Style...
Manage-Settings-Line Styles-Modify Subcategories-New-Call it Overhead Beams-Set the Line Pattern and Line Weight as desired.
2. Temporarily set View Range...
View Properties-View Range-Top Range-Set it above your beam height-Cut Plan-Set it above your beam height.
3. Temporarily change your Detail Level to Fine. This is so you can see the 3D beams.
Floorlan views only look down.
Ceiling Plan views only look up.
The linetype called Overhead
The 'Top Range' of the View Range dialog box is only there to establish how high the 'Cut Plan' can go. Again, Revit will not detect things overhead.
The 'Structural' View Templates set the View Range a little lower but still will not show overhead lines automatically. It will also change the look of the beam lines.
So, here's one workaround:
1. Make a Beam Line Style...
Manage-Settings-Line Styles-Modify Subcategories-New-Call it Overhead Beams-Set the Line Pattern and Line Weight as desired.
2. Temporarily set View Range...
View Properties-View Range-Top Range-Set it above your beam height-Cut Plan-Set it above your beam height.
3. Temporarily change your Detail Level to Fine. This is so you can see the 3D beams.
4. Use the Annotate-Detail Line Tool to draw a line beside the 3D beam using the 'Overhead Beams' Line Style.
5. Use the Align tool to align your line to the middle of the 3D beam. Click the Lock so it is closed.
6. Change your View Range back to normal.
This will line will stay (mostly) connected with the 3D beam. This technique can be used for balconies above, floorplates above, roof overhangs etc.
Please note that there is a bug involving sloping beams and beam systems showing up even when above. Autodesk will be fixing this so I wouldn't use it.
Thursday, September 24, 2009
Autodesk SketchBook Mobile
Saw this on David Lights blog...
Available for 2.99 on the App Store. Is this possibly the cheapest of Autodesk's software?
Autodesk SketchBook Mobile
The Autodesk® SketchBook® Mobile painting and drawing application extends your digital sketchpad to your Apple® iPhone® or Apple iPod touch®. With the same paint engine as Autodesk® SketchBook® Pro software, SketchBook Mobile offers professional-grade painting and drawing tools in a streamlined and intuitive user interface. Use it to digitally capture your ideas as napkin sketches or produce artwork on-the-go.
Website:
http://usa.autodesk.com/adsk/servlet/item?siteID=123112&id=13872203
Video
http://www.youtube.com/watch?v=YwYm5YhA0pQ
Available for 2.99 on the App Store. Is this possibly the cheapest of Autodesk's software?
Autodesk SketchBook Mobile
The Autodesk® SketchBook® Mobile painting and drawing application extends your digital sketchpad to your Apple® iPhone® or Apple iPod touch®. With the same paint engine as Autodesk® SketchBook® Pro software, SketchBook Mobile offers professional-grade painting and drawing tools in a streamlined and intuitive user interface. Use it to digitally capture your ideas as napkin sketches or produce artwork on-the-go.
Website:
http://usa.autodesk.com/adsk/servlet/item?siteID=123112&id=13872203
Video
http://www.youtube.com/watch?v=YwYm5YhA0pQ
Thursday, September 10, 2009
Oh, and by the way...Reinstalling Revit and Plugins
When you reinstall Revit you have to reinstall all of the plugins and in some cases reauthorize them. I wish we could do something about this for the sake of the CAD/BIM Managers out there. This is an issue that Autodesk needs to address as they release one official version and at least two bug-fix versions per year.
Monday, August 31, 2009
Error Importing Sketchup into Revit 2010
I was about to show the great 'import Sketchup' feature to a client when all of a sudden I got the error 'Unable to Import Sketchup'. 'It does it, trust me, really.'
This is a issue is known by Autodesk and they are working to resolve it. In the meantime the only way to fix it is to reinstall.
This is a issue is known by Autodesk and they are working to resolve it. In the meantime the only way to fix it is to reinstall.
Monday, August 24, 2009
Imported 3D AutoCAD not Sectioning
Problem:
A 3D AutoCAD file imported into Revit is not cutting when sectioned.
Solution:
The AutoCAD file first needs to be imported into a Family.
You have options:
1. Start the In-Place Mass command and then import the AutoCAD file. This option works well for large, one time imports like surrounding buildings etc. (use the same method for Sketchup files.)
2. Start a Family based upon a Family Template of your choice (ie. specialty equipment) then import the AutoCAD. Load this Family into your Project. This option works well for creating a quick 3D Family with existing 3D CAD geometry.
A 3D AutoCAD file imported into Revit is not cutting when sectioned.
Solution:
The AutoCAD file first needs to be imported into a Family.
You have options:
1. Start the In-Place Mass command and then import the AutoCAD file. This option works well for large, one time imports like surrounding buildings etc. (use the same method for Sketchup files.)
2. Start a Family based upon a Family Template of your choice (ie. specialty equipment) then import the AutoCAD. Load this Family into your Project. This option works well for creating a quick 3D Family with existing 3D CAD geometry.
Thursday, August 13, 2009
Room Object Not Placed
Have you ever deleted a Room Object and you get a 'deleted but still in project' message? This is a good time-saving feature. Let's say that you build schools, it's a given that you will need the following rooms; Bathroom, Janitor and my favourite, THE Office.
You can pre-make these in your template. When you go to place a Room Object look in the Options Bar (pictured) and drop down the Room list. You have saved yourself from typing the room name and perhaps other important parameters.

More about Room Objects in Schedules here.
You can pre-make these in your template. When you go to place a Room Object look in the Options Bar (pictured) and drop down the Room list. You have saved yourself from typing the room name and perhaps other important parameters.

More about Room Objects in Schedules here.
Thursday, August 06, 2009
Nested Window Visibility with Wall Healing
This one is hard to explain in plain English. Here's the scenario...
Door family with nested window families as sidelights.
Visibility parameter applied to the windows for left and right options.
When inserted into a wall (in a project file -.rvt) checking the sidelights on and off will not leave a hole where the window was. Rather, the wall will 'heal'.

The key is this:
In the window family
Category and Parameters, Shared (check box) is checked.

Thanks to Jeff Steinhauer from the AUGI forum for helping me on this one...
http://forums.augi.com/showthread.php?p=998259#post998259
Door family with nested window families as sidelights.
Visibility parameter applied to the windows for left and right options.
When inserted into a wall (in a project file -.rvt) checking the sidelights on and off will not leave a hole where the window was. Rather, the wall will 'heal'.

The key is this:
In the window family
Category and Parameters, Shared (check box) is checked.

Thanks to Jeff Steinhauer from the AUGI forum for helping me on this one...
http://forums.augi.com/showthread.php?p=998259#post998259
Monday, July 13, 2009
In-Revit Solar Radiation
Use the Solar Radiation Technology Preview to analyze the effects of solar radiation on various surfaces of your conceptual building model...
http://labs.autodesk.com/utilities/ecotect/
http://labs.autodesk.com/utilities/ecotect/
Tuesday, July 07, 2009
Revit Arch 2010 Update 1
The first Update for Revit Arch 2010 is now available...
http://usa.autodesk.com/adsk/servlet/item?siteID=123112&id=12828862
http://usa.autodesk.com/adsk/servlet/item?siteID=123112&id=12828862
Monday, June 08, 2009
Revit 2010 Decal Path
If your path is too long to a specific decal image it will not render. You can workaround this by adding the path of your image to the Options-Rendering-Additional..Paths.
Autodesk is aware of this issue....
Autodesk is aware of this issue....
Friday, June 05, 2009
FIXED: Revit Arch 2010 to Navisworks 2010: Windows Not Cutting Walls
There has been a hotfix posted for this today. You can find it here:
http://usa.autodesk.com/adsk/servlet/ps/dl/item?siteID=123112&id=13379829&linkID=10382102
Please be aware that there is a bug in the export to Navisworks function in the 2010 product line. Walls are covering up windows. This issue has been submitted to Autodesk Development. Read more at the AUGI forum here...http://forums.augi.com/showthread.php?t=101078&highlight=wall+window


http://usa.autodesk.com/adsk/servlet/ps/dl/item?siteID=123112&id=13379829&linkID=10382102
Please be aware that there is a bug in the export to Navisworks function in the 2010 product line. Walls are covering up windows. This issue has been submitted to Autodesk Development. Read more at the AUGI forum here...http://forums.augi.com/showthread.php?t=101078&highlight=wall+window


Monday, June 01, 2009
Rise and Run Roof Slope Tag
Thank you Autodesk for adding one of my wishlist items from way back! This may be a small thing but it's important to residential designers. Thanks again!
I found this on David Duarte's blog Revit Beginners...(Thanks David)
Go to Annotate... Spot Slope... and you might notice that Revit has a new slope annotation that works in plan and elevation view. (choose an arrow or triangle symbol from the options bar)
Now try annotating a roof slope with a spot annotation triangle and you might notice something peculiar. Maybe your roof is 6:12 but the annotation read 4:12. Why the error? Because Revit is annotating the Hip not the face of the roof...Try hitting the tab key while floating over the roof edge and you'll see that the slope tag can report the slope of the hip or the face. The tool just happens to default to reporting the hip first.
This tool does not yet work on ramps or railings.
full article...
http://revitbeginners.blogspot.com/2009/04/revit-2010-new-spot-slopes.html
I found this on David Duarte's blog Revit Beginners...(Thanks David)
Go to Annotate... Spot Slope... and you might notice that Revit has a new slope annotation that works in plan and elevation view. (choose an arrow or triangle symbol from the options bar)
Now try annotating a roof slope with a spot annotation triangle and you might notice something peculiar. Maybe your roof is 6:12 but the annotation read 4:12. Why the error? Because Revit is annotating the Hip not the face of the roof...Try hitting the tab key while floating over the roof edge and you'll see that the slope tag can report the slope of the hip or the face. The tool just happens to default to reporting the hip first.
This tool does not yet work on ramps or railings.
full article...
http://revitbeginners.blogspot.com/2009/04/revit-2010-new-spot-slopes.html
Tag Box Size Relative to Contents
Is it possible to have a tag's box size expand with the contents?
For example, if a room is numbered '1' it doesn't need a big box, but if it's numbered '1001' it does. (This is applicable to all tags really.)
The answer is no, it does not expand automatically. You will need to make a few different types that have different sized boxes.
For example, if a room is numbered '1' it doesn't need a big box, but if it's numbered '1001' it does. (This is applicable to all tags really.)
The answer is no, it does not expand automatically. You will need to make a few different types that have different sized boxes.
Friday, May 29, 2009
Curtain Wall Corner Mullions
Curtain Wall Corner Mullions are preloaded in the default template. You have the following choices of shapes: (see image)


Quad
L
V
Trapezoid

You can make more types by editing the properties. (see image) You can edit material, thickness and general size.

You cannot make a custom profile for corners like you can for non-corner mullions.
If you would like a custom corner you will be best to make it out of a structural column family.
If you are missing the corner mullion families from your project file (maybe they have been purged) do the following.
-Project Browser
-Families
-Curtain Wall Mullions
-Right Click on desired heading
-Choose New Type
Corner mullion size can be adjusted in their Type Properties.
Also, the corner can be non-perpendicular and the corner mullions will adjust.
Click here for more about glass corners.
Click here for more about glass corners.
Wednesday, May 27, 2009
Curtain Wall - Butt Joint Corners
Butt joints at corners can be done the following ways…
Option A
1. Make a new curtain wall panel using the curtain wall panel template
2. Offset the geometry on one side.
3. Save and load the family into your project
4. Make a Curtain Wall Style with Vertical Mullion, Border 2 Type, None
5. Draw the curtain walls on the corner. The wall endpoints will be lined up but the glass will appear to be overlapping by an inch or so.
6. TAB until you can select the panel.
7. Replace the panel with you corner panel.
Option B
1. Draw the curtain walls on the corner. The wall endpoints will be lined up but the glass will appear to be overlapping by an inch or so.
2. TAB until you can select the panel.
3. Edit in-place
4. Stretch the glass panel back by 1”
5. Finish
Option C
1. Draw the curtain walls on the corner. The wall endpoints will be lined up but the glass will appear to be overlapping by an inch or so.
2. TAB until you can select the panel.
3. Turn off the panel’s visibility
4. Draw a wall style which is the thickness of the glass panel and has the material ‘glass’.
Any of these choices are a pain. This is one of the workarounds I would like to see addressed...
Tuesday, May 12, 2009
Lineweights Bug and Workaround

We have noticed that there is a discrepancy in the lineweights between Titleblocks and Projects. It seems that the Titleblock Family's lineweights, although set to the number, appear and print thinner. Autodesk has confirmed that this is an error and plan on fixing it in a future release.
For now you will need to bump your lineweights up (set to a higher number) on your Titleblock Family in order to match the lines on your sheet.
Thursday, May 07, 2009
Database Link in Revit
We've been waiting for this one for a long time...
RDB Link Tool for Revit Family
Technology Preview (COMING SOON)
Overview
The RDBLink tool allows the user to export data from the elements in a Revit project and maintain relationships against data that exists outside of Revit. The tool allows for both import and export of the project data and will allow the user to make changes on the database side that affect the data within the project once imported. Also, during subsequent exports of the data to the same database, only data from the project will be affected, so any new fields or tables added to the database for your own purposes will remain intact along side the newly exported data. The RDBLink import tool provides a grid view of the data to allow the user to make any final edits before import. This grid control also allows the user to create Revit Shared Parameters which will add new fields for those parameters to the database in the related tables. Changes to these new fields within the database will update these Revit Shared Parameters upon future imports.
more...http://labs.autodesk.com/utilities/revit_rdb/
thanks RevitOPED for the tip
RDB Link Tool for Revit Family
Technology Preview (COMING SOON)
Overview
The RDBLink tool allows the user to export data from the elements in a Revit project and maintain relationships against data that exists outside of Revit. The tool allows for both import and export of the project data and will allow the user to make changes on the database side that affect the data within the project once imported. Also, during subsequent exports of the data to the same database, only data from the project will be affected, so any new fields or tables added to the database for your own purposes will remain intact along side the newly exported data. The RDBLink import tool provides a grid view of the data to allow the user to make any final edits before import. This grid control also allows the user to create Revit Shared Parameters which will add new fields for those parameters to the database in the related tables. Changes to these new fields within the database will update these Revit Shared Parameters upon future imports.
more...http://labs.autodesk.com/utilities/revit_rdb/
thanks RevitOPED for the tip
Tuesday, May 05, 2009
Autodesk University Presentations
Public voting is open for Autodesk University Presentations. You can vote here:
http://au.autodesk.com/
I have submitted three proposals.
Session title:
Mutual Symbiosis in the Revit Habitat: Users and Reseller Techies Unite!
Session description:
Software users and software specialists enjoy a symbiotic relationship. Both parties have access to business opportunities and technical resources which are hard to get at while working alone. This class will expose and identify many of the opportunities that a good user-specialist relationship can offer. A BIM/CAD Manager from a progressive, Revit-centric firm and a Reseller Techie will share their experiences on key topics. The secrets to getting technical answers fast from resellers and Autodesk. Techniques on getting the most out of students and teachers in training will be discussed. Plus, learn how to connect with even more experts by starting and running a successful users group. If your symbiotic relationship has been strained, learn how to unite and squeeze more out of a valuable opportunity.
Key learning:
Expand your business network
Get technical answers fast
Start a local users group
Get the most out of students and teachers
Expand your technical resources
Target audience:
BIM/CAD managers, Reseller Application Specialists
Session title:
Navisworks: Coordination as Easy as a Game
Session description:
Turn your building into a video game and email it across your team. Swap materials and render instantly. While taking a virtual tour redline, comment and save animations on the fly. Watch your building get built, in real time. Animate the crane for clearance. Email the whole file to your team for free viewing. In this class we will learn how to take your large multi-meg Revit files and turn them into a smooth, interactive file small enough to email. This is how many consultants, using many different kinds of software, solve the coordination problem.
Key learning:
Import Revit Files
Walking and Flying
Creating an Environment and Applying Materials
Animate!
Timeline your Construction
Target audience:
Architects, Contractors, Builders, Engineers, Designers, Resellers
Session title:
Stairway, or Ramp to Revit Heaven
Session description:
Stairs, ramps and railings are some of the hardest tools to master in Revit. We will discuss specialized techniques for making parking ramps, multi-landing and poured concrete staircases, as well as unique rail conditions. You will learn the ‘rules of thumb’ when making stairs, ramps and railings while exploring the limits of what can be done. We will cover how to properly annotate and detail stairs in sections and plan. If you feel that your stairs haven’t quite reached heavenly heights join us in this session as we climb the stairway, or ramp to Revit heaven.
Key learning:
Make a sloping and curving parking ramp
Make a multi-landing stair
Learn some stair and ramp ‘rules of thumb’
Annotate and detail stairs
Explore the limits
Target audience:
Architects, Engineers and designers who need to make stairs.
http://au.autodesk.com/
I have submitted three proposals.
Session title:
Mutual Symbiosis in the Revit Habitat: Users and Reseller Techies Unite!
Session description:
Software users and software specialists enjoy a symbiotic relationship. Both parties have access to business opportunities and technical resources which are hard to get at while working alone. This class will expose and identify many of the opportunities that a good user-specialist relationship can offer. A BIM/CAD Manager from a progressive, Revit-centric firm and a Reseller Techie will share their experiences on key topics. The secrets to getting technical answers fast from resellers and Autodesk. Techniques on getting the most out of students and teachers in training will be discussed. Plus, learn how to connect with even more experts by starting and running a successful users group. If your symbiotic relationship has been strained, learn how to unite and squeeze more out of a valuable opportunity.
Key learning:
Expand your business network
Get technical answers fast
Start a local users group
Get the most out of students and teachers
Expand your technical resources
Target audience:
BIM/CAD managers, Reseller Application Specialists
Session title:
Navisworks: Coordination as Easy as a Game
Session description:
Turn your building into a video game and email it across your team. Swap materials and render instantly. While taking a virtual tour redline, comment and save animations on the fly. Watch your building get built, in real time. Animate the crane for clearance. Email the whole file to your team for free viewing. In this class we will learn how to take your large multi-meg Revit files and turn them into a smooth, interactive file small enough to email. This is how many consultants, using many different kinds of software, solve the coordination problem.
Key learning:
Import Revit Files
Walking and Flying
Creating an Environment and Applying Materials
Animate!
Timeline your Construction
Target audience:
Architects, Contractors, Builders, Engineers, Designers, Resellers
Session title:
Stairway, or Ramp to Revit Heaven
Session description:
Stairs, ramps and railings are some of the hardest tools to master in Revit. We will discuss specialized techniques for making parking ramps, multi-landing and poured concrete staircases, as well as unique rail conditions. You will learn the ‘rules of thumb’ when making stairs, ramps and railings while exploring the limits of what can be done. We will cover how to properly annotate and detail stairs in sections and plan. If you feel that your stairs haven’t quite reached heavenly heights join us in this session as we climb the stairway, or ramp to Revit heaven.
Key learning:
Make a sloping and curving parking ramp
Make a multi-landing stair
Learn some stair and ramp ‘rules of thumb’
Annotate and detail stairs
Explore the limits
Target audience:
Architects, Engineers and designers who need to make stairs.
Tuesday, April 28, 2009
Elevations and Phases
Elevation markers disappear in different Phases. How do you coordinate the extents and views of these different phases? You can address this by doing the following:
1. Select the Elevation Marker, Cut and Paste Aligned-Same Place. You would do this into the view with the Phase set as desired. The copied Elevation Marker will be in the same place but on the desired Phase.
2. Make a Scope Box. You can drag the extents of the Scope Box to determine where Grids and Levels start and stop. Click on the Grids and Levels, Element Properties, choose the Scope Box you just made. Scope Boxes also have properties that allow you to control the view it's visible in.
3. Organize your Browser. This can also be done by adding a parameter to the views.
1. Select the Elevation Marker, Cut and Paste Aligned-Same Place. You would do this into the view with the Phase set as desired. The copied Elevation Marker will be in the same place but on the desired Phase.
2. Make a Scope Box. You can drag the extents of the Scope Box to determine where Grids and Levels start and stop. Click on the Grids and Levels, Element Properties, choose the Scope Box you just made. Scope Boxes also have properties that allow you to control the view it's visible in.
3. Organize your Browser. This can also be done by adding a parameter to the views.
Wednesday, April 22, 2009
Room Number Intelligence
More and more I am seeing the need for room number intelligence or awareness. I am not alone on this, many of our clients are asking this.
Yes, I can schedule what level a ceiling is on but what about what room it's in? You can do this a little bit with the doors so we know that it's possible. What room is that patient bed, furniture, or light etc. in? It would be nice to then schedule 'by room'. For instance, Room 101 contains: patient bed X, X number of lights.
Please comment...
Yes, I can schedule what level a ceiling is on but what about what room it's in? You can do this a little bit with the doors so we know that it's possible. What room is that patient bed, furniture, or light etc. in? It would be nice to then schedule 'by room'. For instance, Room 101 contains: patient bed X, X number of lights.
Please comment...
Tagging Ceiling Heights in Room Schedules
This can't be done automatically.
Here are a couple of workarounds...
1. From release 2009 and on you can do the following:
Settings-Area and Volume Computations-Calculate Volumes
Make sure the Room object is bounded to the ceiling.
Add a Calculated Value to the Room Schedule using the following info:
Name: Ceiling Height, Type: Length, Formula: Volume/Area
Please note that this workaround only works where the Room and Ceiling are the same shape. The ceiling must be flat.
2. Pre 2009, ie.2008 has another workflow. You may even choose do this in all releases because of the complications of the workaround mentioned above.
Make a Shared Parameter called Ceiling Height
Apply this to the Room Object in the Project file as well as the Room Tag
Make a duplicate of your ceiling plan.
Tag all ceilings showing Height Offset from Level
Tag all Rooms
Now that you can see the actual ceiling height you will be able to manually update the Shared Parameter 'ceiling height' in the Room Tags.
This will keep a coordinated Room Schedule, Tags with the ceiling height.
Here are a couple of workarounds...
1. From release 2009 and on you can do the following:
Settings-Area and Volume Computations-Calculate Volumes
Make sure the Room object is bounded to the ceiling.
Add a Calculated Value to the Room Schedule using the following info:
Name: Ceiling Height, Type: Length, Formula: Volume/Area
Please note that this workaround only works where the Room and Ceiling are the same shape. The ceiling must be flat.
2. Pre 2009, ie.2008 has another workflow. You may even choose do this in all releases because of the complications of the workaround mentioned above.
Make a Shared Parameter called Ceiling Height
Apply this to the Room Object in the Project file as well as the Room Tag
Make a duplicate of your ceiling plan.
Tag all ceilings showing Height Offset from Level
Tag all Rooms
Now that you can see the actual ceiling height you will be able to manually update the Shared Parameter 'ceiling height' in the Room Tags.
This will keep a coordinated Room Schedule, Tags with the ceiling height.
Friday, April 17, 2009
Can't Edit Hatch in Family
Many times you will insert a Family into Revit which has hatch on it. You will not be able to edit the location or orientation of that hatch while it is in the Project. You would need to open the Family, adjust the hatch, then reload it back in.
Thursday, April 16, 2009
AutoCAD Pline Widths in Revit
You want to Import or link an AutoCAD file with plines representing walls. The plines are set to the actual thickness of the wall. When this is imported into Revit the plines lose their thickness.
Changing the Revit lineweight is not the greatest solution because the lines change thickness based on scale. Also, you would have to do some calculations to get the corresponding width right.
You would be best to make the change in AutoCAD before you bring the file in. To that end I've attached a lsp routine which will convert plines to mlines with the corresponding width. You might want to add another string of code which explodes the mlines into lines because mlines don't come into Revit either.
Here's the thread where I found the lsp file written by Joe Burke...
(note: this code leaves out closed segments, you will need to change the plines to 'open'.)
http://discussion.autodesk.com/forums/thread.jspa?messageID=1163735
Here's a cut and paste of the code...
;;;thanks Joe Burke
; CHANGE LINE/PLINE TO MLINE
(defun c:lml ()
;returns list associated with a DXF code
;arguments key: DXF code, alist: object data list
(defun massoc (key alist / x nlist)
(foreach x alist
(if (eq key (car x))
(setq nlist (cons (cdr x) nlist))
)
)
(reverse nlist)
) ;end
;(setq s (ssget))
(setq s (ssget '((0 . "LINE,LWPOLYLINE"))))
(setq teller 0)
(repeat (sslength s)
(setq en (ssname s teller))
(setq ent (entget en))
(if (= "LINE" (cdr (assoc 0 ent)))
(setq PtLst (list (cdr (assoc 10 ent)) (cdr (assoc 11 ent))))
) ;if
(if (= "LWPOLYLINE" (cdr (assoc 0 ent)))
(setq PtLst (massoc 10 ent))
) ;if
(command "mline" (foreach pt PtLst (command pt))) ;point list fed to
mline
;(command "erase" en "")
(entdel en)
(setq teller (1+ teller))
) ;repeat
(princ)
) ;end
Changing the Revit lineweight is not the greatest solution because the lines change thickness based on scale. Also, you would have to do some calculations to get the corresponding width right.
You would be best to make the change in AutoCAD before you bring the file in. To that end I've attached a lsp routine which will convert plines to mlines with the corresponding width. You might want to add another string of code which explodes the mlines into lines because mlines don't come into Revit either.
Here's the thread where I found the lsp file written by Joe Burke...
(note: this code leaves out closed segments, you will need to change the plines to 'open'.)
http://discussion.autodesk.com/forums/thread.jspa?messageID=1163735
Here's a cut and paste of the code...
;;;thanks Joe Burke
; CHANGE LINE/PLINE TO MLINE
(defun c:lml ()
;returns list associated with a DXF code
;arguments key: DXF code, alist: object data list
(defun massoc (key alist / x nlist)
(foreach x alist
(if (eq key (car x))
(setq nlist (cons (cdr x) nlist))
)
)
(reverse nlist)
) ;end
;(setq s (ssget))
(setq s (ssget '((0 . "LINE,LWPOLYLINE"))))
(setq teller 0)
(repeat (sslength s)
(setq en (ssname s teller))
(setq ent (entget en))
(if (= "LINE" (cdr (assoc 0 ent)))
(setq PtLst (list (cdr (assoc 10 ent)) (cdr (assoc 11 ent))))
) ;if
(if (= "LWPOLYLINE" (cdr (assoc 0 ent)))
(setq PtLst (massoc 10 ent))
) ;if
(command "mline" (foreach pt PtLst (command pt))) ;point list fed to
mline
;(command "erase" en "")
(entdel en)
(setq teller (1+ teller))
) ;repeat
(princ)
) ;end
Wednesday, April 15, 2009
Conditional Formatting Trick...
I just saw this trick on Steve Stafford's blog...
When you are creating/editing a schedule and select a value that can be formatted, like Area or a Number value for example press the ALT & N keys in the formatting tab. You will then be able to select a range or do other snazzy things.
His full article...
http://revitoped.blogspot.com/2009/04/conditional-formatting-was-unfair.html
When you are creating/editing a schedule and select a value that can be formatted, like Area or a Number value for example press the ALT & N keys in the formatting tab. You will then be able to select a range or do other snazzy things.
His full article...
http://revitoped.blogspot.com/2009/04/conditional-formatting-was-unfair.html
Thursday, April 09, 2009
Shared Parameters File
Do I need to send it with my Project file?
Will all of the parameters give errors if it is deleted or moved?
The simple answer is no.
Deleting or moving the actual Shared Parameters File does not cause any immediate errors, unless you try to make a parameter from it again. The information from that file is saved with the main Project rvt file. That means that you do not need to send it with a Project file. If the users at the other end want to edit, add or use it they will either need to get yours or make an exact copy themselves.
Here's a little more explanation...
This goes to show just how good Steve Stafford of Revit OpEd is. This is a 2005 article from his blog (which he wrote on a Sunday).
"...deleting the shared parameter from the shared parameter file (there is no link to the shared parameter file) doesn't directly affect a family or project that already uses it. Only when you remove it from a family or project will it affect the existence of data. Also you won't be able to assign or use the parameter again after it is deleted, since a new parameter by the same name is unique in the world as far as Revit is concerned. "
The rest of the article...http://revitoped.blogspot.com/2005/07/shared-parameters-part-3.html
Will all of the parameters give errors if it is deleted or moved?
The simple answer is no.
Deleting or moving the actual Shared Parameters File does not cause any immediate errors, unless you try to make a parameter from it again. The information from that file is saved with the main Project rvt file. That means that you do not need to send it with a Project file. If the users at the other end want to edit, add or use it they will either need to get yours or make an exact copy themselves.
Here's a little more explanation...
This goes to show just how good Steve Stafford of Revit OpEd is. This is a 2005 article from his blog (which he wrote on a Sunday).
"...deleting the shared parameter from the shared parameter file (there is no link to the shared parameter file) doesn't directly affect a family or project that already uses it. Only when you remove it from a family or project will it affect the existence of data. Also you won't be able to assign or use the parameter again after it is deleted, since a new parameter by the same name is unique in the world as far as Revit is concerned. "
The rest of the article...http://revitoped.blogspot.com/2005/07/shared-parameters-part-3.html
Wednesday, April 08, 2009
Autodesk Software Assistance
This is nice news. If you are out of a job in the design industry there is an opportunity for you to get free software and maybe even training within the next few months. Please read the full press release here...
http://pressreleases.autodesk.com/index.php?s=press_releases&item=553%3C%2Ftd%3E
A little extra,
If you are in Ontario, Canada and need a business loan or grant check out this site...
http://www.grants-loans.org/ontario-grants.php
http://pressreleases.autodesk.com/index.php?s=press_releases&item=553%3C%2Ftd%3E
A little extra,
If you are in Ontario, Canada and need a business loan or grant check out this site...
http://www.grants-loans.org/ontario-grants.php
Tuesday, April 07, 2009
Select All Instances Tool Dangerous
I would recommend that all new users not use the Select All Instances tool. If the tool was 'Select All Instances in View', then fine but not as it is. Why? If you pick a piece of text in a drafting view and then use 'Select All Instances' all text of that type will be selected. If you then delete, it's all gone in every view. This holds true for walls, doors and everything.
Linked File Scope Boxes Printing
When a linked file which contains a Scope Box is printed the Scope Box border will print. This will happen even if the 'Hide Scope Boxes' checkbox is ticked.
As a workaround you will need to hide them in each view by using the Visibility/Graphics Overrides box.
Please note that you can override the visibility in the element properties of the Scope Box. If you turn it off in every view you will not be able to click on it again to edit it.
As a workaround you will need to hide them in each view by using the Visibility/Graphics Overrides box.
Please note that you can override the visibility in the element properties of the Scope Box. If you turn it off in every view you will not be able to click on it again to edit it.
Revit 2010 When and How
The Revit Architecture 2010 release is fast approaching.
The when is the middle of April.
The how is a little more difficult...
Subscription customers must choose how they would like their software upgrades to be delivered this year (in Canada).
The delivery options are:
1. Do nothing. Your 2010 Autodesk software DVD / CD will automatically be shipped to you in 30 days. (add on top of this the delivery time which can take anywhere from a few days to weeks)
2. Download your 2010 Autodesk software using the Autodesk Subscription Center.
3. Login to the Autodesk Subscription Center to request a DVD / CD copy of your 2010 software and Autodesk will ship your DVD / CD after you submit your request.
If you need full instructions to get into subscription center call your reseller.
The when is the middle of April.
The how is a little more difficult...
Subscription customers must choose how they would like their software upgrades to be delivered this year (in Canada).
The delivery options are:
1. Do nothing. Your 2010 Autodesk software DVD / CD will automatically be shipped to you in 30 days. (add on top of this the delivery time which can take anywhere from a few days to weeks)
2. Download your 2010 Autodesk software using the Autodesk Subscription Center.
3. Login to the Autodesk Subscription Center to request a DVD / CD copy of your 2010 software and Autodesk will ship your DVD / CD after you submit your request.
If you need full instructions to get into subscription center call your reseller.
Tuesday, March 31, 2009
Activating Revit on a Slow Network
If you are consistently having trouble getting a Revit license from the server it may be that you have a slow network. You may need to add the following Environment Variable.
(this is found under System, Advanced, Environment Variables.)
Variable Name: FLEXLM_TIMEOUT
Variable Value: 1000000
This will give Revit some breathing room to get a license from the server.
(this is found under System, Advanced, Environment Variables.)
Variable Name: FLEXLM_TIMEOUT
Variable Value: 1000000
This will give Revit some breathing room to get a license from the server.
Thursday, March 19, 2009
Newport and Revit
Having a say in Autodesk product development is a unique opportunity that we enjoy in this city, Toronto. Having done some testing myself I can assure you that Newport is going in the right direction. It's also nice to see how seriously the developers take our opinions. If you're not close by, maybe you can get in on the Beta when it comes out? If you are interested in participating contact Ian Hooper at ux.tester@autodesk.com .
Tuesday, March 17, 2009
Architects Should Make Ceiling Levels
In talking with the growing MEP group of users it seems apparent that architects should make ceiling levels. This would help in the following ways...
Copy/Monitor would be able to bring the ceiling heights directly into Revit MEP saving hours.
Walls can be drawn to the ceiling height without user math.
Ceilings heights can be adjusted in fewer clicks by just adjusting the Level.
Feel free to comment...
Copy/Monitor would be able to bring the ceiling heights directly into Revit MEP saving hours.
Walls can be drawn to the ceiling height without user math.
Ceilings heights can be adjusted in fewer clicks by just adjusting the Level.
Feel free to comment...
Thursday, February 26, 2009
Game Engine for Architects

Autodesk® Project Newport - real-time 3D story building technology for architectural visualization and presentation. With game-engine technology and breakthrough ease-of-use, Project Newport enables architects to show their design in context, rapidly explore design options, and create vivid and immersive 3D presentations. Newport brings architectural designs to life by expressing design intent at every stage of a project.
This may be of interest...
Wednesday, February 25, 2009
ORUG Summit-March 4th

ORUG Summit - Wednesday March 4th 6:30 - 9:00 PM
Please join us for our first ORUG Summit. We will have three topic discussion tables:
CAD Manager Issues, Project Manager Issues, and Miscellaneous Topics.
Date: Wednesday March 4, 2009Time: 6:30 PM to 9:00 PM.
Location: Alice Fazooli's, 294 Adelaide St W, Toronto ON, M5V 1P6. Click here for map.
For those taking the TTC, it is conveniently located near both Osgoode and St. Andrew stations on the Yonge-University-Spadina line.
Guest: Charles Simco is a Toronto Litigation lawyer at Shibley Righton LLP who will be available to offer his opinion at the Legal Contract issues discussion table.
Introductions, Welcome and News
Jay Polding will update us about Revit 2010 and what's been going on for the past four months. If you would like to become an ORUG member or attend this meeting as a guest, please contact Jay Polding at jpolding@cadmicro.com. There is no charge to attend.
Topic Discussion Tables
CAD Manager Issues
API
Office Standards and Templates
Project Manager Issues
Integrated Project Delivery
Legal Contract Issues
Miscellaneous Topics
Revit 2010
Revit 2010
Tips and Tricks
There will be 1 moderator at each table and 2 note takers.
Notes will be posted to the ORUG Blog at http://www.orug.ca/.
CAD MicroSolutions Inc.65 International Blvd Toronto ON M9W 6L9P: 416-213-0533 or 1-888-401-5885 F: 416-213-0538http://www.cadmicro.com/ solutions@cadmicro.com
Adding Decimal Places to a Tag
How do you add more decimal places to a tag? For instance, the Property Line tag has two decimal places by default but you may want three. The answer to this also applies to changing a tag from Metric to Imperial units or other formatting issues.
Open Family which you would like to edit. (M_Property Line Tag.rfa)
Click on the Label. (Distance)
Click Edit Label from Options Bar


Click (highlight) on the Parameter which you want to change.
Then click the 'Edit Parameters Units Format' button. (Hand pointing with number sign)
Once it's changed you can save and reload the family.
Once it's changed you can save and reload the family.
Friday, February 20, 2009
Revit 2010 Build Checker
Looks like this might be useful...
The Beside The Cursor Revit Build Checker has been updated to support Revit 2010 products when they are available. No need to launch Revit and search for the build number...just launch my script to get a report on installed versions of Revit from Release 9.1 through 2010.
Also works with 64 bit Windows XP and Vista.
Also works with Revit MEP and Revit Structures.
http://www.integr-8.com/besidethecursor/
The Beside The Cursor Revit Build Checker has been updated to support Revit 2010 products when they are available. No need to launch Revit and search for the build number...just launch my script to get a report on installed versions of Revit from Release 9.1 through 2010.
Also works with 64 bit Windows XP and Vista.
Also works with Revit MEP and Revit Structures.
http://www.integr-8.com/besidethecursor/
Wednesday, February 11, 2009
Revit 2010 First Impressions
Autodesk continues to focus on the Revit platform, and they've been busy! Here's what the big picture looks like for this release...
User Interface
This needed attention and was given. Looks like the Type Selector has been enhanced to show preview images. The 'ribbon' in AutoCAD 2009 has been frustrating at times. From the images that I've seen the Revit ribbon is well organized.
Native 64bit support
This enhancement cannot be understated. It's not flashy but it can make a huge difference in the size of model that you work on. Users won't have to 'break up' models into links as much anymore. Now we can finally move beyond 4gb of RAM!
Freeform Modelling
It's funny because you wouldn't think that the masses of designers need this, but many do. When you're designing in 3D it's amazing the array of shapes needed. Even if you're making a 'classic' (rectangle) building there are custom column capitals, window lintels, furniture, lighting and other things that require non-rectangular shapes. I'm looking forward to getting into this feature.
There will be more but that is just a sampling. There are other sites like revit3d.com which go into greater depth and even have videos.
Looking forward to April...
User Interface
This needed attention and was given. Looks like the Type Selector has been enhanced to show preview images. The 'ribbon' in AutoCAD 2009 has been frustrating at times. From the images that I've seen the Revit ribbon is well organized.
Native 64bit support
This enhancement cannot be understated. It's not flashy but it can make a huge difference in the size of model that you work on. Users won't have to 'break up' models into links as much anymore. Now we can finally move beyond 4gb of RAM!
Freeform Modelling
It's funny because you wouldn't think that the masses of designers need this, but many do. When you're designing in 3D it's amazing the array of shapes needed. Even if you're making a 'classic' (rectangle) building there are custom column capitals, window lintels, furniture, lighting and other things that require non-rectangular shapes. I'm looking forward to getting into this feature.
There will be more but that is just a sampling. There are other sites like revit3d.com which go into greater depth and even have videos.
Looking forward to April...
Wednesday, January 07, 2009
Lineweight Control
Where are lineweight settings controlled? Where are Imported Lineweight settings controlled?
Lineweights are configured for each file. If a team is working on one file(worksharing) and one person changes the line settings, the file has new line settings. These are found under the Settings drop down menu. This is also true of Object Styles.
The lesson here is a common one in Revit, if you change it in one place it changes everywhere. So, if you want a thicker linetype, make a new one.
Imported Lineweights are controlled by a text file stored in C:\Program Files\Revit Architecture 2009\Data\ importlineweights-dwg-default.txt. You can edit it and make new ones. These settings do not move with the rvt file, they are particular to a workstation. Potentially two users could import the same file and get different lineweight results.
A team may want to make one of these text files and distribute across the team as needed.
Lineweights are configured for each file. If a team is working on one file(worksharing) and one person changes the line settings, the file has new line settings. These are found under the Settings drop down menu. This is also true of Object Styles.
The lesson here is a common one in Revit, if you change it in one place it changes everywhere. So, if you want a thicker linetype, make a new one.
Imported Lineweights are controlled by a text file stored in C:\Program Files\Revit Architecture 2009\Data\ importlineweights-dwg-default.txt. You can edit it and make new ones. These settings do not move with the rvt file, they are particular to a workstation. Potentially two users could import the same file and get different lineweight results.
A team may want to make one of these text files and distribute across the team as needed.
Monday, January 05, 2009
Try Ecotect for Free
Autodesk has recently purchased Ecotect and is making the software available for free (trial basis) on this site...
http://ecotect.com/downloads
Ecotect is an environmental simulation software.
http://ecotect.com/downloads
Ecotect is an environmental simulation software.
Wednesday, December 31, 2008
Revit Plugins and Add-ons Review 2008
It seems that in this last year there have been many plugins, add-ons, extensions etc created for Revit. From my perspective plugins are usually best as a stop-gap solution. By this I mean that they do something that Revit out-of-the-box can't do (or do well) at this point in time. CAD/BIM Mangers have an enormous task of installing the latest versions and patches of the core software. Now add on top of that the individual plugins that each user may want. This is compounded by each new release and update. Revit's initial philosophy was to do everything well out-of-the-box. That being said, even Autodesk can't keep up with the developing demands of this hugely popular software. For this good reason the API has enabled people to create some excellent solutions. Autodesk has taken note and even bought up some of the better programs to integrate with the core software.
So, let's review some available plugins for Revit Architecture. This list is by no means comprehensive. Please let me know of any good ones that I have missed as I will keep updating this.
IES VE-Ware
"VE-Ware is our FREE building energy usage and carbon dioxide emission assessment software that can make a real difference to the green credentials of a building, as well as benchmark it against the US Architecture 2030 Challenge."
http://www.iesve.com/content/default.asp?page=s130
ease of installation: easy
ease of use: Knowing how to set up the model before running the calcs is essential.
results: Pretty basic. Not detailed enough but still useful.
price: Free
IES VE-Toolkit
"Our VE-Toolkits are ideal for use at the very early stages of the design process as they give quick sustainability feedback at the click of a few buttons."
http://www.iesve.com/content/default.asp?page=s158
ease of installation: easy
ease of use: Knowing how to set up the model before running the calcs is essential.
results: Very detailed and graphic results. Great value in my opinion.
price: approx. $1500 (ballpark)
Especs for Revit
"e-SPECS for Revit extends the Autodesk® Revit-based products document coordination and quality solutions to the construction specifications. "
http://www.e-specs.com/especs-revit.html
ease of installation: Not very easy.
ease of use: Easy to use once the difficult setup process is done.
results: For the money the results can be awesome, as long as there is some setup and attention to standards. This has great potential but needs to be more accessible.
price: approx $1700(ballpark)
Avatech Tools:
http://www.avatech.com/solutions/building-design/product-details.aspx?product=44
So, let's review some available plugins for Revit Architecture. This list is by no means comprehensive. Please let me know of any good ones that I have missed as I will keep updating this.
IES VE-Ware
"VE-Ware is our FREE building energy usage and carbon dioxide emission assessment software that can make a real difference to the green credentials of a building, as well as benchmark it against the US Architecture 2030 Challenge."
http://www.iesve.com/content/default.asp?page=s130
ease of installation: easy
ease of use: Knowing how to set up the model before running the calcs is essential.
results: Pretty basic. Not detailed enough but still useful.
price: Free
IES VE-Toolkit
"Our VE-Toolkits are ideal for use at the very early stages of the design process as they give quick sustainability feedback at the click of a few buttons."
http://www.iesve.com/content/default.asp?page=s158
ease of installation: easy
ease of use: Knowing how to set up the model before running the calcs is essential.
results: Very detailed and graphic results. Great value in my opinion.
price: approx. $1500 (ballpark)
Especs for Revit
"e-SPECS for Revit extends the Autodesk® Revit-based products document coordination and quality solutions to the construction specifications. "
http://www.e-specs.com/especs-revit.html
ease of installation: Not very easy.
ease of use: Easy to use once the difficult setup process is done.
results: For the money the results can be awesome, as long as there is some setup and attention to standards. This has great potential but needs to be more accessible.
price: approx $1700(ballpark)
Avatech Tools:
http://www.avatech.com/solutions/building-design/product-details.aspx?product=44
Avatech Room Renumber
ease of installation: easy
ease of use: easy
results: This is a nice utility that I would consider a necessary stop-gap.
price: free
Avatech Door Mark Update
ease of installation: easy
ease of use: easy
results: This is what happens when someone actually reads the Wish Lists.
price: free
Autodesk Extensions
available on the Autodesk Subscription Website
ease of installation: easy
price: included with subscription
Autodesk Extensions: Compare Models
ease of use: easy
results: I think this has some good uses but I'm not sure what yet. Useful for diagnostics.
Autodesk Extensions: Element Positioning
ease of use: easy, but not sure what it's for.
results: Seems like this might be a diagnostic tool as well. This one is kind of a mixed bag. There is a tool for tagging but I'm not sure what the rest of the tools do yet. I'll keep you posted.
Autodesk Extensions: Freeze Drawings
ease of use: easy
results: This is very useful for creating static details.
Autodesk Extensions: Text Generator
ease of use: easy
results: A good stop-gap until more tools are added to the Text tool.
Autodesk Extensions: Excel Based model Generation
ease of use: haven't used it yet
results:
Autodesk Extensions: Grids Generator
ease of use: medium
results: creates some 3D lines so you can see where your grids are in 3D. I think it would be nice to toggle ref-planes in 3D.
Autodesk Subscription: Worksharing Monitor
ease of installation: easy, once you find it on the subscription site maze.
ease of use: easy
results: a little buggy at times but useful.
price: included with subscription
Autodesk Subscription: Import/Export Google Earth
ease of installation: easy, once you find it on the subscription site maze.
ease of use: easy
results: A 'cool' tool but also somewhat useful.
price: included with subscription
Autodesk Subscription: Batch Print
ease of installation:easy, once you find it on the subscription site maze.
ease of use: Haven't used it yet.
results:Haven't used it yet.
price:included with subscription
Autodesk Labs: STL Exporter
ease of installation: Haven't used it yet.
ease of use:
results:
price:
BIM Content Manager
http://www.bimcontentmanager.com/
ease of installation: fairly easy
ease of use: kind of complex
results: Autodesk intends to buy the parent company so hopefully a refined version of this lands inside of Revit (not an add-on through subscription).
price: $150 for now...
StrucSoft Metal Wood Framer
http://www.strucsoftsolutions.com/products.asp
"First wall panelizer running on Autodesk Revit Platform for wood and Light Guage metal construction."
Although I haven't used this yet it's very presence is encouraging.
Ideate Explorer for Revit
http://www.ideatexplorer.com/index.php
I haven't used this yet but it looks like a very useful tool.
price: $95
Autodesk Navisworks
Exports a Revit model to Navisworks.
You need to buy Navisworks to get this plugin.
Many macro samples are also available in the SDK (Software Development Kit)
ease of installation: medium-hard, you need to edit the revit.ini
ease of use: medium
results: although they are samples there are some useful tools ie. change case, find-replace etc.
price: free
Affinity for Revit
http://www.trelligence.com/affinity_revit.php
Trelligence Affinity™, Affinity for ArchiCAD™, and Affinity for Revit™ is software focused on enhancing the early architectural design process with a unique programming, space planning and schematic design solution. Targeted at the worldwide architectural, engineering, construction and owner/developer (AECO) market, the Trelligence Affinity patent-pending software integrates with ArchiCAD from Graphisoft, Revit Architecture from Autodesk, and other design tools to extend the benefits of Building Information Modeling (BIM) - faster planning, less rework and better team collaboration - to the early design phases of complex building projects.
ease of installation: ?
ease of use: ?
results:?
price: ?
Tuesday, November 25, 2008
Elevation Depth Line Quality
Here's a typical question:
We have been working with some elevation views on a couple of our projects in Revit and it seems that in terms of line weights the depth of the buildings do not read well. Is there a setting to control how Revit handles the line weights of different parts of the building particularly those that are further back in the distance? The building I am working on happens to have several parts to the building that are in the mid ground background plane so any help would be much appreciated.
This is a good question which has potential to be a good built in automatic utility. For now, though, here's how to address this.
Right-click on object or objects....
Override Graphics in View...
By Element...

Then adjust projection lines as required.

This will do in most scenarios.
There are times when you may have to break down and use the 'linework' tool. You don't want to use this tool too often though since it could be time consuming to keep updated.
We have been working with some elevation views on a couple of our projects in Revit and it seems that in terms of line weights the depth of the buildings do not read well. Is there a setting to control how Revit handles the line weights of different parts of the building particularly those that are further back in the distance? The building I am working on happens to have several parts to the building that are in the mid ground background plane so any help would be much appreciated.
This is a good question which has potential to be a good built in automatic utility. For now, though, here's how to address this.
Right-click on object or objects....
Override Graphics in View...
By Element...

Then adjust projection lines as required.

This will do in most scenarios.
There are times when you may have to break down and use the 'linework' tool. You don't want to use this tool too often though since it could be time consuming to keep updated.
Thursday, October 16, 2008
Rendering with Best Setting
From practice, I have noticed that for the visual difference between the 'Best' and 'High' is not usually worth the time difference. I have also noticed that 'Best' will sometimes even crash the machine.
Let me know if you have seen the same.
Let me know if you have seen the same.
Tuesday, October 07, 2008
Relative vs Absolute Links

The difference between these two settings (found under File-Manage Links) is the following:
Relative: If you move the Revit file you will need to move the dwg link into the same folder. If you don't do this the link will be broken, although it may still display the file in a static state.
Absolute: You can move the Revit file without moving the linked dwg. The only issue with this is if you were to move it to a location that can't access the path, the link will be broken.
Subscribe to:
Posts (Atom)

 Posts
Posts


