Just to let every one know, if you don't already. Revit 64bit is now available for download for Architecture, Structure and MEP. You need to log in to the Autodesk Subscription site to get this. Here's a press release from Autodesk...
SAN RAFAEL, Calif., Sept. 30 /PRNewswire-FirstCall/ -- Autodesk, Inc.,(NASDAQ: ADSK) today announced that versions of its Revit software applications for Building Information Modeling (BIM) specifically designed for personal computers using Windows 64-bit operating systems are now available. This marks the company's first venture into 64-bit BIM applications and applies to Revit Architecture 2009, Revit Structure 2009 and Revit MEP 2009. The 64-bit versions are now available to existing Revit platform software subscribers. Customer beta testers reported that the newsoftware applications offer significantly improved performance and stabilityfor memory intensive tasks such as rendering, printing, model upgrading andfile importing and exporting. Some examples of their experience include:
"In every single test I threw at the Revit Structure for the 64-bit system it beat the 32-bit system," said Ken Murphy, BIM manager, Thornton Tomasetti. "On average, we observed approximately a 20 percent performance gain on operations such as saving files and exporting models to other formats for outside consultants. And when it comes to rendering images of large project models, such as an American football stadium with thousands of members, we saw up to a 50 percent performance improvement over the 32-bit platform."
"With 64-bit Revit Architecture we can completely load a very large project into a session and work on it at one time; and that is something that represents a significant efficiency improvement over the 32-bit environment,"said Lonnie Cumpton, Revit task force manager for the Friedmutter Group. "For example, we have a large project that consists of 2.9 gigabytes of Revit data contained in 22 individual files. With 64-bit Revit Architecture we can link all the pieces together into one big model and cut an entire building section to gain an understanding from a section elevation standpoint of the entireproject at one time. Using 32-bit Revit Architecture we'd have to cut individual pieces of sections in each model and then piece them back together. It took us a day to do that. Now we can do it in less than an hour."
"We've been beta testing the 64-bit Revit Structure software and the increases in efficiency and productivity are impressive," said Jamie Richardson, Associate & CAD manager, Ericksen Roed & Associates. "Cutting sections and switching between views is much faster. Moving within the viewsand rotating the model in a 3D view is also noticeably faster and smoother.With what we have seen in our beta testing, and what we're hearing from userstesting the beta on their current projects, we see no reason not to go to the64-bit version of Revit Structure."
The English language versions of new 64-bit Revit software applications areavailable now to existing Revit Architecture 2009, Revit Structure 2009 andRevit MEP 2009 subscribers via the online Subscription Center. The 64-bit software will release in other languages at a later date.
"We're very excited to hear our beta testers report stunning performance gains with the native 64-bit versions of the Revit software applications,"said Jay Bhatt, senior vice president, Autodesk AEC Solutions. "Breaking the four gigabytes RAM barrier is an important milestone, which helps ourcustomers experience the power of BIM in even their largest projects."
Tuesday, September 30, 2008
Friday, September 26, 2008
Caution: Import DWG Lines Move
I read this on Steve Stafford's blog and wanted to spread the word. I have sent this to Autodesk as a support issue. I would recommend for you to do the same!
"Revit alters the lines in a imported cad file if they are very nearly horizontal or vertical. It has done this for quite some time. It isn't clear if it isn't a problem very often or if it isn't noticed very often. I'm reminded of this issue by a recent post at AUGI naturally.In this instance a member wrote that a property line (in a cad import) whose bearing is 89 degrees 57 minutes and 56 seconds is altered by Revit to simply 90 degrees even. The cad file isn't "changed" but what we see of it in Revit is."
Complete article...http://revitoped.blogspot.com/2008/09/dwg-import-lines-nearly.html
Model Lines to Detail Lines and back
Thanks to Yogesh Ishwar for this tip...
If you have Model lines and want to change them to Detail Lines do the following:
Cut Model Lines
Start Filled Region Command
Paste Aligned-Same Place
Cut Lines again
Close Filled Region Command without saving
Paste Aligned-Same Place. These lines will now be Detail Lines
If you want to go the other way just replace Filled Region command with the Floor command.
Monday, September 22, 2008
Tagging and Scheduling Nested Families
Challenge: You want a door and a window to be inserted as one, but you want to tag and schedule them individually.

This can be done the following way.
Open window family.
Make sure the shared button is checked. Under Settings, Family Category and Parameters.

Open the door family.
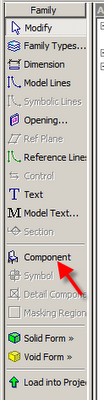
Insert the window as a component.

Make sure the shared button is checked. Under Settings, Family Category and Parameters.
When you insert the nested family you will be able to tag and schedule each object.
Friday, September 19, 2008
Metric and Imperial Units in Tags and Schedules
Metric and Imperial Units in Tags: 

Open the Tag family.
Add the Area label.
Edit the unit format.

Metric and Imperial Units in Schedules:
Add a calculated value
Type: Area
Formula: Area
Go to the Formatting tab and adjust the units format for the new parameter.

Wednesday, September 10, 2008
Using IES Files in revit Architecture 2009
Thanks to Yogesh Ishwar for this one.
To specify an IES file for a light source
Obtain the desired IES file.
You can obtain an IES file directly from the manufacturer, or use an IES file provided by Revit Architecture. The Revit IES files reside in the following location, by default:
C:\Program Files\\Data\Electrical Components\IES
Specify Photometric Web light distribution, as follows:
Open the lighting fixture family in the Family Editor.
In the drawing area, select the light source.
On the Options Bar, click Light Source Definition.
For Emit from Shape, select the desired shape.
For Light distribution, select (Photometric Web).
Click OK.
Save changes to the lighting fixture family.
Specify the IES file to use, as follows:
If you want the IES file to define light distribution for the entire lighting fixture family, keep the lighting fixture family open in the Family Editor. Click Family Types. For Name, select the family type to modify.
If you want the IES file to define light distribution for selected instances of the lighting fixture family, open a project that uses it, and select a lighting fixture in the project. Right click, and click Element Properties. Click Edit/New. Click Duplicate, specify a name for the new family type, and click OK.
In the list of type parameters, scroll down to Photometric.
For Photometric Web File, click in the Value column.
Click (Browse).
Note: The Browse button displays after you click in the field.
Navigate to the desired IES file, select it, and click Open.
Click OK.
Save changes to the project or the lighting fixture family.
In the drawing area, the shape of the light source reflects the specified IES file. To see the light source in a project view, you must make light sources visible.
To specify an IES file for a light source
Obtain the desired IES file.
You can obtain an IES file directly from the manufacturer, or use an IES file provided by Revit Architecture. The Revit IES files reside in the following location, by default:
C:\Program Files\
Specify Photometric Web light distribution, as follows:
Open the lighting fixture family in the Family Editor.
In the drawing area, select the light source.
On the Options Bar, click Light Source Definition.
For Emit from Shape, select the desired shape.
For Light distribution, select (Photometric Web).
Click OK.
Save changes to the lighting fixture family.
Specify the IES file to use, as follows:
If you want the IES file to define light distribution for the entire lighting fixture family, keep the lighting fixture family open in the Family Editor. Click Family Types. For Name, select the family type to modify.
If you want the IES file to define light distribution for selected instances of the lighting fixture family, open a project that uses it, and select a lighting fixture in the project. Right click, and click Element Properties. Click Edit/New. Click Duplicate, specify a name for the new family type, and click OK.
In the list of type parameters, scroll down to Photometric.
For Photometric Web File, click in the Value column.
Click (Browse).
Note: The Browse button displays after you click in the field.
Navigate to the desired IES file, select it, and click Open.
Click OK.
Save changes to the project or the lighting fixture family.
In the drawing area, the shape of the light source reflects the specified IES file. To see the light source in a project view, you must make light sources visible.
Tuesday, September 09, 2008

Subscribe to:
Posts (Atom)


