No, I didn't go to Waltham Mass. (Near Boston) just to have a pint at Cheers (although I did). My main purpose was attending the Revit Implementation Certified Expert (ICE) training. The course was really well taught and developed. It was interesting to meet counterparts from all over the world; Japan, Korea, USA, and even from my little ol' Canada. One thing that was impressed upon me was that even though Revit is easy to use you need a plan to implement it. The other thing is attitude. If someone doesn't want to learn something, forget it. So, choosing the right people for your team is very important. Here are some basic steps to a successful implementation and for project planning in general:
Establish a baseline of where you are; people, projects, workflow, technology etc.
Make a detailed plan; training, deployment etc.
Follow your plan and try not to get sidetracked.
Follow up on your plan and see how you can do things better the next time.
Monday, December 11, 2006
Thursday, October 19, 2006
CDV Systems Video Review
I have recently went through the instructional videos "TLC AR01 TFER - The Family Editor Revealed ". This is found at http://www.cdvsystems.com/
The videos are well organized into 68 vignettes based on topic. The content is accurate and concise. There are also some tips and tricks which the help files don't tell you, these are gems. The only faults that I found was that the audio volume was a little low and the video size had to be adjusted for each of the videos. The price is $30 for each download which I would say is quite reasonable.
The videos are well organized into 68 vignettes based on topic. The content is accurate and concise. There are also some tips and tricks which the help files don't tell you, these are gems. The only faults that I found was that the audio volume was a little low and the video size had to be adjusted for each of the videos. The price is $30 for each download which I would say is quite reasonable.
Thursday, October 12, 2006
Ontario Revit User's Group
Plan to attend the inaugural Ontario Revit Users Group Meeting with guest speakers from KPMB Architects and Phil Read from Autodesk.
When: Wednesday, October 25th 6:30pm to 9:00pm.
Location: Alice Fazooli's,
Agenda
Reception: Join us for hors d'oeuvres and drinks at 6:30.
Introduction: Meet the Ontario Revit User's Group Organizers and dedicated volunteers who are leading the Revit wave in
Revit - Cross Country Checkup: This year has shown tremendous gains in the adoption
of Revit. Caesar Ruest from Autodesk
ORUG Member Presentation: The Revit team from KPMB Architects will discuss their experience with using Revit on the Manitoba Hydro tower project.
Guest Speaker - Phil Read Speaks on Design Iteration in Revit: Phil is a Revit implementation architect with Autodesk and works directly with firms in training, project implementation, and establishing best practices. Phil holds Bachelor of Science degrees
in Communications and Architecture, as well a Master of Architecture degree from the
Q & A: Use this great opportunity to ask questions about your use of Revit.
Thursday, October 05, 2006
Change a Revit Mass Name
Here's how to change the name of a Revit mass object.
1. Go to the Families listing in the Project Browser
2. Find Mass
3. Find Instance, right-click, rename!
1. Go to the Families listing in the Project Browser
2. Find Mass
3. Find Instance, right-click, rename!
Detailing in Revit
Many people who haven't used Revit claim that it doesn't do detailing well. They are wrong in two areas:
1. Revit doesn't 'do' details, a person does. It seems obvious enough but just because you have the ability to cut sections through components doesn't mean that section will know the specific conditions that you need to communicate...
2. Revit does have a robust set of detailing tools that enable you to draw BETTER details than AutoCAD.
You need to ask the following question before you start detailing:
1. Should I model this in 3D, 2D or both?
These questions help you answer this:
a. Will this condition be visible from any other views?
b. Is this a generic detail that is used over different projects, or is it specific to this one only?
c. How far are we into the design, will this part of the building change drastically?
An good example is a door section.
Will you see the structural lintel and flashing from other views? No, draw it in 2D on top of the section/callout view.
What about the connection to the wall, insulation, frame extrusion shapes etc? Again, no. Draw it in 2D overtop of the section/callout view.
Will I see the masonry lintel from another view? Yes. Model the lintel in the door family in 3D so it shows correctly in sections and elevations.
If the door manufacturer has sent their own pre-engineered detail in AutoCAD just import that file into a Drafting View and link it to a callout. Why 'reinvent the wheel'?!
Friday, September 15, 2006
Ontario Revit Users Group
Revit Ontario Users Group Meeting
Plan to attend the inaugural Ontario Revit Users Group Meeting on Wednesday October 25th from 7:00PM to 9:00PM.
Location: Alice Fazooli's, 294 Adelaide Street West, Toronto, ON
Agenda: Introduction to the ORUG organizers, report on Revit usage across Canada, update on Revit development, guest speaker, Q+A, networking, food and drink.
Registration: Please email your interest in attending to Jay Polding at jpolding@cadmicro.com
Friday, September 08, 2006
What's Really New in Revit 9.1
First off, I would like to say, after reviewing this release, GREAT JOB and THANK YOU to the development team. They have listened to us, the users, and fixed some of the persistent issues that have been coming up.
I would categorize the enhancements into two areas:
Talking to other programs
Autodesk has purchased FM Desktop which will allow Revit and AutoCAD to mesh into the Facilities management arena. Great idea. They have also acquired Robobat, a leading engineering calculations software. Great idea. What this means is a more disciplines working based on the Revit model. So this is where the development team has to integrate existing functions into all of the other necessary programs.
Adding common wishlist items
As we all know, details are critical. We make suggestions and the Revit team is listening. Is their reaction time fast enough? We have to balance our reaction to this. No, we don't want them to be complacent but at the same time we need to be realistic. They did fix some of my wishlist items but the major test will be what release 10 fixes and adds.
Here we go...
Selecting units for DWG export (Talking to other programs)(Adding common wishlist items)
You can set the DWG units for projects you export to DWG format. Unit options are feet, inches, meters, centimeters, and millimeters. The default units are inches for imperial projects and meters for metric projects.
Exporting room and area properties to 2D DWF (Talking to other programs)
When you export a project or a view that has rooms or areas to 2D DWF, you can have the room/area properties exported on a separate layer than the geometric representation. Setting this option allows you to view individual rooms and room data when you are exporting a project or a view for use with facility management software (such as Autodesk® FMDesktop), or DWF markup software (such as Autodesk® Design Review).
Specifying the building type and zip code for exported gbXML files (Talking to other programs)(Adding common wishlist items)
You can now specify the building type and zip code for projects that export to gbXML. Several analysis software packages use this information when importing gbXML files to add default design values for energy use and costs, thermal loads, and construction.
Hiding elevation tags(Adding common wishlist items)
You can set the view scale at which elevation tags are hidden in project views. Each elevation tag instance can have a different view scale at which it is hidden.
Improved snapping for section views(Adding common wishlist items)
You can now snap a section line either parallel or perpendicular to a non-orthogonal datum or wall. Snapping to a wall is available in plan views.
Set room bounding condition for columns prior to placement(Adding common wishlist items)(Talking to other programs, especially Revit Structure)
You can now specify whether an architectural column is room bounding before placing it. This setting persists until you change it.
Placing windows and doors on in-place walls in plan view(Adding common wishlist items)
In plan view, you can now place windows and doors on in-place and face-based walls, for example a sloped wall.
Moving end-joined components(Adding common wishlist items)
Components that share a common end join can be moved simultaneously without breaking the join by using a new drag control, or by selecting an option on the context menu. This functionality is available for walls, lines, beams, braces, and line-based families.
New area property for filled region(Adding common wishlist items)
To quickly determine area you can now use the filled region tool and view the new area property.You view the area property for a filled region in its Element Properties dialog. The area value is the area of the region's closed perimeter loop less the area of any closed loops within the perimeter. The area property is reported in the project units (for example, square meters or square feet). The area property is read-only and cannot be scheduled or tagged.
The following topics could be grouped under (Talking to other programs, especially Revit Structure) (Adding common wishlist items)Using the Trim/Extend tool with beams and braces
You can now use the Trim/Extend tool (trim/extend to corner and trim/extend single element options) to trim or extend braces and beams.
Moving braces out of their originating plane
You can now copy, move, mirror, array, and rotate braces out of the vertical plane they were created in. You can accomplish this in plan and 3D views.
Non-planar beam systems
You can create non-planar beam systems in which the elevation of a beam is defined by its sketch lines. Sketched beam lines:
New option for the Layout Rule instance parameterConcrete drawing improvements
Concrete beams that are in the same plane and are joined to the same concrete column (where the beams are wider than the column) automatically clean up.
Automatic concrete joins
Beam Direction Edge tool renamed
New options for sketching beam directions
Different display options for hidden, non-rectangular concrete beams
Independent visibility control for revision clouds and revision tags
Monday, August 28, 2006
Revit 9.1 and Structure 4, SURPRISE!
Wow, that was quick. Here's what Autodesk is saying about this release coming out tomorrow (in Canada anyway):
The Revit Building 9.1 products deliver the best possible information for decision making by increasing support for interoperability and enhancing coordination and quality, while optimizing workflow across the Autodesk Revit product suite. (this is an interchangeable blurb Autodesk uses when it a. doesn't have anything to report b. doesn't want us to know.)
Revit Structure 4 contains many new modeling features, pre-cast concrete and steel content, analytical tools and enhancements for reinforced concrete documentation. Of particular note are the TrussWizard (available only to Subscription customers) and the one-click beam system creation feature. (sound interesting)
Thursday, August 24, 2006
Tell Autodesk how to improve Revit
Just saw this on AUGI, it's a site that helps get our wishlist items onto the next release.
http://www.revitcc.com
http://www.revitcc.com
Tuesday, August 22, 2006
Revit Structure - Book Review
Autodesk Revit Structure 3 - Essentials
Autodesk Official Training Courseware
My Impression:
This is a very good introduction to Revit Structure. The book comes with a CD that contains example projects and tutorials along with a second CD with a full working copy of Revit Structure 3. The course can been done on-screen or by reading the book. All of the examples work and are somewhat realistic. The explanatory text is well written and gives some basic background into structural design.
Residential Revit - Book Review
Residential Design using Autodesk Revit Building 9
Author: Daniel John Stine
SDC Publcations
My Impression:
Some instructional books try to please everybody and become too generic. That's definitely not the case with this one. The basics of Revit are applied to imperial unit based, wood frame residential techniques of most of the USA and Canada. The narrative is conversational and easy to understand but needs a good editor and spell checker. I like the large print and diagrams. The approach is to take one project from preliminary drawings to working drawings, details and renderings etc. All of the essentials are covered but nothing really in-depth. This book will help the residential designer or student get up to speed fast with Revit but needs to be followed up with an advanced version.
Friday, July 28, 2006
Revit Books-Reviews
The list of Revit instructional books is growing as Revit is steadily being adopted as the industry standard. Each book seems to have it's strength and it might be necessary to have a couple on-hand.
Mastering Autodesk Building
Author: Paul F. Aubin
Thomspson Delmar Learning/Autodesk Press
My Impression:
Overall, this is a very comprehensive book although I would have to say that the name is misleading. It gives the impression that if you read this book you will master Revit. Not so, there's nothing on rendering or creating camera views and very little is said about materials. In-depth tutorials and explanations are given for most of the main topics and example files are provided on a companion CD. It's over 700 pages so get ready for a lot of reading.

Introduction to Commercial Design Using Autodesk Revit Building 9
Author: Daniel John Stine
SDC Publcations
My Impression:
As an introduction, this is a good start. The reader is taken through a very basic project to demonstrate the funamental tools and what Revit is capable of. There are lots of architectural drafting explanations as to why Revit behaves the way it does. You will finish this book learning the basics and wanting to learn more.

Mastering Autodesk Building
Author: Paul F. Aubin
Thomspson Delmar Learning/Autodesk Press
My Impression:
Overall, this is a very comprehensive book although I would have to say that the name is misleading. It gives the impression that if you read this book you will master Revit. Not so, there's nothing on rendering or creating camera views and very little is said about materials. In-depth tutorials and explanations are given for most of the main topics and example files are provided on a companion CD. It's over 700 pages so get ready for a lot of reading.
Introduction to Commercial Design Using Autodesk Revit Building 9
Author: Daniel John Stine
SDC Publcations
My Impression:
As an introduction, this is a good start. The reader is taken through a very basic project to demonstrate the funamental tools and what Revit is capable of. There are lots of architectural drafting explanations as to why Revit behaves the way it does. You will finish this book learning the basics and wanting to learn more.
Friday, July 14, 2006
Section Bubbles disappear
Problem: When you change scales in a view the section marks disappear.
This is a setting in the properties of the section mark. This is intended to prevent HUGE section marks at scales like 1:1000 or 1/64"=1'-0". Here's how to change that parameter:
1. Click on section mark
2. Open Properties
3. change the 'Hide at scales coarser than' parameter
This applies to one section annotation at a time.
Tuesday, July 11, 2006
View Levels or Sections in 3D
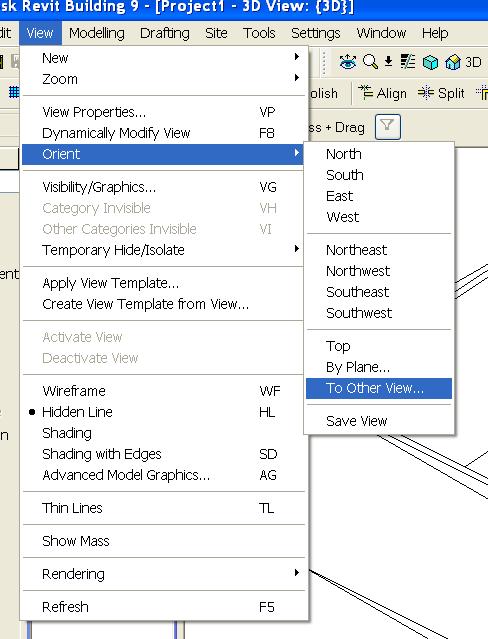
Let's pretend that you have a 20 storey building and you only want to show level 3 in a 3D isometric view. Or you want to make an axonometric projection of each floor. Or you want to see a 3D version of a 2D section. How do you do this? You could use the Section Box feature alone but sometimes it can be slow, depending on the model. And this is not always precise. Here's an alternative:
1. Go to a 3D view
2. Turn on Section Box (this is automatic, see comments)
3. Pulldown menu View-Orient-To Other View
4. Choose one of your Levels or Sections
Your 3D view will look like it turned 2D, but it didn't. If you use the View-Orient-Northeast tool you will see the results. You could also use the Spin tool.
If you want this to be an axonometric than you will need to do this for each floor and then drag and drop them onto a sheet.
Monday, July 10, 2006
Revit Content Wishlist!
Please take this opportunity to submit your content wishlist items. As an example ; more steel sections, or more furniture etc. I can assure you that every entry will be seriously considered!...
You can comment on this thread or just email me your list :jpoldingATcadmicroDOTcom
You can comment on this thread or just email me your list :jpoldingATcadmicroDOTcom
Monday, June 12, 2006
Green Autodesk?
Autodesk has launched a green building website with some interesting information. www.autodesk-centers.com/green/
They've also sponsored an in-depth PBS documentary about the subject featuring Brad Pitt as narrator. This is also available to be downloaded as audio or video/audio.
www.design-e2.com/
They've also sponsored an in-depth PBS documentary about the subject featuring Brad Pitt as narrator. This is also available to be downloaded as audio or video/audio.
www.design-e2.com/
Tuesday, June 06, 2006
Architecture Competition-Importing Sketchup
Use Google Sketchup, Google Earth and Revit (OF COURSE) to design one of three projects.
Here's the competition site:
www.lineofsite.info
Let's show them how Revit can really kick it up a notch!
- Everest Base Camp
- UNDP World Waters Embassy
- Thames Opera House
Here's the competition site:
www.lineofsite.info
Let's show them how Revit can really kick it up a notch!
Friday, June 02, 2006
Revit Builds
Revit is in ongoing development. The developers read the forums at AUGI.com and respond to bug reports etc. These builds are not advertised as thoroughly as they should be. That means that as users we should keep an eye on the Revit forum at AUGI.com because that is usually where it's posted first. The builds are coded so we know which one is the latest. You can find out what version you have by going to Help-About Autodesk Revit. Build 20060518_2300 has just come out and addresses mainly area plan calculations; there is a full discussion of this topic here http://forums.augi.com/showthread.php?t=38578.
Tuesday, May 30, 2006
New Revit Blogs
Here's an interesting blog to keep an eye on. How Revit relates to environmentally friendly design and building. Welcome to the Revit blogsphere Brad!
Green Revit-Brad Hartnagle
http://greenrevit.blogspot.com/
Another jem by Steve Stafford, this blog lists firms that use Revit.
http://www.revitinside.com/
Green Revit-Brad Hartnagle
http://greenrevit.blogspot.com/
Another jem by Steve Stafford, this blog lists firms that use Revit.
http://www.revitinside.com/
Wednesday, May 24, 2006
Rendering Survey
I just saw a link to a rendering with Revit survey on Steve Stafford's blog. (I have a link to his site- RevitOpEd.) This will help Autodesk decide on what rendering engine people want inside Revit. It's only good for 2 more days, May 26.
Friday, May 19, 2006
Walls that keep on going...
Walls in Revit are designed to automatically join when they get within a close distance. This is usually a good thing except when you don't want them to join, then it can be frustrating. Here how to override this:
1. Drag the wall end back from any other walls.
(please see comments for a better step 1. Thank you commentators!)
2. Click on 'Edit Wall Joins' tool.
3. Click on the end that you don't want to join.
4. Click on 'Disallow Joins' in the options bar.
5. Move the wall back into position (it won't recognize the other walls)
The 'Edit Cut Profile' tool is useful when used in combination with this technique. (We'll talk about that tool another time.)
Tuesday, May 02, 2006
Find and Replace Text
This tool is found in most Windows based products and is conspicuously absent in Revit. Here's a link to a function that Danny Polkinhorn put together. I've tested it and it works.
http://forums.augi.com/showthread.php?t=30343
http://forums.augi.com/showthread.php?t=30343
Revit 9 Build
Hold off on installing Revit 9 until this Thursday. Autodesk has found a few bugs and is making a build. They said that they will be done sometime on Wednesday, May 3. I'll repost if this date changes.
Friday, April 21, 2006
Happy 13,000th viewer
Sorry, there's no prize. Just a 'thanks for visiting my blog'. The quantity of visits astounds me and leads me to believe that Revit is truly taking hold and fast. Blogs have accelerated this wave because they're a place for honest opinions and views, even if those views and opinions change over time. They also help document an opinion at a given time showing the progress (I hope) of Revit. Thanks again for visiting and stay tuned for further personal perspectives of this revolutionary tool.
Friday, April 07, 2006
What's New in Revit 9?
There are a few nice things. It seems this release is what some would call "evolution" not "revolution". That is not necessarily a bad thing, especially for software that is being adopted as fast as this one. The modifications that I like are:
-shadow studies
-improved control of linked files
-more coordination of room and area objects
Things I’d like to see in version 10 would be:
1. 64 bit
2. Updated and streamlined interface
3. Ironing out existing bugs (found on the AUGI.com wish list)
-shadow studies
-improved control of linked files
-more coordination of room and area objects
Things I’d like to see in version 10 would be:
1. 64 bit
2. Updated and streamlined interface
3. Ironing out existing bugs (found on the AUGI.com wish list)
Thursday, March 30, 2006
Custom Lines (fence line)
You want to draw lines that have other shapes in them eg. --x--x--x--x or --o--o--o--o. These are sometimes used to define a fence. This has to be done with a 'repeating detail'. Here's how:
1. Make a family using the 'detail component' template. This will be the lines and shapes you want to repeat.
2. Load into project.
3. Go to the drafting toolbar. Choose Repeating Detail. Click on properties. Edit/New. Choose the new detail component family as the "Detail". You can set other things like spacing and rotation.
4. Start drawing the repeating detail as if it's a line. This "linetype" can be imported/exported using the "transfer project standards" tool. (I've blogged this as well under "Importing Wall Styles".)
Tuesday, March 21, 2006
Exporting to 3D DWF
Email your clients a 3D model that they can spin, zoom, filter components etc. Just go to a 3D view and choose File-Export DWF-3D DWF...
This will create a tiny file that you can email. Here's the link to the writer:
http://usa.autodesk.com/adsk/servlet/index?id=6101824&siteID=123112
Here's the link to the viewer:
http://usa.autodesk.com/adsk/servlet/index?siteID=123112&id=6101821
This will create a tiny file that you can email. Here's the link to the writer:
http://usa.autodesk.com/adsk/servlet/index?id=6101824&siteID=123112
Here's the link to the viewer:
http://usa.autodesk.com/adsk/servlet/index?siteID=123112&id=6101821
Importing Wall Styles
So you know how to load a door family but how about other things like wall styles or maybe text styles? Here's how:
1. Open an existing project (we'll call it project A) that contains the styles you want.
2. Open a the project that you want the styles imported into (project B).
3. While project B is open go to File-Transfer Project Standards...
4. A list will appear with all the styles that you want (from project A). Simply check the ones you want and press OK.
Thursday, March 16, 2006
Line Styles in Family Editor
Line Styles are not available in the Family Editor.
To make your own, you need to go Settings-Object Styles-New (button). You can make a style and apply any of the line patterns to it.
To make your own, you need to go Settings-Object Styles-New (button). You can make a style and apply any of the line patterns to it.
Friday, March 10, 2006
Revit Annotations..continued
Schedule Text
How could I forget? The schedule text style is controlled in the PROJECT (.rvt) and more specifically in the view properties of the individual schedule. Right click in the schedule view and choose ‘view properties’ then ‘appearance’. You can select the fonts, sizes etc. You’ll see the changes only when the schedule is dropped onto a sheet. (The font’s etc will not show in the schedule view only on a sheet.)
Titleblock Text
Titleblocks are a FAMILY. The text inside of a family is controlled within that family. Its styles do not automatically get imported into the project.
Monday, March 06, 2006
How to Fillet in Revit
Watch the video...
I can trim, offset and align but where's fillet?
Fillet is used with a 'draw' tool like line or wall. Here's how to put a radius on the corner of walls;
Start the wall tool and choose fillet arc from the dropdown list.
Pick the two corner walls and draw a preliminary arc.
Pick the arc and adjust the radius by typing the number in the dimension.
Friday, February 24, 2006
Revit Annotations
Why doesn't the Level Head text change when I change the text style?!!
Why doesn't the Section Head text change when I change the text style?!!
Where do I change the boundary line of the callout?!!
Many are confused by this. So I'm going to try and explain in plain English. Some annotations are controlled in the Project file (.RVT) that you're drawing the model in. Others are controlled partially in a separate Family file (.RFA). When they have a FAMILY FILE involved you will have to load (File-Load From Library-Family) it into your PROJECT FILE. I'll specify in the following explanations.
Text Style: Controlled in the PROJECT FILE.
This is only for the notes and titles. You do this by editing an existing instance into your new style.
Dimension Style: Controlled in the PROJECT FILE.
These are made from the Settings-Annotation drop down menu. You can also duplicate and edit an existing dimension. The text style for the dimensions is controlled from the dimension style editor.
Level Head: Controlled in a FAMILY FILE and the PROJECT FILE.
This is an Annotation Family. You have to open it and edit the text inside the family. To find the file name of the family you want to edit; click on a level-properties-Edit/New-Other-Level Head (you just have to write it down or memorize it). The level linetype is controlled in the PROJECT FILE by clicking Properties-Edit/New-Line Pattern.
Grid Head: Controlled in a FAMILY FILE and the PROJECT FILE.
The same as Level Head. The grid linetype is controlled in the PROJECT FILE by clicking Properties-Edit/New-Line Pattern.
Section Bubble: Controlled in a FAMILY FILE and the PROJECT FILE.
Again, these are an Annotation Family. They consist of two families which have to be edited separately. One would be the bubble and one would be the tick mark at the other end. The section linetype is controlled in the PROJECT FILE through Object Styles-Annotation-Section Line.
Callout Bubble: Controlled in a FAMILY FILE and the PROJECT FILE.
These are similar to Section tags but only have one family. The callout boundary line is controlled in the PROJECT FILE through Object Styles-Annotation-Callout Boundary.
Elevation Bubble: Controlled in the PROJECT FILE.
The Settings dropdown menu-Elevation Tags and edit away.
Annotations should be setup in your template file (.RTE).
Monday, February 20, 2006
The 3 Gb Switch Caution
Earlier, I posted the link to the "3 Gb switch" how-to site. It has just come to my attention that this should not be performed when using a video card with 512 mb of RAM.
The reason is that the video card requires double the amount of RAM it has (512 Mb x 2=1Gb) from Windows XP. So with 2 Gb used for Revit and 1 Gb used for Windows that leaves 0 Gb available for the video card. Not good.
64 bit computing won't come too soon in my opinion!
The reason is that the video card requires double the amount of RAM it has (512 Mb x 2=1Gb) from Windows XP. So with 2 Gb used for Revit and 1 Gb used for Windows that leaves 0 Gb available for the video card. Not good.
64 bit computing won't come too soon in my opinion!
Tuesday, February 14, 2006
Revit Websites
Hundreds of architects from around the world discuss Revit issues here: www.augi.com
Download "families" (similar to blocks) from this site: www.revitcity.com
Here's a great Revit blog for the advanced user: Revit OpEd
A service for LEED calcs for Revit Models: http://www.greenbuildingstudio.com/About.aspx
I'll add more links in the future.
Download "families" (similar to blocks) from this site: www.revitcity.com
Here's a great Revit blog for the advanced user: Revit OpEd
A service for LEED calcs for Revit Models: http://www.greenbuildingstudio.com/About.aspx
I'll add more links in the future.
Time to Learn Revit
Here are some questions to ask yourself when considering learning Revit:
1. How well do I know how buildings are constructed?
2. Do I have any experience with CAD in general?
3. Do I have Microsoft Windows experience?
If you said yes to the previous questions consider this path:
1. Do the "Getting Started" tutorials under the Revit Help menu.
2. Take minimum 4 days of instructor lead fundamentals training.
3. Register with http://www.augi.com/ where hundreds of architects discuss Revit issues.
4. Start a project ASAP! You won't be disappointed.
Within 3 months you will be comfortable and starting to gain some serious productivity. If you don't take training it could take up to 6 months.
Thursday, February 02, 2006
The Revit Team
Many wonder how a Revit Team could go together. I would argue that the team members already exist with one or two exceptions. Some or these roles would bleed together naturally. Here's how it could go:
Design and drafting
Know how buildings go together and have a broad knowledge of Revit. Should also know what a construction document set looks like. (DUH!)
Family and styles maker
Feed the design/drafting team with custom content. Build Families (doors, furniture, fixtures etc.) from the ground up, download Revit Families or adapt from existing AutoCAD Blocks. Deep knowledge of the Family Editor would be needed.
Scheduler and spec writer
Everything in Revit can be quantified. Harness the information and present it for construction docs, estimating, budgeting, LEED certification, accounting etc.
Rendering and post editing
You would be amazed at the quality of presentations that are being done by using two pieces of software; Revit and Illustrator/Corel. Of course by using software like Vue 5, Maxwell Render and VIZ, animations and photorealistic stills can kick it up a notch. BAM!
AutoCAD Coordinator
That's right, AutoCAD. This person would clean up dwgs that come in from consultants. They would coordinate the exported and imported dwgs in the model. And finally they would organize and/or draw fine details that could get imported. You can detail in Revit but for now there's no use in abandoning all of the existing detail content done in AutoCAD.
Revit Worksets
Okay, I'm just going to come out and say it. Worksets are to Revit what Layers are to AutoCAD. Oh, that hurts! But I should add that Layering in AutoCAD has ballooned way beyond what is needed or was intended for. Worksets, on the other hand, seem to be shrinking. More and more is controlled behind the scenes. I've done projects where I didn't even activate Worksets. When working on large scale projects, with a team, worksets will be your best friend. One out of two experts agree that it's a good idea to turn them on right from the get go. It's a bit of a pain to add things to them after the fact. It would be comparable in AutoCAD to drawing everything and trying to make Layers after. Again, ouch! Here are some basic rules for worksets:
Make them general; Envelope, Core, Partitions, Fixtures etc.
You probably will only need 10 or so.
Make a spreadsheet before you start. This will map how the Revit elements will be organized onto Worksets.
Make them general; Envelope, Core, Partitions, Fixtures etc.
You probably will only need 10 or so.
Make a spreadsheet before you start. This will map how the Revit elements will be organized onto Worksets.
Tuesday, January 31, 2006
Printing PDF
Most of the time it works fine. When it doesn't, it usually has something to do with the print quality (DPI) of the PDF writer. This is found under Print-Properties(of the PDF writer)-Advanced-Print Quality. The two common occurences are:
Arcs are looking squared; set the DPI up (try 600).
The final print has streaks, blotches and/or boxes; set the DPI lower, like 300 DPI.
CutePDF is free and seems to work fine, although not better or worse than any others I've tried.
Arcs are looking squared; set the DPI up (try 600).
The final print has streaks, blotches and/or boxes; set the DPI lower, like 300 DPI.
CutePDF is free and seems to work fine, although not better or worse than any others I've tried.
Thursday, January 26, 2006
Revit Hardware
This is likely the number one question asked about Revit. 'What's the best hardware configuration? '
As of today it seems that RAM is the biggest influence on performance. Most video cards that claim to be good for CAD work fine.
Chips are important, here's what to keep in mind; get the fastest good quality chip either by Intel or AMD. Revit rendering will take advantage of dual core. Revit is not 64bit ready but it wouldn't hurt to look at those chip offerings as well.
When you talk RAM you also have to talk Microsoft Windows. Simply stated, only 2 GB are available for any given operation. There are ways to get 3 gigs available to Revit but let's avoid the techno-babble.
Here's how, just in case:
http://www.microsoft.com/whdc/system/platform/server/PAE/PAEmem.mspx
Welcome
About five or six years ago a charismatic guy named Cyril gave my company an online Revit demo. The company didn't go for it but I was hooked.
I hope to share some of the things, good and bad, that I have learned and continue to discover. As you can see from the title I will try to avoid the technobabble.
I hope to share some of the things, good and bad, that I have learned and continue to discover. As you can see from the title I will try to avoid the technobabble.
Subscribe to:
Posts (Atom)


