Issue
Revit 2010 is not able to recover a lost network license when Revit is running. The program switches to Demo mode and any open data files will not be saved.
Solution (well, kind of...)
The files attached will allow Revit 2010 to recover a network license while running. If, after a 2 hour grace period, a network license is not found, Revit 2010 will display a dialog with the options to Save As & Exit or Exit. The user will not encounter Demo mode at anytime during this process.
more...
http://usa.autodesk.com/adsk/servlet/ps/dl/item?siteID=123112&id=14309812&linkID=9243099
Friday, February 05, 2010
BIM Cloud Computing
Steve Staffords blog referred to this great article on cloud computing with Revit....
http://www.aecbytes.com/feature/2010/BIM_Cloud.html
http://www.aecbytes.com/feature/2010/BIM_Cloud.html
Tuesday, February 02, 2010
Ontario Revit Users Group Feb.3, 2010
We are really excited about 2010 at the Ontario Revit Users Group. Response to the 2010 Syllabus has been overwhelming.
John Peterson, a project architect with KPMB, has designed an exciting ORUG syllabus based on the design process and leveraging the information inherent to a Revit model. This series will consist of four meetings that will take us on a journey through the ups and downs of idealized proposals and real Revit projects
We will travel from the initial sketches to a robust, coordinated BIM model. Along the way we will cover important side ventures into Green Model analysis, cost estimating, Revit Structure and MEP coordination, Family creation, hardware optimization and Worksets.
Invitation:
http://ontariorevit.blogspot.com/2010/01/orug-meeting-feb-3-2010-new-syllabus.html
Keep an eye on the ORUG.ca blog for the post-meeting article.
Monday, February 01, 2010
AutoCAD File 2 Miles Across
If you're getting this error check the following:
In AutoCAD:
-zoom extents, delete any extraneous points or objects. Do this in plan and elevation views. Objects in the Z plane which are 2 miles away can also cause problems.
-confirm what the units are (we will need this when importing into Revit)
-make sure the that the entire drawing is not too far from the origin-0,0,0. You can move the drawing to 0,0,0 if needed with the move command.
In Revit:
Before you import make sure that you choose the correct import units.
As a side note. When importing site plans it may be a good idea to import the contours separate from the site plan lines. This is because the contours are usually at a proper sea elevation and site elevation while the the other site lines are at 0. You can isolate the contours layer and wblock it.
Here's some additional info and links on Steve Stafford's blog...
http://revitoped.blogspot.com/2010/02/revit-and-2-mile-limit.html
Thursday, January 28, 2010
Revit FAQ
Here's a great post by Chris Price on the most asked questions of Revit. It's a few years old but most of the questions still remain relavent...
http://blog.cadway.com.au/2005/11/frequently-asked-questions.html
http://blog.cadway.com.au/2005/11/frequently-asked-questions.html
Curtain Wall Glass Corner - No Corner Mullion

You may have noticed that Revit curtain wall corners don't trim or clean up very well. While you are able to replace the end mullions with one of the corner mullions there is still no option for a glass butt-joint panel. So there's a workaround...
Make a Wall Type called 'Glass Panel'
Make a Wall Type called 'Glass Panel'
Edit the structure to be the desired thickness of your glass.
Set the material to 'Glass'.

On the Curtain Wall:

On the Curtain Wall:
Tab to select the corner panels and replace them with the wall type 'Glass Panel'. (You may need to unpin them first.)
Delete the vertical mullions on the corner. (You may need to unpin them first.)

Wednesday, December 09, 2009
Grid Bubble with Other Information
Let's say that your would like a Grid Bubble to show both the grid name and something else. Here's how to do it...
You will need to make a custom Grid Head family with the lines and circles desired using the grid family template.
You can add two labels, the Grid Number and a custom parameter. You will also have to make a ‘Shared Parameter’ for year or phase, or both.
Then you will load that family into the project and apply it to the System Grid family.
You will also need to add the Shared Parameter to the Project Parameters. Then you will be able to type the year or phase into the grid.
Monday, November 09, 2009
Revit Structure - Missing Columns - Graphical Column Schedule
Thank You Steve Stafford, Revit OPED for documenting this:
If columns are not showing on your column schedules make sure the columns are intersecting with grids and Levels.
http://revitoped.blogspot.com/2009/05/revit-structure-missing-columns.html
If columns are not showing on your column schedules make sure the columns are intersecting with grids and Levels.
http://revitoped.blogspot.com/2009/05/revit-structure-missing-columns.html
Thursday, November 05, 2009
Revit Wish List
'Wishes will be collected three times per year; the top 10 wishes from each cycle will be sent on to the development teams at Autodesk. After each cycle the wish list starts anew to ensure that the wishes are current. The top wishes from the year will be presented to Autodesk in person at Autodesk University.'
'These wishes can only be considered for Revit 2012 and beyond...'
Here's the link...
http://augi.com/revit/ballot.asp
'These wishes can only be considered for Revit 2012 and beyond...'
Here's the link...
http://augi.com/revit/ballot.asp
Wednesday, October 28, 2009
Visibility issues, Volume 1
Visibility Issues are among the most common issues with Revit. These can usually be chalked up to the following...
Category is turned off in the view
Object Graphics or Visibility overridden (ie., set as transparent, turned off)
View Range
Plan Regions
Worksets (turned off in Visibility Overrides)
Design Options
Phases
Object being blocked by another (like a floor slab)
View Properties-Discipline(21-May-10)
Worksharing:
Keep in mind that when working in a team environment (Worksharing) others may be editing your settings without you knowing. One way to mitigate this is by making some initialed views, especially when it comes to the overall 3D and Section Box views. Another common solution is to yell at the people who are doing this.
Wednesday, October 21, 2009
New Revit Release Now...
Subscription Advantage Pack for Autodesk Revit Architecture 2010
The Autodesk® Subscription Advantage Pack for Autodesk® Revit® Architecture 2010 extends the capabilities of Autodesk® Revit® Architecture 2010 software. Productivity-enhancing functionality and features better support modeling, coordination, and documentation, while improved tools help you work more efficiently within the software.
Watch this to see what it's all about...
http://www.subscriptionvideos.com/subscription_rac_video.html
Monday, October 19, 2009
Revit Standards - File Path Locations
You can set up standard locations for file paths to standard Families and Templates in the following way. You will need to do this at each workstation if Revit has been installed.
-Go to: Application 'R' menu
-Options
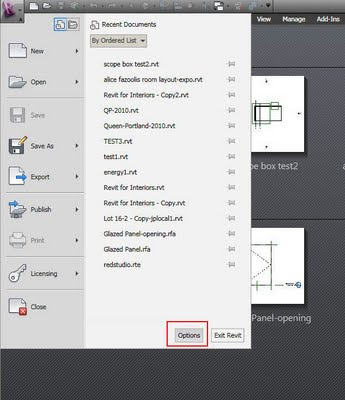
-File Locations
-Places
-Add the name of the location and then browse.
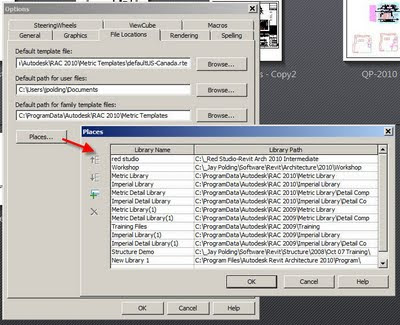
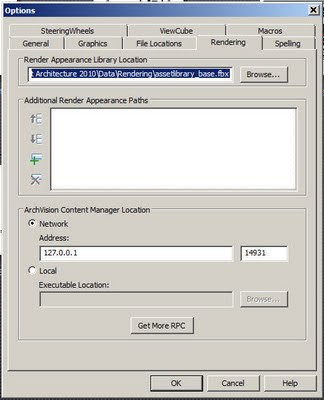
I don't recommend pointing your rendering library off the local machines. This will cause a serious slowdown in rendering times.
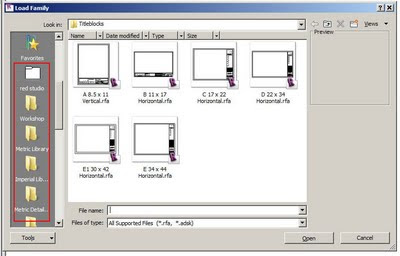
The locations will then be available on the left-hand side of 'load' and 'open' dialog boxes.
-Go to: Application 'R' menu
-Options

-File Locations
-Places
-Add the name of the location and then browse.

I don't recommend pointing your rendering library off the local machines. This will cause a serious slowdown in rendering times.

The locations will then be available on the left-hand side of 'load' and 'open' dialog boxes.

Monday, October 05, 2009
Revit Arch 2010 Structural Slab Span Symbol
The Revit Architecture 2010 Help files describe how a Structural Slab can be added along with a Span Direction Symbol. Autodesk has confirmed that this is an error in both the Help file and Structural Slab tool. Some Revit Structure files got into the Revit Arch Help files. They said that this will be addressed in the 2011 version. Although they didn't elaborate they will probably remove the reference out of the help files and removing the Structural Slab tool altogether from RAC.
Showing Beams Above in Revit Architecture
Here are some facts that may help in explaining how to show beams which are above:
Floorlan views only look down.
Ceiling Plan views only look up.
The linetype called Overheadis just a standard linetype like 'Hidden' or 'Thin Lines'. Revit will not detect things overhead.
The 'Top Range' of the View Range dialog box is only there to establish how high the 'Cut Plan' can go. Again, Revit will not detect things overhead.
The 'Structural' View Templates set the View Range a little lower but still will not show overhead lines automatically. It will also change the look of the beam lines.
So, here's one workaround:
1. Make a Beam Line Style...
Manage-Settings-Line Styles-Modify Subcategories-New-Call it Overhead Beams-Set the Line Pattern and Line Weight as desired.
2. Temporarily set View Range...
View Properties-View Range-Top Range-Set it above your beam height-Cut Plan-Set it above your beam height.
3. Temporarily change your Detail Level to Fine. This is so you can see the 3D beams.
Floorlan views only look down.
Ceiling Plan views only look up.
The linetype called Overhead
The 'Top Range' of the View Range dialog box is only there to establish how high the 'Cut Plan' can go. Again, Revit will not detect things overhead.
The 'Structural' View Templates set the View Range a little lower but still will not show overhead lines automatically. It will also change the look of the beam lines.
So, here's one workaround:
1. Make a Beam Line Style...
Manage-Settings-Line Styles-Modify Subcategories-New-Call it Overhead Beams-Set the Line Pattern and Line Weight as desired.
2. Temporarily set View Range...
View Properties-View Range-Top Range-Set it above your beam height-Cut Plan-Set it above your beam height.
3. Temporarily change your Detail Level to Fine. This is so you can see the 3D beams.
4. Use the Annotate-Detail Line Tool to draw a line beside the 3D beam using the 'Overhead Beams' Line Style.
5. Use the Align tool to align your line to the middle of the 3D beam. Click the Lock so it is closed.
6. Change your View Range back to normal.
This will line will stay (mostly) connected with the 3D beam. This technique can be used for balconies above, floorplates above, roof overhangs etc.
Please note that there is a bug involving sloping beams and beam systems showing up even when above. Autodesk will be fixing this so I wouldn't use it.
Thursday, September 24, 2009
Autodesk SketchBook Mobile
Saw this on David Lights blog...
Available for 2.99 on the App Store. Is this possibly the cheapest of Autodesk's software?
Autodesk SketchBook Mobile
The Autodesk® SketchBook® Mobile painting and drawing application extends your digital sketchpad to your Apple® iPhone® or Apple iPod touch®. With the same paint engine as Autodesk® SketchBook® Pro software, SketchBook Mobile offers professional-grade painting and drawing tools in a streamlined and intuitive user interface. Use it to digitally capture your ideas as napkin sketches or produce artwork on-the-go.
Website:
http://usa.autodesk.com/adsk/servlet/item?siteID=123112&id=13872203
Video
http://www.youtube.com/watch?v=YwYm5YhA0pQ
Thursday, September 10, 2009
Oh, and by the way...Reinstalling Revit and Plugins
When you reinstall Revit you have to reinstall all of the plugins and in some cases reauthorize them. I wish we could do something about this for the sake of the CAD/BIM Managers out there. This is an issue that Autodesk needs to address as they release one official version and at least two bug-fix versions per year.
Monday, August 31, 2009
Error Importing Sketchup into Revit 2010
I was about to show the great 'import Sketchup' feature to a client when all of a sudden I got the error 'Unable to Import Sketchup'. 'It does it, trust me, really.'
This is a issue is known by Autodesk and they are working to resolve it. In the meantime the only way to fix it is to reinstall.
This is a issue is known by Autodesk and they are working to resolve it. In the meantime the only way to fix it is to reinstall.
Monday, August 24, 2009
Imported 3D AutoCAD not Sectioning
Problem:
A 3D AutoCAD file imported into Revit is not cutting when sectioned.
Solution:
The AutoCAD file first needs to be imported into a Family.
You have options:
1. Start the In-Place Mass command and then import the AutoCAD file. This option works well for large, one time imports like surrounding buildings etc. (use the same method for Sketchup files.)
2. Start a Family based upon a Family Template of your choice (ie. specialty equipment) then import the AutoCAD. Load this Family into your Project. This option works well for creating a quick 3D Family with existing 3D CAD geometry.
Thursday, August 13, 2009
Room Object Not Placed
Have you ever deleted a Room Object and you get a 'deleted but still in project' message? This is a good time-saving feature. Let's say that you build schools, it's a given that you will need the following rooms; Bathroom, Janitor and my favourite, THE Office.
You can pre-make these in your template. When you go to place a Room Object look in the Options Bar (pictured) and drop down the Room list. You have saved yourself from typing the room name and perhaps other important parameters.

More about Room Objects in Schedules here.
You can pre-make these in your template. When you go to place a Room Object look in the Options Bar (pictured) and drop down the Room list. You have saved yourself from typing the room name and perhaps other important parameters.

More about Room Objects in Schedules here.
Thursday, August 06, 2009
Nested Window Visibility with Wall Healing
This one is hard to explain in plain English. Here's the scenario...
Door family with nested window families as sidelights.
Visibility parameter applied to the windows for left and right options.
When inserted into a wall (in a project file -.rvt) checking the sidelights on and off will not leave a hole where the window was. Rather, the wall will 'heal'.

The key is this:
In the window family
Category and Parameters, Shared (check box) is checked.

Thanks to Jeff Steinhauer from the AUGI forum for helping me on this one...
http://forums.augi.com/showthread.php?p=998259#post998259
Subscribe to:
Posts (Atom)


