Thursday, August 05, 2010

Better Way of Importing CAD into Revit-Continued

Here's a valued opinion to my previous post.


Andre from BIMSolutions....


Yes, this is the best approach so far. The reason I have been using this method initially was not even related to speed but to end with a problem that I faced back in 2007. At that time I had a team using Revit and another using CAD in a sort of hybrid project. I had CAD files linked directly into the Revit central file. As the CAD users kept updating their CAD files, the central file would see the changes exactly as if someone was working directly in the central file. When a local file tried to save to central, a warning would pop up saying that the central file had changes in more than shared coordinates and could invalidate the local file... To solve that, I first use this method: Xref the CAD files into a blank CAD file which was then linked into the central file. This worked well because the changes were now being done in the CAD file A which was Xref'd into CAD file B. Because no one opened or saved CAD file B, the central file wouldn't be affected and still show the changes.

Then later, with improvements on how to manage Revit linked files, I started to use this option you are suggesting and I'm happy with it so far. Just more management since before I could control layers of the CAD files directly in the main model and now I have to unload the linked file, open it to do the changes and then load it back... Also, letting the team know that trying to delete one line of the CAD files will delete all CAD files, since it is all one link... (Another tip is to create a design option and put your Revit link there. People won't even be able to select it and accidentally move or delete it, unless they know how to edit design options or realize they have to uncheck that option "Exclude Options" at the bottom of the screen...)

Anyway, the same approach can be used with elements like furniture: link your main Revit file into a blank file and add the furniture there. Then link the furniture file back into your main model. No need to carry furniture in your main model...

By the way, for the linked CAD files, the only way to make this work is to show the link by linked view. Also, all this works with 2D CAD files. I tried once with a 3D CAD file and wasn't successful making it to work.


Andre Carvalho

Vice President - Implementation Strategies


b i m s o l u t i o n s inc.
Building Information Modeling · Integrated Project Delivery

15 Polson Street · Toronto, ON · M5A 1A4
Phone: 1 (800) 413.7992 · Cell: 1 (647) 378.2728

E-mail: acarvalho@bimsolutions.ca


Better Way of Importing CAD into Revit

As most experienced Revit users know, importing CAD files into Revit can sometimes cause problems. Why? Because many CAD files are not properly made and contain errors, extra info, links of their own etc. While doing some prep work on the CAD files is good, it doesn't eliminate the problems.

I extracted the following nugget from the new Mastering Autodesk Revit Architecture 2011, known lovingly as MARA to some. Paraphrasing 'One way to manage many CAD references in larger projects is to create a separate Revit project containing only the linked data.' You will probably need to use the Visibility/Graphics override in order to see the CAD file in question but still, awesome. I can admit that I haven't done this in practice so let me know what you think...

Tuesday, July 27, 2010

Revit 2010 Crashing on Startup

I found another thread about Revit Crashing on Startup which can be found below.

http://forums.autodesk.com/t5/Autodesk-Revit-Structure/Random-Crashes-in-Revit-2010/m-p/2582907

Is Revit crashing on startup?

If so, you may want to look at this thread:
http://discussion.autodesk.com/forums/thread.jspa?threadID=774015
You could try two things:
UI State.dat may be corrupt- More information on this is here:
http://revitclinic.typepad.com/my_weblog/2009/04/revit-2010-ui.html
or here:
http://dorevit.blogspot.com/2010/04/revit-10-crashing-uistatedat.html
Short answer:
To reset the ribbon and Quick Access toolbar, rename or delete the UIState.dat file located in the following folders:

For Windows XP:
%USERPROFILE%\Local Settings\Application Data\Autodesk\Revit\Autodesk Revit Structure 2010

For Windows Vista/ Windows 7:
%LOCALAPPDATA%\Autodesk\Revit\Autodesk Revit Structure 2010

Or a CommCenter file may be corrupt: From the information here:
http://usa.autodesk.com/adsk/servlet/ps/dl/item?siteID=123112&id=15145616&linkID=9243099

This can occur because of a conflict with a Communication Center file. Delete the following file, if present on the workstation at the following location:

Windows XP

Autodesk Revit Structure 2010
c:\Documents and Settings\%USERNAME%\Local Settings\Application Data\Autodesk\Revit\Autodesk Revit Structure 2010\ENU\Components\WebServices\WSCommCntrData.xml

Windows Vista \ Windows 7

Autodesk Revit Structure 2010
C:\Users\%username%\AppData\Local\Autodesk\Revit\Autodesk Revit Structure 2010\ENU\Components\WebServices\WSCommCntrData.xml

Monday, July 26, 2010

Revit Architecture 2011 Certification

Simplicity is great! The official Autodesk Revit Architecture 2011 training guide and exam prep guide is now available in one book:

Mastering Autodesk Revit Architecture 2011 [Paperback]
Eddy Krygiel (Author), Phil Read (Author), James Vandezande (Author)

Here's the Autodesk Exam Preparation Road map pdf.

The book is not yet available in Canada but I have mine on pre-order. Knowing the authors, I'm absolutely sure of their level of skill, detail and commitment. Here's their blog, it's a great read.

Update: Just got mine in the mail, looks good!

Point Known - Laser Measurements into Revit (Revit OPED)

Point the laser, draw a wall in Revit...

This seems like a great solution for building surveying, on-site measuring, as-built measuring or whatever you may call it. I saw this on Steve Stafford's blog http://revitoped.blogspot.com/.
Worth a watch:

Thursday, July 22, 2010

Can't Get Network License Error 15.370.?

Just encountered this issue for a Maya install but it applies to Revit etc. Plus the error was just 15.370.00 not 15.370.36. The fix still worked.

You configured a machine to be a network license server and then installed an Autodesk product on the same machine. When you launch the product, it tries to check out a network license and fails.

On Windows, the FLEXnet Finder dialog displays and, when dismissed, is followed by a license error dialog displaying the error code [-15.570.36]. In the Mac OS, a license error dialog displays the same error code but it does not display a FLEXnet Finder dialog.

This happens on all operating systems where an IPv6 stack is installed.

Solution

The following steps should allow the client to find the server and check out a license file:

Windows:

1. Get the IP address of the machine (by typing “ipconfig” command in a CMD window or by getting it from the LMTOOLS “System setting” tab).
2. Open the hosts file located in C:\Windows\System32\drivers\etc.
3. Add the IP address and hostname to the hosts file, e.g., “111.222.333.444 machine_name”.
4. Save and close the hosts file.


Full Autodesk Doc:
http://usa.autodesk.com/adsk/servlet/ps/dl/item?siteID=123112&id=14077688&linkID=9240697

Mound Shaped Curtain Wall


Because you've always wanted to do this...

I've combined some tools into one, two part, video, as requested:

Mound Shape using Conceptual Massing Tools
Applying a Surface Pattern to a Mass
Creating a 'Curtain Panel Pattern Based' family


Part 1

Part 2

Wednesday, July 21, 2010

Revit 2010 and 2011 Not Getting License

All of the Autodesk 2010 and 2011 products have a propensity of corrupting the cascadeinfo.cas file. This file is directly related to the obtaining of a license from LMTools. We have found that when Revit can't find a license from the server you need to do the following:

WorkAround

The current workaround it to rename/remove the corrupt CascadeInfo.cas file following these steps.

1.
Return any borrowed licenses
2.
Check in any checked out licenses and exit all Autodesk products
3.
Rename or delete the corrupt CascadeInfo.cas

The CascadeInfo.cas file can be found in the following locations:

Windows XP:

C:\Documents and Settings\All Users\Application Data\Autodesk\Adlm

Windows Vista and Windows 7:

C:\ProgramData\Autodesk\Adlm

Mac:

/Library/Application Support/Autodesk/Adlm/.config

Here's the full Autodesk technical document:
http://usa.autodesk.com/adsk/servlet/ps/dl/item?siteID=123112&id=13894457&linkID=9240817

other links:
http://forums.autodesk.com/t5/AutoCAD-2010/autocad-2010-crashes-at-startup/m-p/2523880

http://forums.autodesk.com/t5/Installation-Licensing/Error-5-412-0-Error-4-132-0/m-p/2521683


One word of caution. This may cause your corresponding AutoCAD product to crash on startup. We are looking into this and I will post when I get an answer for this.

Friday, June 04, 2010

IESVE Approved for LEED Canada

This is a good press release from IES. IESVE is a good, solid and trustworthy energy modeler...

IESVE is approved energy simulation software for LEED Canada

Integrated Environmental Solutions (IES) is pleased to let you know that the Virtual Environment (VE) is now an approved energy simulation software for LEED Canada to demonstrate compliance for Energy and Atmosphere (EA) Prerequisite 2 and EA Credit 1.

Take a look at the Canada Green Building Council web site to find out more.

For LEED Canada the energy simulation software program must also meet the requirements for Qualified Software per IRS Notice 2006-52 as amplified by IRS Notice 2008-40, Section 4.

You can access the approved software list which the VE is on at:
http://www1.eere.energy.gov/buildings/qualified_software.html

You can also access the pdf providing details on the VE compliance with the requirements at:
http://apps1.eere.energy.gov/buildings/publications/pdfs/corporate/ns/qs_iesve_v6_1.pdf

IES can review and approve your VE models for LEED Canada
Are you looking for an independent assessor to review and approve your energy models created in the VE? IES can help you.
As an approved Experienced Modeller, Luc Delestrade (Senior Project Consultant at IES) can review energy models prepared in the VE. Based in Vancouver, Luc is a highly experienced energy modeller and building simulation consultant with significant experience in assisting design teams to achieve their low energy targets.
Contact Luc to find out how he can help.
Email luc.delestrade@iesve.com
Call+1 (604) 561 4842

Template Change

Just wanted to let my reader know that I changed my blog template. If http://www.architecture-tech.com/ can do it, so can I.

Thanks for reading, Bob. See you at darts.

Monday, May 31, 2010

Revit PCP Files

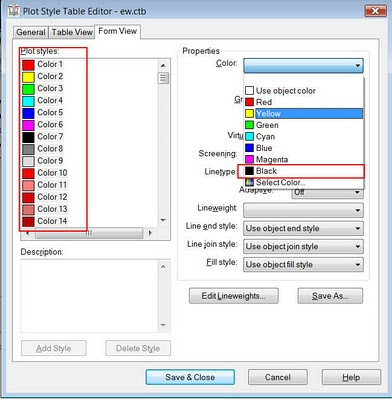
When converted to a ctb, pcp files do NOT involve the colour. You will need to set this to black. Here's an explanation...


When exporting a Revit file to AutoCAD a 'pcp' file is created in the same folder of the 'dwg'. This file is intended to duplicate the lineweight of the Revit file in the AutoCAD file. You will need to convert the pcp file to a ctb file in AutoCAD.
-You can do this by using the Print-Manage Plot Styles-Add a Plot Style Wizard.
-The Wizard will prompt you for a pcp file as you go.
-Before you finish click on the Plot Style Table Editor button.
-Then go to Form View. Select all of the colours (listed as Plot styles). Then change their property colour to black.

Tuesday, May 18, 2010

AU2010 Presentation Voting

Autodesk University Class Voting

Go to Architecture Power Track
I have submitted two presentations for this year:

2840
Revit Residential Survival Guide
Lecture
Polding, Jay

8173
Design Your Own Adventure: Integrating Energy and Cost Analysis into Revit
Lecture
Polding, Jay

Walls Disappearing

Here's the scenario...You have a wall which can be seen in 3D, section and elevation but not in plan. You have confirmed the usual visibility issues are not to blame.

It could be a corrupt Plan Region. Look around the wall in question, find the Plan Region and delete it. How do you know which one is corrupt...trial and error. Autodesk development is aware of this bug and is working on it.

Thursday, May 13, 2010

Common Installation and Licensing Troubleshooting

Video: Troubleshooting Revit Install and Licensing Issues

http://usa.autodesk.com/adsk/servlet/ps/dl/item?siteID=123112&id=14878060&linkID=9243182

Video: Troubleshooting Common Install Problems

http://usa.autodesk.com/adsk/servlet/ps/dl/item?siteID=123112&id=14868637&linkID=9240697

Video: Network Installation (doesn't include LMTools or license file acquisition)
http://www.youtube.com/watch?v=QDOwkw4VMU0

Divisions

Note to self...

PROCUREMENT AND CONTRACTING REQUIREMENTS GROUP:
Division 00 — Procurement and Contracting Requirements
SPECIFICATIONS GROUP
General Requirements Subgroup
Division 01 — General Requirements
Facility Construction Subgroup
Division 02 — Existing Conditions
Division 03 — Concrete
Division 04 — Masonry
Division 05 — Metals
Division 06 — Wood, Plastics, and Composites
Division 07 — Thermal and Moisture Protection
Division 08 — Openings
Division 09 — Finishes
Division 10 — Specialties
Division 11 — Equipment
Division 12 — Furnishings
Division 13 — Special Construction
Division 14 — Conveying Equipment
Division 15 — RESERVED FOR FUTURE EXPANSION
Division 16 — RESERVED FOR FUTURE EXPANSION
Facility Services Subgroup:
Division 20 — RESERVED FOR FUTURE EXPANSION
Division 21 — Fire Suppression
Division 22 — Plumbing
Division 23 — Heating Ventilating and Air Conditioning
Division 24 — RESERVED FOR FUTURE EXPANSION
Division 25 — Integrated Automation
Division 26 — Electrical
Division 27 — Communications
Division 28 — Electronic Safety and Security
Division 29 — RESERVED FOR FUTURE EXPANSION
Site and Infrastructure Subgroup:
Division 30 — RESERVED FOR FUTURE EXPANSION
Division 31 — Earthwork
Division 32 — Exterior Improvements
Division 33 — Utilities
Division 34 — Transportation
Division 35 — Waterway and Marine
Division 36 — RESERVED FOR FUTURE EXPANSION
Division 37 — RESERVED FOR FUTURE EXPANSION
Division 38 — RESERVED FOR FUTURE EXPANSION
Division 39 — RESERVED FOR FUTURE EXPANSION
Process Equipment Subgroup:
Division 40 — Process Integration
Division 41 — Material Processing and Handling Equipment
Division 42 — Process Heating, Cooling, and Drying Equipment
Division 43 — Process Gas and Liquid Handling, Purification and Storage Equipment
Division 44 — Pollution Control Equipment
Division 45 — Industry-Specific Manufacturing Equipment
Division 46 — RESERVED FOR FUTURE EXPANSION
Division 47 — RESERVED FOR FUTURE EXPANSION
Division 48 — Electrical Power Generation
Division 49 — RESERVED FOR FUTURE EXPANSION

Tuesday, May 11, 2010

Revit Suite Network License Bumped

This is one of the many possible things that can cause you to not get a network license for a Revit Suite product.

If the CascadeInfo.cas file is corrupt due to a power failure or any reason, cascading functionality will not be available. This issue only applies to network licensed products and does not affect stand-alone licensed products.

WorkAround
The current workaround it to rename/remove the corrupt CascadeInfo.cas file following these steps.
Return any borrowed licenses
Check in any checked out licenses and exit all Autodesk products
Rename or delete the corrupt CascadeInfo.cas

more...
http://usa.autodesk.com/adsk/servlet/ps/dl/item?siteID=123112&id=13894457&linkID=9240617

Monday, May 10, 2010

Hatches and Materials on Blends in Families

Let's say that you have a tapered brick column family. When you apply the brick material, one side is horizontal but the other side is vertical. There are a couple of things that affect this.


Although we would like be able to create a material parameter for this scenario we can't. This is because we cannot rotate hatch which is applied to a family in a project file. Also, when you apply materials/hatches to blends it tends to rotate the model hatch in strange ways.

This means that we need to apply the material to the blend in the family editor and rotate it right there. You will also be able to adjust the coursing. You can pick directly on the hatch line by using the TAB key, then you can use the rotate and move commands as needed.


Families have limited material choices by default. I'm planning on making another post to explain the best way of importing materials into your custom family.

Thursday, May 06, 2010

Revit Wishlist - Just Do it!

There are some really practical suggestions on this year's wishlist. Make sure you vote...

http://www.augi.com/revit/ballot.asp

Lack of site tools wishes makes me wonder if/when Revit Civil will be revealed?

Wednesday, April 21, 2010

Autodesk 2011 Product Launch Event

Hopefully you will be able to attend our May 7th launch event where I will be delivering two presentations. Here's a description of one of them:

Design Your Own Adventure:
Combining Energy and Cost Analysis with Autodesk® Revit® Architecture

Design can be like a ‘Choose Your Own Adventure® ’ book. Wouldn’t it be nice to flip to the ending instead of heading out on a long design detour? When it comes to sustainable design decisions, the earlier they are made, the better. Make informed decisions based on good information. Along with best practices, we need to be armed with accurate data about the building; price, energy usage, appearance etc. One way we can get this information is by using Autodesk® Revit® Architecture, along with programs like Autodesk® Green Building Studio®, the IES Toolkit and SmartBIM QTO. We will examine a scenario where the designer and client are trying to understand the implications of design decisions on price, LEED credits including the LEED Daylight credit, and overall energy usage. We will document the process and provide best practices in using these analysis solutions. Go ahead, flip to the end of the book and design your own adventure!

Autodesk® 2011 Solutions Event
Date & Time: Friday, May 7, 20108:30am - 2:00pm
LocationToronto Congress Centre 650 Dixon RoadToronto, ON M9W 1J1

Click here for the fancy invitation loaded with information...

Autodesk 2011 Product Keys - Revit3D


Thanks to Gregory Arkin for posting this...

2011 Product Keys
Product Key
License Description
237C1 AutoCAD Civil 3D 2011 English, International
240C1 Revit Architecture 2011 English, International
255C1 Revit Structure 2011 English, International
001C1 AutoCAD 2011 English, International
057C1 AutoCAD LT 2011 English, International
129C1 AutoCAD Map 3D 2011 English, International
240C1 Revit Architecture 2011 English, International
507C1 Autodesk Navisworks Manage 2011 English, International
235C1 AutoCAD MEP 2011 English, International
185C1 AutoCAD Architecture 2011 English, International
057C1 AutoCAD LT 2011 Multi-Lang 11
001C1 AutoCAD 2011 Multi-Lang AMER 1
129C1 AutoCAD Map 3D 2011 English, International
128C1 Autodesk 3ds Max 2011 English, International
661C1 Autodesk 3ds Max Entertainment Creation Suite 2011 English, International
660C1 Autodesk Maya Entertainment Creation Suite 2011 English, International
256C1 AutoCAD Revit Structure Suite 2011 English, International
241C1 AutoCAD Revit Architecture Suite 2011 English, International
257C1 AutoCAD Revit MEP Suite 2011 English, International
593C1 Autodesk Ecotect Analysis 2011 English, International
237C1 AutoCAD Civil 3D 2011 English, International

Orbiting and Camera Views

This is a 'heads up' to you if you're working with Revit cameras. If you are doing multiple renderings of the same view I would highly recommend duplicating the camera view for each version. You should also make a duplicate if you plan on orbiting. If you orbit (shift-middle mouse roller-button) while in a camera view it is very difficult to get back to your original vantage point. Undo will not get you back.

Friday, April 16, 2010

Revit Architecture 2011

This looks like a good release. Many wishlist and workaround items were addressed. Thank you, to the Revit team at Autodesk.

Here are a few goodies...

Interface is more consistent and faster
Better control of linked files
Control of Temporary Dimensions size
Align works on Wall tops in 3D
Select All, View or Project
Bullets, Text Box and Leader placement controls
Placeholder sheets and grids for lining up views on sheets
Custom elevation tag
List sheets not in a project on drawing list
Background images in renderings
Repeat last command
Removal of 4 core rendering limit

Here's a comprehensive list...

Thursday, March 11, 2010

Accessing Project Parameters in Multiple Schedules

Thank you Domenic Serravite from IBI Group for discovering this undocumented feature!

You can access Project Information parameters in any schedule. For instance if you want to have a factor(coefficient) that is used in many different schedules and formulas this is the way. We will use unit planning as an example. You will want a Mass object with floor faces to start.

Manage-Project Settings-Project Parameters-Add
Name: Average Unit Size
Group Under: Identity Data
Type of Parameter: Number
Category: Project Information

Manage-Project Settings-Project Information
Fill out the new parameter Average Unit Size to a factor like 1000. This represents 1000 square feet.
Make a Mass Schedule
Include Gross Floor Area
Check the Include Elements in Linked Files box


Drop the list down to display Project Information


Average Unit Size will now be available
Make a calculated value called Number of Units
Put this formula in: Gross Floor Area / 1 SF / Average Unit Size

Now you can control centrally important information from one place. This can be done in Room and Area schedules as well.
Autodesk is aware that this is confusing and will sumbit it to the development team.

Wednesday, March 03, 2010

Coordinates, Base Points, Surveys, Linking and Other Confusing Things - Part 1

If you browse through the forums, blogs, how-to videos and books you will find a wealth of information on the above titled subject. And it's all conflicting. It's just about the most confusing subject you will encounter in Revit. I will now add my voice to the many others. The method I'm proposing can be boiled down to a common point which is graphically represented in all files. You will then line everything else up based upon that.

The architect must set this up BEFORE anything is done in Revit. No modelling, importing, linking, not anything.
Step 1. Set up the AutoCAD
AutoCAD survey drawings usually have 3D contours and 2D drafted information. The 2D stuff is at 0 Z elevation, the 3D is at it's actual height off of Sea Level. The 0,0,0 or Origin can be anywhere and sometimes it relates to something but sometimes not. We will be changing this.
Save as.
Give new name.
Move everything so the 0,0 is at the bottom left (don't adjust the Z). This could be at the property line intersection.
Make sure there is nothing outside of a 10 mile radius sphere from the 0,0,0. That means you will need to take a look in the Z.
Draw a circle on an individual layer at 0,0,0.
Rotate these to Project North. Make sure there is a North Arrow visible.
Break this file into two files, one with 2D plan info and the other with contours. You can use the wblock command or saveas.
Of course, you should audit and purge the AutoCAD file as well.

Step 2. Not in Revit yet...

Get the longitude/latitude information relating to the AutoCAD site file.
Open Google Earth and go to the address. Find the longitude/latitude of the corner of the site that corresponds with the 0,0, write it down.
The Google Plugin also works great as well. It will import the location to Revit's 0,0,0 as well as draw some Reference Planes and bring in a flat image. It will also give you the true north.

Step 3. Revit Architecture

Revit has a 10 mile diameter of where you can draw or even import. You cannot have anything outside of that.

Manage Place and Locations will assign the Longitude/Latitude numbers to your Revit 0,0 (Origin)
Revit 0,0,0 is found by default at the centre of the elevation markers. It's also the default location of the Project Base Point and Survey Base Point. The Revit origin can not be moved.

Make a view called AutoCAD Site Plan.
Import the 2D AutoCAD. Origin to Origin. Current View Only turned on. You cannot change Revit's origin. The origin can be found at the nexus of the elevation markers in plan. This point is dead centre on your screen when you start from a standard Revit Template.
Then Import the 3D AutoCAD Contours, Origin to Origin. Current View Only turned off. You won't see this file yet, it's above your view.
Go to elevation, move the contours down to level 1.
Go to the site plan view.
Confirm that your Survey Base Point(triangle with an x) is at the centre of the circle you drew in AutoCAD.
Click on the Project Base Point (a blue circle with an x). Click in the 'Angle to True North' and type the difference between your project north and the true north. You may have to type a negative in front of the degrees to get the expected results.
The Project Base Point and Survey Base Point will be in the same place. That's fine.
You may also want to draw two Reference Planes based on the centre of the AutoCAD circle which is also the origin. Name them something logical.
Adjust your elevation markers and datums to focus on where your building will be.
Start drawing grids and modelling etc.
Step 4. Other Linked Revit Files...
Start your new Revit Structure or MEP file.Very first thing you do is link the Revit Architecture file (which we just setup) Origin to Origin.
Check that the Z has come in correctly.
Adjust your elevation markers and datums to focus on where your building will be.
Draw Grids and Levels over top of the linked Revit Architecture as needed.
Start drawing grids and modelling etc.
About Exporting back to CAD...
When exporting back to AutoCAD the origins of both AutoCAD and Revit will line up as long as you have used the default location of the Project Base Point.

Monday, March 01, 2010

Book Review: Revit 2010 Family Standards and Best Practices


Revit 2010 Family Standards and Best Practices (Take the Dysfunction Out of Your Families)
By Shawn Zirbes & Integrated Content Solutions, Inc.
205 pages
$79.99
Right on the front cover the book states that ICS is a Premier member for Autodesk Seek. I don't want to start off negative but as of today the content on Autodesk Seek is not something to brag about. http://forums.augi.com/showthread.php?t=108569&highlight=Autodesk+Seek
Autodesk Seek is a good framework for the distribution of content. That's why it's so disappointing that many of the families are useless. But this isn't a review of Autodesk Seek.

This book has lots of good tips, tricks and best practices. The more unique tips are highlighted in red. The MEP connectors section is quite well developed. There are good naming conventions proposed throughout. Family testing methods are explained (makes me wonder if they're used at Autodesk Seek?). In the beginning of the book there are some nice graphic scenarios on Sketch Mode and Masking Regions. It seems that this tales off and some chapters are very sparse. I was looking forward to the formulas chapter but was disappointed to find that it was virtually just cut and pasted from the Revit Families Guide with no extra examples, tips or otherwise. Overall I would say that this book takes the best segments from the Revit Families Guide and Revit Model Content Guide, adds a few extra tips and organizes them into a tidy little pocket guide.

Here's a link to the Amazon page:

Wednesday, February 24, 2010

AntiVirus Software and Revit Worksets

Some people have seen the situation where they can save a file to the server but as soon as they try to make a Central file Revit says 'File Not Saved'. This can be the AntiVirus software blocking it. You will want to make sure that the following file extensions are allowed:
*.rvt
*.rfa
*.rte
*.dat
*.rws
*.slog
When you make a Central File Revit will make a sub-folder with the above listed file extensions. Of course you will always want to make sure full read/write permissions are given to the user.

Tuesday, February 23, 2010

Upcoming BIM Webcast to Explore Integrated Project Delivery

FYI

On Feb. 25, 2010, at 2p.m. (EST), Reed Construction Data will present “Lessons in BIM Adoption: How Integrated Project Delivery Can Work”; a free webcast exploring the benefits and challenges of a collaborative approach to design and construction....

http://www.reedconstructiondata.com/press-releases/press-release/2010/02/upcoming-bim-webcast-to-explore-integrated-project-delivery

Tuesday, February 16, 2010

Sending CAD Files to Background

Sometimes imported CAD files appear in the foreground and you just can't move them back. This can be addressed by the following method:
1. Import the CAD file and make sure that 'Current View Only' is checked.
2. Click on the CAD file. In the Options Bar you will see 'Foreground' or 'Background'.

Monday, February 08, 2010

ORUG Feb3rd Notes

http://ontariorevit.blogspot.com/2010/02/feb-3rd-meeting-notes.html

Pinned Storefront Door Disappears

Make a Storefront Curtain Wall.
'Unpin' a panel.
Replace the unpinned panel with a Curtain Wall Door Panel.
If you try to 'pin' the new Curtain Wall Door Panel it will be changed back into a standard panel.

Friday, February 05, 2010

Revit 2010 License Timeout Workaround

Issue
Revit 2010 is not able to recover a lost network license when Revit is running. The program switches to Demo mode and any open data files will not be saved.

Solution (well, kind of...)
The files attached will allow Revit 2010 to recover a network license while running. If, after a 2 hour grace period, a network license is not found, Revit 2010 will display a dialog with the options to Save As & Exit or Exit. The user will not encounter Demo mode at anytime during this process.

more...
http://usa.autodesk.com/adsk/servlet/ps/dl/item?siteID=123112&id=14309812&linkID=9243099

BIM Cloud Computing

Steve Staffords blog referred to this great article on cloud computing with Revit....

http://www.aecbytes.com/feature/2010/BIM_Cloud.html

Tuesday, February 02, 2010

Ontario Revit Users Group Feb.3, 2010

We are really excited about 2010 at the Ontario Revit Users Group. Response to the 2010 Syllabus has been overwhelming.

John Peterson, a project architect with KPMB, has designed an exciting ORUG syllabus based on the design process and leveraging the information inherent to a Revit model. This series will consist of four meetings that will take us on a journey through the ups and downs of idealized proposals and real Revit projects
We will travel from the initial sketches to a robust, coordinated BIM model. Along the way we will cover important side ventures into Green Model analysis, cost estimating, Revit Structure and MEP coordination, Family creation, hardware optimization and Worksets.

Invitation:
http://ontariorevit.blogspot.com/2010/01/orug-meeting-feb-3-2010-new-syllabus.html

Keep an eye on the ORUG.ca blog for the post-meeting article.

Monday, February 01, 2010

AutoCAD File 2 Miles Across

If you're getting this error check the following:

In AutoCAD:
-zoom extents, delete any extraneous points or objects. Do this in plan and elevation views. Objects in the Z plane which are 2 miles away can also cause problems.
-confirm what the units are (we will need this when importing into Revit)
-make sure the that the entire drawing is not too far from the origin-0,0,0. You can move the drawing to 0,0,0 if needed with the move command.

In Revit:
Before you import make sure that you choose the correct import units.

As a side note. When importing site plans it may be a good idea to import the contours separate from the site plan lines. This is because the contours are usually at a proper sea elevation and site elevation while the the other site lines are at 0. You can isolate the contours layer and wblock it.

Here's some additional info and links on Steve Stafford's blog...
http://revitoped.blogspot.com/2010/02/revit-and-2-mile-limit.html

Thursday, January 28, 2010

Revit FAQ

Here's a great post by Chris Price on the most asked questions of Revit. It's a few years old but most of the questions still remain relavent...

http://blog.cadway.com.au/2005/11/frequently-asked-questions.html

Curtain Wall Glass Corner - No Corner Mullion

You may have noticed that Revit curtain wall corners don't trim or clean up very well. While you are able to replace the end mullions with one of the corner mullions there is still no option for a glass butt-joint panel. So there's a workaround...

Make a Wall Type called 'Glass Panel'
Edit the structure to be the desired thickness of your glass.
Set the material to 'Glass'.

On the Curtain Wall:
Tab to select the corner panels and replace them with the wall type 'Glass Panel'. (You may need to unpin them first.)
Delete the vertical mullions on the corner. (You may need to unpin them first.)


Click here for more on corner mullions.

Wednesday, December 09, 2009

Grid Bubble with Other Information

Let's say that your would like a Grid Bubble to show both the grid name and something else. Here's how to do it...

You will need to make a custom Grid Head family with the lines and circles desired using the grid family template.
You can add two labels, the Grid Number and a custom parameter. You will also have to make a ‘Shared Parameter’ for year or phase, or both.

Then you will load that family into the project and apply it to the System Grid family.

You will also need to add the Shared Parameter to the Project Parameters. Then you will be able to type the year or phase into the grid.

Monday, November 09, 2009

Revit Structure - Missing Columns - Graphical Column Schedule

Thank You Steve Stafford, Revit OPED for documenting this:

If columns are not showing on your column schedules make sure the columns are intersecting with grids and Levels.

http://revitoped.blogspot.com/2009/05/revit-structure-missing-columns.html

Thursday, November 05, 2009

Revit Wish List

'Wishes will be collected three times per year; the top 10 wishes from each cycle will be sent on to the development teams at Autodesk. After each cycle the wish list starts anew to ensure that the wishes are current. The top wishes from the year will be presented to Autodesk in person at Autodesk University.'

'These wishes can only be considered for Revit 2012 and beyond...'

Here's the link...
http://augi.com/revit/ballot.asp

Wednesday, October 28, 2009

Visibility issues, Volume 1

Visibility Issues are among the most common issues with Revit. These can usually be chalked up to the following...

Category is turned off in the view

Object Graphics or Visibility overridden (ie., set as transparent, turned off)

View Range

Plan Regions

Worksets (turned off in Visibility Overrides)

Design Options

Phases

Object being blocked by another (like a floor slab)

View Properties-Discipline(21-May-10)

Worksharing:

Keep in mind that when working in a team environment (Worksharing) others may be editing your settings without you knowing. One way to mitigate this is by making some initialed views, especially when it comes to the overall 3D and Section Box views. Another common solution is to yell at the people who are doing this.

Wednesday, October 21, 2009

New Revit Release Now...

Subscription Advantage Pack for Autodesk Revit Architecture 2010

The Autodesk® Subscription Advantage Pack for Autodesk® Revit® Architecture 2010 extends the capabilities of Autodesk® Revit® Architecture 2010 software. Productivity-enhancing functionality and features better support modeling, coordination, and documentation, while improved tools help you work more efficiently within the software.

Watch this to see what it's all about...

http://www.subscriptionvideos.com/subscription_rac_video.html

Monday, October 19, 2009

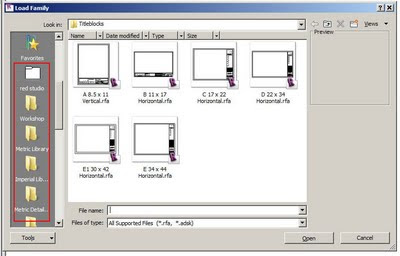
Revit Standards - File Path Locations

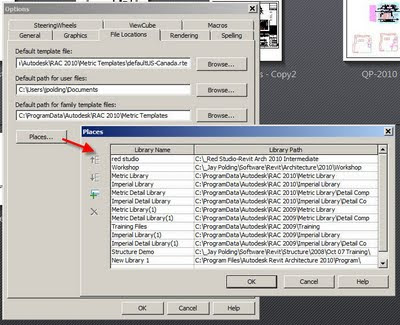
You can set up standard locations for file paths to standard Families and Templates in the following way. You will need to do this at each workstation if Revit has been installed.

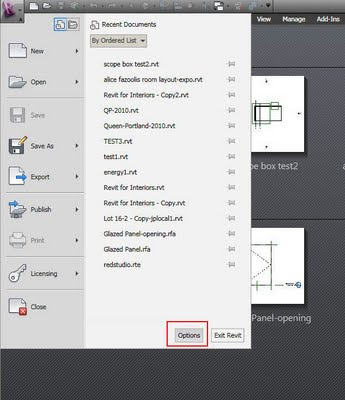
-Go to: Application 'R' menu
-Options

-File Locations
-Places
-Add the name of the location and then browse.

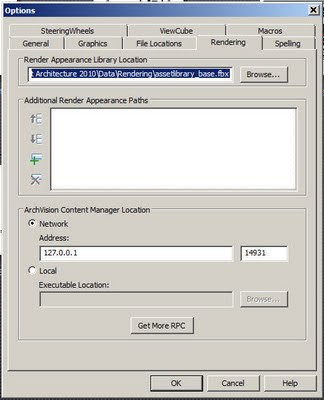
I don't recommend pointing your rendering library off the local machines. This will cause a serious slowdown in rendering times.

The locations will then be available on the left-hand side of 'load' and 'open' dialog boxes.

Monday, October 05, 2009

Revit Arch 2010 Structural Slab Span Symbol

The Revit Architecture 2010 Help files describe how a Structural Slab can be added along with a Span Direction Symbol. Autodesk has confirmed that this is an error in both the Help file and Structural Slab tool. Some Revit Structure files got into the Revit Arch Help files. They said that this will be addressed in the 2011 version. Although they didn't elaborate they will probably remove the reference out of the help files and removing the Structural Slab tool altogether from RAC.

Showing Beams Above in Revit Architecture

Here are some facts that may help in explaining how to show beams which are above:

Floorlan views only look down.

Ceiling Plan views only look up.

The linetype called Overhead is just a standard linetype like 'Hidden' or 'Thin Lines'. Revit will not detect things overhead.

The 'Top Range' of the View Range dialog box is only there to establish how high the 'Cut Plan' can go. Again, Revit will not detect things overhead.

The 'Structural' View Templates set the View Range a little lower but still will not show overhead lines automatically. It will also change the look of the beam lines.

So, here's one workaround:

1. Make a Beam Line Style...

Manage-Settings-Line Styles-Modify Subcategories-New-Call it Overhead Beams-Set the Line Pattern and Line Weight as desired.

2. Temporarily set View Range...

View Properties-View Range-Top Range-Set it above your beam height-Cut Plan-Set it above your beam height.

3. Temporarily change your Detail Level to Fine. This is so you can see the 3D beams.

4. Use the Annotate-Detail Line Tool to draw a line beside the 3D beam using the 'Overhead Beams' Line Style.

5. Use the Align tool to align your line to the middle of the 3D beam. Click the Lock so it is closed.

6. Change your View Range back to normal.

This will line will stay (mostly) connected with the 3D beam. This technique can be used for balconies above, floorplates above, roof overhangs etc.

Please note that there is a bug involving sloping beams and beam systems showing up even when above. Autodesk will be fixing this so I wouldn't use it.

Thursday, September 24, 2009

Autodesk SketchBook Mobile

Saw this on David Lights blog...

Available for 2.99 on the App Store. Is this possibly the cheapest of Autodesk's software?

Autodesk SketchBook Mobile
The Autodesk® SketchBook® Mobile painting and drawing application extends your digital sketchpad to your Apple® iPhone® or Apple iPod touch®. With the same paint engine as Autodesk® SketchBook® Pro software, SketchBook Mobile offers professional-grade painting and drawing tools in a streamlined and intuitive user interface. Use it to digitally capture your ideas as napkin sketches or produce artwork on-the-go.


Website:
http://usa.autodesk.com/adsk/servlet/item?siteID=123112&id=13872203

Video
http://www.youtube.com/watch?v=YwYm5YhA0pQ

Thursday, September 10, 2009

Oh, and by the way...Reinstalling Revit and Plugins

When you reinstall Revit you have to reinstall all of the plugins and in some cases reauthorize them. I wish we could do something about this for the sake of the CAD/BIM Managers out there. This is an issue that Autodesk needs to address as they release one official version and at least two bug-fix versions per year.

Monday, August 31, 2009

Error Importing Sketchup into Revit 2010

I was about to show the great 'import Sketchup' feature to a client when all of a sudden I got the error 'Unable to Import Sketchup'. 'It does it, trust me, really.'
This is a issue is known by Autodesk and they are working to resolve it. In the meantime the only way to fix it is to reinstall.

Monday, August 24, 2009

Imported 3D AutoCAD not Sectioning

Problem:
A 3D AutoCAD file imported into Revit is not cutting when sectioned.

Solution:
The AutoCAD file first needs to be imported into a Family.
You have options:
1. Start the In-Place Mass command and then import the AutoCAD file. This option works well for large, one time imports like surrounding buildings etc. (use the same method for Sketchup files.)
2. Start a Family based upon a Family Template of your choice (ie. specialty equipment) then import the AutoCAD. Load this Family into your Project. This option works well for creating a quick 3D Family with existing 3D CAD geometry.

Thursday, August 13, 2009

Room Object Not Placed

Have you ever deleted a Room Object and you get a 'deleted but still in project' message? This is a good time-saving feature. Let's say that you build schools, it's a given that you will need the following rooms; Bathroom, Janitor and my favourite, THE Office.
You can pre-make these in your template. When you go to place a Room Object look in the Options Bar (pictured) and drop down the Room list. You have saved yourself from typing the room name and perhaps other important parameters.


More about Room Objects in Schedules here.

Thursday, August 06, 2009

Nested Window Visibility with Wall Healing

This one is hard to explain in plain English. Here's the scenario...

Door family with nested window families as sidelights.
Visibility parameter applied to the windows for left and right options.
When inserted into a wall (in a project file -.rvt) checking the sidelights on and off will not leave a hole where the window was. Rather, the wall will 'heal'.


The key is this:
In the window family
Category and Parameters, Shared (check box) is checked.


Thanks to Jeff Steinhauer from the AUGI forum for helping me on this one...
http://forums.augi.com/showthread.php?p=998259#post998259

Monday, July 13, 2009

In-Revit Solar Radiation

Use the Solar Radiation Technology Preview to analyze the effects of solar radiation on various surfaces of your conceptual building model...

http://labs.autodesk.com/utilities/ecotect/