Here's a great post by Chris Price on the most asked questions of Revit. It's a few years old but most of the questions still remain relavent...
http://blog.cadway.com.au/2005/11/frequently-asked-questions.html
Thursday, January 28, 2010
Curtain Wall Glass Corner - No Corner Mullion

You may have noticed that Revit curtain wall corners don't trim or clean up very well. While you are able to replace the end mullions with one of the corner mullions there is still no option for a glass butt-joint panel. So there's a workaround...
Make a Wall Type called 'Glass Panel'
Make a Wall Type called 'Glass Panel'
Edit the structure to be the desired thickness of your glass.
Set the material to 'Glass'.

On the Curtain Wall:

On the Curtain Wall:
Tab to select the corner panels and replace them with the wall type 'Glass Panel'. (You may need to unpin them first.)
Delete the vertical mullions on the corner. (You may need to unpin them first.)

Wednesday, December 09, 2009
Grid Bubble with Other Information
Let's say that your would like a Grid Bubble to show both the grid name and something else. Here's how to do it...
You will need to make a custom Grid Head family with the lines and circles desired using the grid family template.
You can add two labels, the Grid Number and a custom parameter. You will also have to make a ‘Shared Parameter’ for year or phase, or both.
Then you will load that family into the project and apply it to the System Grid family.
You will also need to add the Shared Parameter to the Project Parameters. Then you will be able to type the year or phase into the grid.
You will need to make a custom Grid Head family with the lines and circles desired using the grid family template.
You can add two labels, the Grid Number and a custom parameter. You will also have to make a ‘Shared Parameter’ for year or phase, or both.
Then you will load that family into the project and apply it to the System Grid family.
You will also need to add the Shared Parameter to the Project Parameters. Then you will be able to type the year or phase into the grid.
Monday, November 09, 2009
Revit Structure - Missing Columns - Graphical Column Schedule
Thank You Steve Stafford, Revit OPED for documenting this:
If columns are not showing on your column schedules make sure the columns are intersecting with grids and Levels.
http://revitoped.blogspot.com/2009/05/revit-structure-missing-columns.html
If columns are not showing on your column schedules make sure the columns are intersecting with grids and Levels.
http://revitoped.blogspot.com/2009/05/revit-structure-missing-columns.html
Thursday, November 05, 2009
Revit Wish List
'Wishes will be collected three times per year; the top 10 wishes from each cycle will be sent on to the development teams at Autodesk. After each cycle the wish list starts anew to ensure that the wishes are current. The top wishes from the year will be presented to Autodesk in person at Autodesk University.'
'These wishes can only be considered for Revit 2012 and beyond...'
Here's the link...
http://augi.com/revit/ballot.asp
'These wishes can only be considered for Revit 2012 and beyond...'
Here's the link...
http://augi.com/revit/ballot.asp
Wednesday, October 28, 2009
Visibility issues, Volume 1
Visibility Issues are among the most common issues with Revit. These can usually be chalked up to the following...
Category is turned off in the view
Object Graphics or Visibility overridden (ie., set as transparent, turned off)
View Range
Plan Regions
Worksets (turned off in Visibility Overrides)
Design Options
Phases
Object being blocked by another (like a floor slab)
View Properties-Discipline(21-May-10)
Worksharing:
Keep in mind that when working in a team environment (Worksharing) others may be editing your settings without you knowing. One way to mitigate this is by making some initialed views, especially when it comes to the overall 3D and Section Box views. Another common solution is to yell at the people who are doing this.
Wednesday, October 21, 2009
New Revit Release Now...
Subscription Advantage Pack for Autodesk Revit Architecture 2010
The Autodesk® Subscription Advantage Pack for Autodesk® Revit® Architecture 2010 extends the capabilities of Autodesk® Revit® Architecture 2010 software. Productivity-enhancing functionality and features better support modeling, coordination, and documentation, while improved tools help you work more efficiently within the software.
Watch this to see what it's all about...
http://www.subscriptionvideos.com/subscription_rac_video.html
The Autodesk® Subscription Advantage Pack for Autodesk® Revit® Architecture 2010 extends the capabilities of Autodesk® Revit® Architecture 2010 software. Productivity-enhancing functionality and features better support modeling, coordination, and documentation, while improved tools help you work more efficiently within the software.
Watch this to see what it's all about...
http://www.subscriptionvideos.com/subscription_rac_video.html
Monday, October 19, 2009
Revit Standards - File Path Locations
You can set up standard locations for file paths to standard Families and Templates in the following way. You will need to do this at each workstation if Revit has been installed.
-Go to: Application 'R' menu
-Options
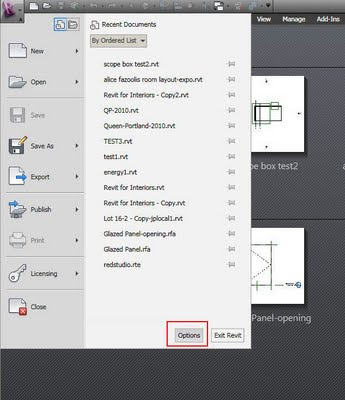
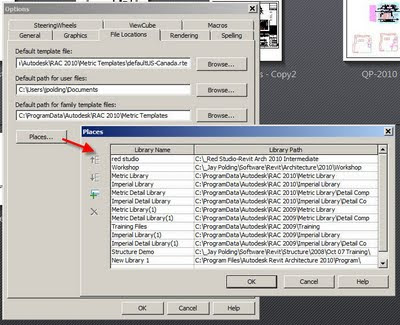
-File Locations
-Places
-Add the name of the location and then browse.
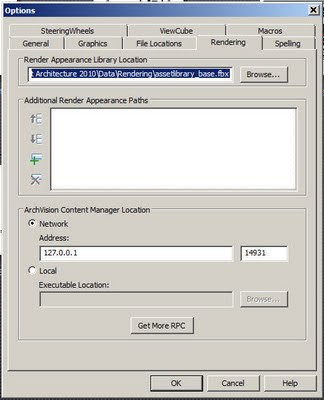
I don't recommend pointing your rendering library off the local machines. This will cause a serious slowdown in rendering times.
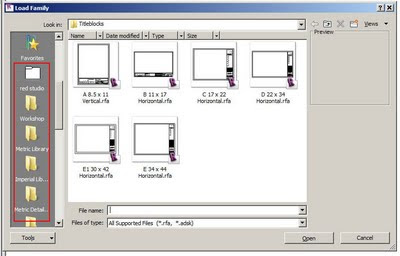
The locations will then be available on the left-hand side of 'load' and 'open' dialog boxes.
-Go to: Application 'R' menu
-Options

-File Locations
-Places
-Add the name of the location and then browse.

I don't recommend pointing your rendering library off the local machines. This will cause a serious slowdown in rendering times.

The locations will then be available on the left-hand side of 'load' and 'open' dialog boxes.

Monday, October 05, 2009
Revit Arch 2010 Structural Slab Span Symbol
The Revit Architecture 2010 Help files describe how a Structural Slab can be added along with a Span Direction Symbol. Autodesk has confirmed that this is an error in both the Help file and Structural Slab tool. Some Revit Structure files got into the Revit Arch Help files. They said that this will be addressed in the 2011 version. Although they didn't elaborate they will probably remove the reference out of the help files and removing the Structural Slab tool altogether from RAC.
Showing Beams Above in Revit Architecture
Here are some facts that may help in explaining how to show beams which are above:
Floorlan views only look down.
Ceiling Plan views only look up.
The linetype called Overheadis just a standard linetype like 'Hidden' or 'Thin Lines'. Revit will not detect things overhead.
The 'Top Range' of the View Range dialog box is only there to establish how high the 'Cut Plan' can go. Again, Revit will not detect things overhead.
The 'Structural' View Templates set the View Range a little lower but still will not show overhead lines automatically. It will also change the look of the beam lines.
So, here's one workaround:
1. Make a Beam Line Style...
Manage-Settings-Line Styles-Modify Subcategories-New-Call it Overhead Beams-Set the Line Pattern and Line Weight as desired.
2. Temporarily set View Range...
View Properties-View Range-Top Range-Set it above your beam height-Cut Plan-Set it above your beam height.
3. Temporarily change your Detail Level to Fine. This is so you can see the 3D beams.
Floorlan views only look down.
Ceiling Plan views only look up.
The linetype called Overhead
The 'Top Range' of the View Range dialog box is only there to establish how high the 'Cut Plan' can go. Again, Revit will not detect things overhead.
The 'Structural' View Templates set the View Range a little lower but still will not show overhead lines automatically. It will also change the look of the beam lines.
So, here's one workaround:
1. Make a Beam Line Style...
Manage-Settings-Line Styles-Modify Subcategories-New-Call it Overhead Beams-Set the Line Pattern and Line Weight as desired.
2. Temporarily set View Range...
View Properties-View Range-Top Range-Set it above your beam height-Cut Plan-Set it above your beam height.
3. Temporarily change your Detail Level to Fine. This is so you can see the 3D beams.
4. Use the Annotate-Detail Line Tool to draw a line beside the 3D beam using the 'Overhead Beams' Line Style.
5. Use the Align tool to align your line to the middle of the 3D beam. Click the Lock so it is closed.
6. Change your View Range back to normal.
This will line will stay (mostly) connected with the 3D beam. This technique can be used for balconies above, floorplates above, roof overhangs etc.
Please note that there is a bug involving sloping beams and beam systems showing up even when above. Autodesk will be fixing this so I wouldn't use it.
Thursday, September 24, 2009
Autodesk SketchBook Mobile
Saw this on David Lights blog...
Available for 2.99 on the App Store. Is this possibly the cheapest of Autodesk's software?
Autodesk SketchBook Mobile
The Autodesk® SketchBook® Mobile painting and drawing application extends your digital sketchpad to your Apple® iPhone® or Apple iPod touch®. With the same paint engine as Autodesk® SketchBook® Pro software, SketchBook Mobile offers professional-grade painting and drawing tools in a streamlined and intuitive user interface. Use it to digitally capture your ideas as napkin sketches or produce artwork on-the-go.
Website:
http://usa.autodesk.com/adsk/servlet/item?siteID=123112&id=13872203
Video
http://www.youtube.com/watch?v=YwYm5YhA0pQ
Available for 2.99 on the App Store. Is this possibly the cheapest of Autodesk's software?
Autodesk SketchBook Mobile
The Autodesk® SketchBook® Mobile painting and drawing application extends your digital sketchpad to your Apple® iPhone® or Apple iPod touch®. With the same paint engine as Autodesk® SketchBook® Pro software, SketchBook Mobile offers professional-grade painting and drawing tools in a streamlined and intuitive user interface. Use it to digitally capture your ideas as napkin sketches or produce artwork on-the-go.
Website:
http://usa.autodesk.com/adsk/servlet/item?siteID=123112&id=13872203
Video
http://www.youtube.com/watch?v=YwYm5YhA0pQ
Thursday, September 10, 2009
Oh, and by the way...Reinstalling Revit and Plugins
When you reinstall Revit you have to reinstall all of the plugins and in some cases reauthorize them. I wish we could do something about this for the sake of the CAD/BIM Managers out there. This is an issue that Autodesk needs to address as they release one official version and at least two bug-fix versions per year.
Monday, August 31, 2009
Error Importing Sketchup into Revit 2010
I was about to show the great 'import Sketchup' feature to a client when all of a sudden I got the error 'Unable to Import Sketchup'. 'It does it, trust me, really.'
This is a issue is known by Autodesk and they are working to resolve it. In the meantime the only way to fix it is to reinstall.
This is a issue is known by Autodesk and they are working to resolve it. In the meantime the only way to fix it is to reinstall.
Monday, August 24, 2009
Imported 3D AutoCAD not Sectioning
Problem:
A 3D AutoCAD file imported into Revit is not cutting when sectioned.
Solution:
The AutoCAD file first needs to be imported into a Family.
You have options:
1. Start the In-Place Mass command and then import the AutoCAD file. This option works well for large, one time imports like surrounding buildings etc. (use the same method for Sketchup files.)
2. Start a Family based upon a Family Template of your choice (ie. specialty equipment) then import the AutoCAD. Load this Family into your Project. This option works well for creating a quick 3D Family with existing 3D CAD geometry.
A 3D AutoCAD file imported into Revit is not cutting when sectioned.
Solution:
The AutoCAD file first needs to be imported into a Family.
You have options:
1. Start the In-Place Mass command and then import the AutoCAD file. This option works well for large, one time imports like surrounding buildings etc. (use the same method for Sketchup files.)
2. Start a Family based upon a Family Template of your choice (ie. specialty equipment) then import the AutoCAD. Load this Family into your Project. This option works well for creating a quick 3D Family with existing 3D CAD geometry.
Thursday, August 13, 2009
Room Object Not Placed
Have you ever deleted a Room Object and you get a 'deleted but still in project' message? This is a good time-saving feature. Let's say that you build schools, it's a given that you will need the following rooms; Bathroom, Janitor and my favourite, THE Office.
You can pre-make these in your template. When you go to place a Room Object look in the Options Bar (pictured) and drop down the Room list. You have saved yourself from typing the room name and perhaps other important parameters.

More about Room Objects in Schedules here.
You can pre-make these in your template. When you go to place a Room Object look in the Options Bar (pictured) and drop down the Room list. You have saved yourself from typing the room name and perhaps other important parameters.

More about Room Objects in Schedules here.
Thursday, August 06, 2009
Nested Window Visibility with Wall Healing
This one is hard to explain in plain English. Here's the scenario...
Door family with nested window families as sidelights.
Visibility parameter applied to the windows for left and right options.
When inserted into a wall (in a project file -.rvt) checking the sidelights on and off will not leave a hole where the window was. Rather, the wall will 'heal'.

The key is this:
In the window family
Category and Parameters, Shared (check box) is checked.

Thanks to Jeff Steinhauer from the AUGI forum for helping me on this one...
http://forums.augi.com/showthread.php?p=998259#post998259
Door family with nested window families as sidelights.
Visibility parameter applied to the windows for left and right options.
When inserted into a wall (in a project file -.rvt) checking the sidelights on and off will not leave a hole where the window was. Rather, the wall will 'heal'.

The key is this:
In the window family
Category and Parameters, Shared (check box) is checked.

Thanks to Jeff Steinhauer from the AUGI forum for helping me on this one...
http://forums.augi.com/showthread.php?p=998259#post998259
Monday, July 13, 2009
In-Revit Solar Radiation
Use the Solar Radiation Technology Preview to analyze the effects of solar radiation on various surfaces of your conceptual building model...
http://labs.autodesk.com/utilities/ecotect/
http://labs.autodesk.com/utilities/ecotect/
Tuesday, July 07, 2009
Revit Arch 2010 Update 1
The first Update for Revit Arch 2010 is now available...
http://usa.autodesk.com/adsk/servlet/item?siteID=123112&id=12828862
http://usa.autodesk.com/adsk/servlet/item?siteID=123112&id=12828862
Monday, June 08, 2009
Revit 2010 Decal Path
If your path is too long to a specific decal image it will not render. You can workaround this by adding the path of your image to the Options-Rendering-Additional..Paths.
Autodesk is aware of this issue....
Autodesk is aware of this issue....
Friday, June 05, 2009
FIXED: Revit Arch 2010 to Navisworks 2010: Windows Not Cutting Walls
There has been a hotfix posted for this today. You can find it here:
http://usa.autodesk.com/adsk/servlet/ps/dl/item?siteID=123112&id=13379829&linkID=10382102
Please be aware that there is a bug in the export to Navisworks function in the 2010 product line. Walls are covering up windows. This issue has been submitted to Autodesk Development. Read more at the AUGI forum here...http://forums.augi.com/showthread.php?t=101078&highlight=wall+window


http://usa.autodesk.com/adsk/servlet/ps/dl/item?siteID=123112&id=13379829&linkID=10382102
Please be aware that there is a bug in the export to Navisworks function in the 2010 product line. Walls are covering up windows. This issue has been submitted to Autodesk Development. Read more at the AUGI forum here...http://forums.augi.com/showthread.php?t=101078&highlight=wall+window


Monday, June 01, 2009
Rise and Run Roof Slope Tag
Thank you Autodesk for adding one of my wishlist items from way back! This may be a small thing but it's important to residential designers. Thanks again!
I found this on David Duarte's blog Revit Beginners...(Thanks David)
Go to Annotate... Spot Slope... and you might notice that Revit has a new slope annotation that works in plan and elevation view. (choose an arrow or triangle symbol from the options bar)
Now try annotating a roof slope with a spot annotation triangle and you might notice something peculiar. Maybe your roof is 6:12 but the annotation read 4:12. Why the error? Because Revit is annotating the Hip not the face of the roof...Try hitting the tab key while floating over the roof edge and you'll see that the slope tag can report the slope of the hip or the face. The tool just happens to default to reporting the hip first.
This tool does not yet work on ramps or railings.
full article...
http://revitbeginners.blogspot.com/2009/04/revit-2010-new-spot-slopes.html
I found this on David Duarte's blog Revit Beginners...(Thanks David)
Go to Annotate... Spot Slope... and you might notice that Revit has a new slope annotation that works in plan and elevation view. (choose an arrow or triangle symbol from the options bar)
Now try annotating a roof slope with a spot annotation triangle and you might notice something peculiar. Maybe your roof is 6:12 but the annotation read 4:12. Why the error? Because Revit is annotating the Hip not the face of the roof...Try hitting the tab key while floating over the roof edge and you'll see that the slope tag can report the slope of the hip or the face. The tool just happens to default to reporting the hip first.
This tool does not yet work on ramps or railings.
full article...
http://revitbeginners.blogspot.com/2009/04/revit-2010-new-spot-slopes.html
Tag Box Size Relative to Contents
Is it possible to have a tag's box size expand with the contents?
For example, if a room is numbered '1' it doesn't need a big box, but if it's numbered '1001' it does. (This is applicable to all tags really.)
The answer is no, it does not expand automatically. You will need to make a few different types that have different sized boxes.
For example, if a room is numbered '1' it doesn't need a big box, but if it's numbered '1001' it does. (This is applicable to all tags really.)
The answer is no, it does not expand automatically. You will need to make a few different types that have different sized boxes.
Friday, May 29, 2009
Curtain Wall Corner Mullions
Curtain Wall Corner Mullions are preloaded in the default template. You have the following choices of shapes: (see image)


Quad
L
V
Trapezoid

You can make more types by editing the properties. (see image) You can edit material, thickness and general size.

You cannot make a custom profile for corners like you can for non-corner mullions.
If you would like a custom corner you will be best to make it out of a structural column family.
If you are missing the corner mullion families from your project file (maybe they have been purged) do the following.
-Project Browser
-Families
-Curtain Wall Mullions
-Right Click on desired heading
-Choose New Type
Corner mullion size can be adjusted in their Type Properties.
Also, the corner can be non-perpendicular and the corner mullions will adjust.
Click here for more about glass corners.
Click here for more about glass corners.
Wednesday, May 27, 2009
Curtain Wall - Butt Joint Corners
Butt joints at corners can be done the following ways…
Option A
1. Make a new curtain wall panel using the curtain wall panel template
2. Offset the geometry on one side.
3. Save and load the family into your project
4. Make a Curtain Wall Style with Vertical Mullion, Border 2 Type, None
5. Draw the curtain walls on the corner. The wall endpoints will be lined up but the glass will appear to be overlapping by an inch or so.
6. TAB until you can select the panel.
7. Replace the panel with you corner panel.
Option B
1. Draw the curtain walls on the corner. The wall endpoints will be lined up but the glass will appear to be overlapping by an inch or so.
2. TAB until you can select the panel.
3. Edit in-place
4. Stretch the glass panel back by 1”
5. Finish
Option C
1. Draw the curtain walls on the corner. The wall endpoints will be lined up but the glass will appear to be overlapping by an inch or so.
2. TAB until you can select the panel.
3. Turn off the panel’s visibility
4. Draw a wall style which is the thickness of the glass panel and has the material ‘glass’.
Any of these choices are a pain. This is one of the workarounds I would like to see addressed...
Tuesday, May 12, 2009
Lineweights Bug and Workaround

We have noticed that there is a discrepancy in the lineweights between Titleblocks and Projects. It seems that the Titleblock Family's lineweights, although set to the number, appear and print thinner. Autodesk has confirmed that this is an error and plan on fixing it in a future release.
For now you will need to bump your lineweights up (set to a higher number) on your Titleblock Family in order to match the lines on your sheet.
Thursday, May 07, 2009
Database Link in Revit
We've been waiting for this one for a long time...
RDB Link Tool for Revit Family
Technology Preview (COMING SOON)
Overview
The RDBLink tool allows the user to export data from the elements in a Revit project and maintain relationships against data that exists outside of Revit. The tool allows for both import and export of the project data and will allow the user to make changes on the database side that affect the data within the project once imported. Also, during subsequent exports of the data to the same database, only data from the project will be affected, so any new fields or tables added to the database for your own purposes will remain intact along side the newly exported data. The RDBLink import tool provides a grid view of the data to allow the user to make any final edits before import. This grid control also allows the user to create Revit Shared Parameters which will add new fields for those parameters to the database in the related tables. Changes to these new fields within the database will update these Revit Shared Parameters upon future imports.
more...http://labs.autodesk.com/utilities/revit_rdb/
thanks RevitOPED for the tip
RDB Link Tool for Revit Family
Technology Preview (COMING SOON)
Overview
The RDBLink tool allows the user to export data from the elements in a Revit project and maintain relationships against data that exists outside of Revit. The tool allows for both import and export of the project data and will allow the user to make changes on the database side that affect the data within the project once imported. Also, during subsequent exports of the data to the same database, only data from the project will be affected, so any new fields or tables added to the database for your own purposes will remain intact along side the newly exported data. The RDBLink import tool provides a grid view of the data to allow the user to make any final edits before import. This grid control also allows the user to create Revit Shared Parameters which will add new fields for those parameters to the database in the related tables. Changes to these new fields within the database will update these Revit Shared Parameters upon future imports.
more...http://labs.autodesk.com/utilities/revit_rdb/
thanks RevitOPED for the tip
Tuesday, May 05, 2009
Autodesk University Presentations
Public voting is open for Autodesk University Presentations. You can vote here:
http://au.autodesk.com/
I have submitted three proposals.
Session title:
Mutual Symbiosis in the Revit Habitat: Users and Reseller Techies Unite!
Session description:
Software users and software specialists enjoy a symbiotic relationship. Both parties have access to business opportunities and technical resources which are hard to get at while working alone. This class will expose and identify many of the opportunities that a good user-specialist relationship can offer. A BIM/CAD Manager from a progressive, Revit-centric firm and a Reseller Techie will share their experiences on key topics. The secrets to getting technical answers fast from resellers and Autodesk. Techniques on getting the most out of students and teachers in training will be discussed. Plus, learn how to connect with even more experts by starting and running a successful users group. If your symbiotic relationship has been strained, learn how to unite and squeeze more out of a valuable opportunity.
Key learning:
Expand your business network
Get technical answers fast
Start a local users group
Get the most out of students and teachers
Expand your technical resources
Target audience:
BIM/CAD managers, Reseller Application Specialists
Session title:
Navisworks: Coordination as Easy as a Game
Session description:
Turn your building into a video game and email it across your team. Swap materials and render instantly. While taking a virtual tour redline, comment and save animations on the fly. Watch your building get built, in real time. Animate the crane for clearance. Email the whole file to your team for free viewing. In this class we will learn how to take your large multi-meg Revit files and turn them into a smooth, interactive file small enough to email. This is how many consultants, using many different kinds of software, solve the coordination problem.
Key learning:
Import Revit Files
Walking and Flying
Creating an Environment and Applying Materials
Animate!
Timeline your Construction
Target audience:
Architects, Contractors, Builders, Engineers, Designers, Resellers
Session title:
Stairway, or Ramp to Revit Heaven
Session description:
Stairs, ramps and railings are some of the hardest tools to master in Revit. We will discuss specialized techniques for making parking ramps, multi-landing and poured concrete staircases, as well as unique rail conditions. You will learn the ‘rules of thumb’ when making stairs, ramps and railings while exploring the limits of what can be done. We will cover how to properly annotate and detail stairs in sections and plan. If you feel that your stairs haven’t quite reached heavenly heights join us in this session as we climb the stairway, or ramp to Revit heaven.
Key learning:
Make a sloping and curving parking ramp
Make a multi-landing stair
Learn some stair and ramp ‘rules of thumb’
Annotate and detail stairs
Explore the limits
Target audience:
Architects, Engineers and designers who need to make stairs.
http://au.autodesk.com/
I have submitted three proposals.
Session title:
Mutual Symbiosis in the Revit Habitat: Users and Reseller Techies Unite!
Session description:
Software users and software specialists enjoy a symbiotic relationship. Both parties have access to business opportunities and technical resources which are hard to get at while working alone. This class will expose and identify many of the opportunities that a good user-specialist relationship can offer. A BIM/CAD Manager from a progressive, Revit-centric firm and a Reseller Techie will share their experiences on key topics. The secrets to getting technical answers fast from resellers and Autodesk. Techniques on getting the most out of students and teachers in training will be discussed. Plus, learn how to connect with even more experts by starting and running a successful users group. If your symbiotic relationship has been strained, learn how to unite and squeeze more out of a valuable opportunity.
Key learning:
Expand your business network
Get technical answers fast
Start a local users group
Get the most out of students and teachers
Expand your technical resources
Target audience:
BIM/CAD managers, Reseller Application Specialists
Session title:
Navisworks: Coordination as Easy as a Game
Session description:
Turn your building into a video game and email it across your team. Swap materials and render instantly. While taking a virtual tour redline, comment and save animations on the fly. Watch your building get built, in real time. Animate the crane for clearance. Email the whole file to your team for free viewing. In this class we will learn how to take your large multi-meg Revit files and turn them into a smooth, interactive file small enough to email. This is how many consultants, using many different kinds of software, solve the coordination problem.
Key learning:
Import Revit Files
Walking and Flying
Creating an Environment and Applying Materials
Animate!
Timeline your Construction
Target audience:
Architects, Contractors, Builders, Engineers, Designers, Resellers
Session title:
Stairway, or Ramp to Revit Heaven
Session description:
Stairs, ramps and railings are some of the hardest tools to master in Revit. We will discuss specialized techniques for making parking ramps, multi-landing and poured concrete staircases, as well as unique rail conditions. You will learn the ‘rules of thumb’ when making stairs, ramps and railings while exploring the limits of what can be done. We will cover how to properly annotate and detail stairs in sections and plan. If you feel that your stairs haven’t quite reached heavenly heights join us in this session as we climb the stairway, or ramp to Revit heaven.
Key learning:
Make a sloping and curving parking ramp
Make a multi-landing stair
Learn some stair and ramp ‘rules of thumb’
Annotate and detail stairs
Explore the limits
Target audience:
Architects, Engineers and designers who need to make stairs.
Tuesday, April 28, 2009
Elevations and Phases
Elevation markers disappear in different Phases. How do you coordinate the extents and views of these different phases? You can address this by doing the following:
1. Select the Elevation Marker, Cut and Paste Aligned-Same Place. You would do this into the view with the Phase set as desired. The copied Elevation Marker will be in the same place but on the desired Phase.
2. Make a Scope Box. You can drag the extents of the Scope Box to determine where Grids and Levels start and stop. Click on the Grids and Levels, Element Properties, choose the Scope Box you just made. Scope Boxes also have properties that allow you to control the view it's visible in.
3. Organize your Browser. This can also be done by adding a parameter to the views.
1. Select the Elevation Marker, Cut and Paste Aligned-Same Place. You would do this into the view with the Phase set as desired. The copied Elevation Marker will be in the same place but on the desired Phase.
2. Make a Scope Box. You can drag the extents of the Scope Box to determine where Grids and Levels start and stop. Click on the Grids and Levels, Element Properties, choose the Scope Box you just made. Scope Boxes also have properties that allow you to control the view it's visible in.
3. Organize your Browser. This can also be done by adding a parameter to the views.
Wednesday, April 22, 2009
Room Number Intelligence
More and more I am seeing the need for room number intelligence or awareness. I am not alone on this, many of our clients are asking this.
Yes, I can schedule what level a ceiling is on but what about what room it's in? You can do this a little bit with the doors so we know that it's possible. What room is that patient bed, furniture, or light etc. in? It would be nice to then schedule 'by room'. For instance, Room 101 contains: patient bed X, X number of lights.
Please comment...
Yes, I can schedule what level a ceiling is on but what about what room it's in? You can do this a little bit with the doors so we know that it's possible. What room is that patient bed, furniture, or light etc. in? It would be nice to then schedule 'by room'. For instance, Room 101 contains: patient bed X, X number of lights.
Please comment...
Tagging Ceiling Heights in Room Schedules
This can't be done automatically.
Here are a couple of workarounds...
1. From release 2009 and on you can do the following:
Settings-Area and Volume Computations-Calculate Volumes
Make sure the Room object is bounded to the ceiling.
Add a Calculated Value to the Room Schedule using the following info:
Name: Ceiling Height, Type: Length, Formula: Volume/Area
Please note that this workaround only works where the Room and Ceiling are the same shape. The ceiling must be flat.
2. Pre 2009, ie.2008 has another workflow. You may even choose do this in all releases because of the complications of the workaround mentioned above.
Make a Shared Parameter called Ceiling Height
Apply this to the Room Object in the Project file as well as the Room Tag
Make a duplicate of your ceiling plan.
Tag all ceilings showing Height Offset from Level
Tag all Rooms
Now that you can see the actual ceiling height you will be able to manually update the Shared Parameter 'ceiling height' in the Room Tags.
This will keep a coordinated Room Schedule, Tags with the ceiling height.
Here are a couple of workarounds...
1. From release 2009 and on you can do the following:
Settings-Area and Volume Computations-Calculate Volumes
Make sure the Room object is bounded to the ceiling.
Add a Calculated Value to the Room Schedule using the following info:
Name: Ceiling Height, Type: Length, Formula: Volume/Area
Please note that this workaround only works where the Room and Ceiling are the same shape. The ceiling must be flat.
2. Pre 2009, ie.2008 has another workflow. You may even choose do this in all releases because of the complications of the workaround mentioned above.
Make a Shared Parameter called Ceiling Height
Apply this to the Room Object in the Project file as well as the Room Tag
Make a duplicate of your ceiling plan.
Tag all ceilings showing Height Offset from Level
Tag all Rooms
Now that you can see the actual ceiling height you will be able to manually update the Shared Parameter 'ceiling height' in the Room Tags.
This will keep a coordinated Room Schedule, Tags with the ceiling height.
Friday, April 17, 2009
Can't Edit Hatch in Family
Many times you will insert a Family into Revit which has hatch on it. You will not be able to edit the location or orientation of that hatch while it is in the Project. You would need to open the Family, adjust the hatch, then reload it back in.
Thursday, April 16, 2009
AutoCAD Pline Widths in Revit
You want to Import or link an AutoCAD file with plines representing walls. The plines are set to the actual thickness of the wall. When this is imported into Revit the plines lose their thickness.
Changing the Revit lineweight is not the greatest solution because the lines change thickness based on scale. Also, you would have to do some calculations to get the corresponding width right.
You would be best to make the change in AutoCAD before you bring the file in. To that end I've attached a lsp routine which will convert plines to mlines with the corresponding width. You might want to add another string of code which explodes the mlines into lines because mlines don't come into Revit either.
Here's the thread where I found the lsp file written by Joe Burke...
(note: this code leaves out closed segments, you will need to change the plines to 'open'.)
http://discussion.autodesk.com/forums/thread.jspa?messageID=1163735
Here's a cut and paste of the code...
;;;thanks Joe Burke
; CHANGE LINE/PLINE TO MLINE
(defun c:lml ()
;returns list associated with a DXF code
;arguments key: DXF code, alist: object data list
(defun massoc (key alist / x nlist)
(foreach x alist
(if (eq key (car x))
(setq nlist (cons (cdr x) nlist))
)
)
(reverse nlist)
) ;end
;(setq s (ssget))
(setq s (ssget '((0 . "LINE,LWPOLYLINE"))))
(setq teller 0)
(repeat (sslength s)
(setq en (ssname s teller))
(setq ent (entget en))
(if (= "LINE" (cdr (assoc 0 ent)))
(setq PtLst (list (cdr (assoc 10 ent)) (cdr (assoc 11 ent))))
) ;if
(if (= "LWPOLYLINE" (cdr (assoc 0 ent)))
(setq PtLst (massoc 10 ent))
) ;if
(command "mline" (foreach pt PtLst (command pt))) ;point list fed to
mline
;(command "erase" en "")
(entdel en)
(setq teller (1+ teller))
) ;repeat
(princ)
) ;end
Changing the Revit lineweight is not the greatest solution because the lines change thickness based on scale. Also, you would have to do some calculations to get the corresponding width right.
You would be best to make the change in AutoCAD before you bring the file in. To that end I've attached a lsp routine which will convert plines to mlines with the corresponding width. You might want to add another string of code which explodes the mlines into lines because mlines don't come into Revit either.
Here's the thread where I found the lsp file written by Joe Burke...
(note: this code leaves out closed segments, you will need to change the plines to 'open'.)
http://discussion.autodesk.com/forums/thread.jspa?messageID=1163735
Here's a cut and paste of the code...
;;;thanks Joe Burke
; CHANGE LINE/PLINE TO MLINE
(defun c:lml ()
;returns list associated with a DXF code
;arguments key: DXF code, alist: object data list
(defun massoc (key alist / x nlist)
(foreach x alist
(if (eq key (car x))
(setq nlist (cons (cdr x) nlist))
)
)
(reverse nlist)
) ;end
;(setq s (ssget))
(setq s (ssget '((0 . "LINE,LWPOLYLINE"))))
(setq teller 0)
(repeat (sslength s)
(setq en (ssname s teller))
(setq ent (entget en))
(if (= "LINE" (cdr (assoc 0 ent)))
(setq PtLst (list (cdr (assoc 10 ent)) (cdr (assoc 11 ent))))
) ;if
(if (= "LWPOLYLINE" (cdr (assoc 0 ent)))
(setq PtLst (massoc 10 ent))
) ;if
(command "mline" (foreach pt PtLst (command pt))) ;point list fed to
mline
;(command "erase" en "")
(entdel en)
(setq teller (1+ teller))
) ;repeat
(princ)
) ;end
Wednesday, April 15, 2009
Conditional Formatting Trick...
I just saw this trick on Steve Stafford's blog...
When you are creating/editing a schedule and select a value that can be formatted, like Area or a Number value for example press the ALT & N keys in the formatting tab. You will then be able to select a range or do other snazzy things.
His full article...
http://revitoped.blogspot.com/2009/04/conditional-formatting-was-unfair.html
When you are creating/editing a schedule and select a value that can be formatted, like Area or a Number value for example press the ALT & N keys in the formatting tab. You will then be able to select a range or do other snazzy things.
His full article...
http://revitoped.blogspot.com/2009/04/conditional-formatting-was-unfair.html
Thursday, April 09, 2009
Shared Parameters File
Do I need to send it with my Project file?
Will all of the parameters give errors if it is deleted or moved?
The simple answer is no.
Deleting or moving the actual Shared Parameters File does not cause any immediate errors, unless you try to make a parameter from it again. The information from that file is saved with the main Project rvt file. That means that you do not need to send it with a Project file. If the users at the other end want to edit, add or use it they will either need to get yours or make an exact copy themselves.
Here's a little more explanation...
This goes to show just how good Steve Stafford of Revit OpEd is. This is a 2005 article from his blog (which he wrote on a Sunday).
"...deleting the shared parameter from the shared parameter file (there is no link to the shared parameter file) doesn't directly affect a family or project that already uses it. Only when you remove it from a family or project will it affect the existence of data. Also you won't be able to assign or use the parameter again after it is deleted, since a new parameter by the same name is unique in the world as far as Revit is concerned. "
The rest of the article...http://revitoped.blogspot.com/2005/07/shared-parameters-part-3.html
Will all of the parameters give errors if it is deleted or moved?
The simple answer is no.
Deleting or moving the actual Shared Parameters File does not cause any immediate errors, unless you try to make a parameter from it again. The information from that file is saved with the main Project rvt file. That means that you do not need to send it with a Project file. If the users at the other end want to edit, add or use it they will either need to get yours or make an exact copy themselves.
Here's a little more explanation...
This goes to show just how good Steve Stafford of Revit OpEd is. This is a 2005 article from his blog (which he wrote on a Sunday).
"...deleting the shared parameter from the shared parameter file (there is no link to the shared parameter file) doesn't directly affect a family or project that already uses it. Only when you remove it from a family or project will it affect the existence of data. Also you won't be able to assign or use the parameter again after it is deleted, since a new parameter by the same name is unique in the world as far as Revit is concerned. "
The rest of the article...http://revitoped.blogspot.com/2005/07/shared-parameters-part-3.html
Wednesday, April 08, 2009
Autodesk Software Assistance
This is nice news. If you are out of a job in the design industry there is an opportunity for you to get free software and maybe even training within the next few months. Please read the full press release here...
http://pressreleases.autodesk.com/index.php?s=press_releases&item=553%3C%2Ftd%3E
A little extra,
If you are in Ontario, Canada and need a business loan or grant check out this site...
http://www.grants-loans.org/ontario-grants.php
http://pressreleases.autodesk.com/index.php?s=press_releases&item=553%3C%2Ftd%3E
A little extra,
If you are in Ontario, Canada and need a business loan or grant check out this site...
http://www.grants-loans.org/ontario-grants.php
Tuesday, April 07, 2009
Select All Instances Tool Dangerous
I would recommend that all new users not use the Select All Instances tool. If the tool was 'Select All Instances in View', then fine but not as it is. Why? If you pick a piece of text in a drafting view and then use 'Select All Instances' all text of that type will be selected. If you then delete, it's all gone in every view. This holds true for walls, doors and everything.
Linked File Scope Boxes Printing
When a linked file which contains a Scope Box is printed the Scope Box border will print. This will happen even if the 'Hide Scope Boxes' checkbox is ticked.
As a workaround you will need to hide them in each view by using the Visibility/Graphics Overrides box.
Please note that you can override the visibility in the element properties of the Scope Box. If you turn it off in every view you will not be able to click on it again to edit it.
As a workaround you will need to hide them in each view by using the Visibility/Graphics Overrides box.
Please note that you can override the visibility in the element properties of the Scope Box. If you turn it off in every view you will not be able to click on it again to edit it.
Revit 2010 When and How
The Revit Architecture 2010 release is fast approaching.
The when is the middle of April.
The how is a little more difficult...
Subscription customers must choose how they would like their software upgrades to be delivered this year (in Canada).
The delivery options are:
1. Do nothing. Your 2010 Autodesk software DVD / CD will automatically be shipped to you in 30 days. (add on top of this the delivery time which can take anywhere from a few days to weeks)
2. Download your 2010 Autodesk software using the Autodesk Subscription Center.
3. Login to the Autodesk Subscription Center to request a DVD / CD copy of your 2010 software and Autodesk will ship your DVD / CD after you submit your request.
If you need full instructions to get into subscription center call your reseller.
The when is the middle of April.
The how is a little more difficult...
Subscription customers must choose how they would like their software upgrades to be delivered this year (in Canada).
The delivery options are:
1. Do nothing. Your 2010 Autodesk software DVD / CD will automatically be shipped to you in 30 days. (add on top of this the delivery time which can take anywhere from a few days to weeks)
2. Download your 2010 Autodesk software using the Autodesk Subscription Center.
3. Login to the Autodesk Subscription Center to request a DVD / CD copy of your 2010 software and Autodesk will ship your DVD / CD after you submit your request.
If you need full instructions to get into subscription center call your reseller.
Tuesday, March 31, 2009
Activating Revit on a Slow Network
If you are consistently having trouble getting a Revit license from the server it may be that you have a slow network. You may need to add the following Environment Variable.
(this is found under System, Advanced, Environment Variables.)
Variable Name: FLEXLM_TIMEOUT
Variable Value: 1000000
This will give Revit some breathing room to get a license from the server.
(this is found under System, Advanced, Environment Variables.)
Variable Name: FLEXLM_TIMEOUT
Variable Value: 1000000
This will give Revit some breathing room to get a license from the server.
Thursday, March 19, 2009
Newport and Revit
Having a say in Autodesk product development is a unique opportunity that we enjoy in this city, Toronto. Having done some testing myself I can assure you that Newport is going in the right direction. It's also nice to see how seriously the developers take our opinions. If you're not close by, maybe you can get in on the Beta when it comes out? If you are interested in participating contact Ian Hooper at ux.tester@autodesk.com .
Tuesday, March 17, 2009
Architects Should Make Ceiling Levels
In talking with the growing MEP group of users it seems apparent that architects should make ceiling levels. This would help in the following ways...
Copy/Monitor would be able to bring the ceiling heights directly into Revit MEP saving hours.
Walls can be drawn to the ceiling height without user math.
Ceilings heights can be adjusted in fewer clicks by just adjusting the Level.
Feel free to comment...
Copy/Monitor would be able to bring the ceiling heights directly into Revit MEP saving hours.
Walls can be drawn to the ceiling height without user math.
Ceilings heights can be adjusted in fewer clicks by just adjusting the Level.
Feel free to comment...
Thursday, February 26, 2009
Game Engine for Architects

Autodesk® Project Newport - real-time 3D story building technology for architectural visualization and presentation. With game-engine technology and breakthrough ease-of-use, Project Newport enables architects to show their design in context, rapidly explore design options, and create vivid and immersive 3D presentations. Newport brings architectural designs to life by expressing design intent at every stage of a project.
This may be of interest...
Wednesday, February 25, 2009
ORUG Summit-March 4th

ORUG Summit - Wednesday March 4th 6:30 - 9:00 PM
Please join us for our first ORUG Summit. We will have three topic discussion tables:
CAD Manager Issues, Project Manager Issues, and Miscellaneous Topics.
Date: Wednesday March 4, 2009Time: 6:30 PM to 9:00 PM.
Location: Alice Fazooli's, 294 Adelaide St W, Toronto ON, M5V 1P6. Click here for map.
For those taking the TTC, it is conveniently located near both Osgoode and St. Andrew stations on the Yonge-University-Spadina line.
Guest: Charles Simco is a Toronto Litigation lawyer at Shibley Righton LLP who will be available to offer his opinion at the Legal Contract issues discussion table.
Introductions, Welcome and News
Jay Polding will update us about Revit 2010 and what's been going on for the past four months. If you would like to become an ORUG member or attend this meeting as a guest, please contact Jay Polding at jpolding@cadmicro.com. There is no charge to attend.
Topic Discussion Tables
CAD Manager Issues
API
Office Standards and Templates
Project Manager Issues
Integrated Project Delivery
Legal Contract Issues
Miscellaneous Topics
Revit 2010
Revit 2010
Tips and Tricks
There will be 1 moderator at each table and 2 note takers.
Notes will be posted to the ORUG Blog at http://www.orug.ca/.
CAD MicroSolutions Inc.65 International Blvd Toronto ON M9W 6L9P: 416-213-0533 or 1-888-401-5885 F: 416-213-0538http://www.cadmicro.com/ solutions@cadmicro.com
Adding Decimal Places to a Tag
How do you add more decimal places to a tag? For instance, the Property Line tag has two decimal places by default but you may want three. The answer to this also applies to changing a tag from Metric to Imperial units or other formatting issues.
Open Family which you would like to edit. (M_Property Line Tag.rfa)
Click on the Label. (Distance)
Click Edit Label from Options Bar


Click (highlight) on the Parameter which you want to change.
Then click the 'Edit Parameters Units Format' button. (Hand pointing with number sign)
Once it's changed you can save and reload the family.
Once it's changed you can save and reload the family.
Friday, February 20, 2009
Revit 2010 Build Checker
Looks like this might be useful...
The Beside The Cursor Revit Build Checker has been updated to support Revit 2010 products when they are available. No need to launch Revit and search for the build number...just launch my script to get a report on installed versions of Revit from Release 9.1 through 2010.
Also works with 64 bit Windows XP and Vista.
Also works with Revit MEP and Revit Structures.
http://www.integr-8.com/besidethecursor/
The Beside The Cursor Revit Build Checker has been updated to support Revit 2010 products when they are available. No need to launch Revit and search for the build number...just launch my script to get a report on installed versions of Revit from Release 9.1 through 2010.
Also works with 64 bit Windows XP and Vista.
Also works with Revit MEP and Revit Structures.
http://www.integr-8.com/besidethecursor/
Wednesday, February 11, 2009
Revit 2010 First Impressions
Autodesk continues to focus on the Revit platform, and they've been busy! Here's what the big picture looks like for this release...
User Interface
This needed attention and was given. Looks like the Type Selector has been enhanced to show preview images. The 'ribbon' in AutoCAD 2009 has been frustrating at times. From the images that I've seen the Revit ribbon is well organized.
Native 64bit support
This enhancement cannot be understated. It's not flashy but it can make a huge difference in the size of model that you work on. Users won't have to 'break up' models into links as much anymore. Now we can finally move beyond 4gb of RAM!
Freeform Modelling
It's funny because you wouldn't think that the masses of designers need this, but many do. When you're designing in 3D it's amazing the array of shapes needed. Even if you're making a 'classic' (rectangle) building there are custom column capitals, window lintels, furniture, lighting and other things that require non-rectangular shapes. I'm looking forward to getting into this feature.
There will be more but that is just a sampling. There are other sites like revit3d.com which go into greater depth and even have videos.
Looking forward to April...
User Interface
This needed attention and was given. Looks like the Type Selector has been enhanced to show preview images. The 'ribbon' in AutoCAD 2009 has been frustrating at times. From the images that I've seen the Revit ribbon is well organized.
Native 64bit support
This enhancement cannot be understated. It's not flashy but it can make a huge difference in the size of model that you work on. Users won't have to 'break up' models into links as much anymore. Now we can finally move beyond 4gb of RAM!
Freeform Modelling
It's funny because you wouldn't think that the masses of designers need this, but many do. When you're designing in 3D it's amazing the array of shapes needed. Even if you're making a 'classic' (rectangle) building there are custom column capitals, window lintels, furniture, lighting and other things that require non-rectangular shapes. I'm looking forward to getting into this feature.
There will be more but that is just a sampling. There are other sites like revit3d.com which go into greater depth and even have videos.
Looking forward to April...
Wednesday, January 07, 2009
Lineweight Control
Where are lineweight settings controlled? Where are Imported Lineweight settings controlled?
Lineweights are configured for each file. If a team is working on one file(worksharing) and one person changes the line settings, the file has new line settings. These are found under the Settings drop down menu. This is also true of Object Styles.
The lesson here is a common one in Revit, if you change it in one place it changes everywhere. So, if you want a thicker linetype, make a new one.
Imported Lineweights are controlled by a text file stored in C:\Program Files\Revit Architecture 2009\Data\ importlineweights-dwg-default.txt. You can edit it and make new ones. These settings do not move with the rvt file, they are particular to a workstation. Potentially two users could import the same file and get different lineweight results.
A team may want to make one of these text files and distribute across the team as needed.
Lineweights are configured for each file. If a team is working on one file(worksharing) and one person changes the line settings, the file has new line settings. These are found under the Settings drop down menu. This is also true of Object Styles.
The lesson here is a common one in Revit, if you change it in one place it changes everywhere. So, if you want a thicker linetype, make a new one.
Imported Lineweights are controlled by a text file stored in C:\Program Files\Revit Architecture 2009\Data\ importlineweights-dwg-default.txt. You can edit it and make new ones. These settings do not move with the rvt file, they are particular to a workstation. Potentially two users could import the same file and get different lineweight results.
A team may want to make one of these text files and distribute across the team as needed.
Monday, January 05, 2009
Try Ecotect for Free
Autodesk has recently purchased Ecotect and is making the software available for free (trial basis) on this site...
http://ecotect.com/downloads
Ecotect is an environmental simulation software.
http://ecotect.com/downloads
Ecotect is an environmental simulation software.
Wednesday, December 31, 2008
Revit Plugins and Add-ons Review 2008
It seems that in this last year there have been many plugins, add-ons, extensions etc created for Revit. From my perspective plugins are usually best as a stop-gap solution. By this I mean that they do something that Revit out-of-the-box can't do (or do well) at this point in time. CAD/BIM Mangers have an enormous task of installing the latest versions and patches of the core software. Now add on top of that the individual plugins that each user may want. This is compounded by each new release and update. Revit's initial philosophy was to do everything well out-of-the-box. That being said, even Autodesk can't keep up with the developing demands of this hugely popular software. For this good reason the API has enabled people to create some excellent solutions. Autodesk has taken note and even bought up some of the better programs to integrate with the core software.
So, let's review some available plugins for Revit Architecture. This list is by no means comprehensive. Please let me know of any good ones that I have missed as I will keep updating this.
IES VE-Ware
"VE-Ware is our FREE building energy usage and carbon dioxide emission assessment software that can make a real difference to the green credentials of a building, as well as benchmark it against the US Architecture 2030 Challenge."
http://www.iesve.com/content/default.asp?page=s130
ease of installation: easy
ease of use: Knowing how to set up the model before running the calcs is essential.
results: Pretty basic. Not detailed enough but still useful.
price: Free
IES VE-Toolkit
"Our VE-Toolkits are ideal for use at the very early stages of the design process as they give quick sustainability feedback at the click of a few buttons."
http://www.iesve.com/content/default.asp?page=s158
ease of installation: easy
ease of use: Knowing how to set up the model before running the calcs is essential.
results: Very detailed and graphic results. Great value in my opinion.
price: approx. $1500 (ballpark)
Especs for Revit
"e-SPECS for Revit extends the Autodesk® Revit-based products document coordination and quality solutions to the construction specifications. "
http://www.e-specs.com/especs-revit.html
ease of installation: Not very easy.
ease of use: Easy to use once the difficult setup process is done.
results: For the money the results can be awesome, as long as there is some setup and attention to standards. This has great potential but needs to be more accessible.
price: approx $1700(ballpark)
Avatech Tools:
http://www.avatech.com/solutions/building-design/product-details.aspx?product=44
So, let's review some available plugins for Revit Architecture. This list is by no means comprehensive. Please let me know of any good ones that I have missed as I will keep updating this.
IES VE-Ware
"VE-Ware is our FREE building energy usage and carbon dioxide emission assessment software that can make a real difference to the green credentials of a building, as well as benchmark it against the US Architecture 2030 Challenge."
http://www.iesve.com/content/default.asp?page=s130
ease of installation: easy
ease of use: Knowing how to set up the model before running the calcs is essential.
results: Pretty basic. Not detailed enough but still useful.
price: Free
IES VE-Toolkit
"Our VE-Toolkits are ideal for use at the very early stages of the design process as they give quick sustainability feedback at the click of a few buttons."
http://www.iesve.com/content/default.asp?page=s158
ease of installation: easy
ease of use: Knowing how to set up the model before running the calcs is essential.
results: Very detailed and graphic results. Great value in my opinion.
price: approx. $1500 (ballpark)
Especs for Revit
"e-SPECS for Revit extends the Autodesk® Revit-based products document coordination and quality solutions to the construction specifications. "
http://www.e-specs.com/especs-revit.html
ease of installation: Not very easy.
ease of use: Easy to use once the difficult setup process is done.
results: For the money the results can be awesome, as long as there is some setup and attention to standards. This has great potential but needs to be more accessible.
price: approx $1700(ballpark)
Avatech Tools:
http://www.avatech.com/solutions/building-design/product-details.aspx?product=44
Avatech Room Renumber
ease of installation: easy
ease of use: easy
results: This is a nice utility that I would consider a necessary stop-gap.
price: free
Avatech Door Mark Update
ease of installation: easy
ease of use: easy
results: This is what happens when someone actually reads the Wish Lists.
price: free
Autodesk Extensions
available on the Autodesk Subscription Website
ease of installation: easy
price: included with subscription
Autodesk Extensions: Compare Models
ease of use: easy
results: I think this has some good uses but I'm not sure what yet. Useful for diagnostics.
Autodesk Extensions: Element Positioning
ease of use: easy, but not sure what it's for.
results: Seems like this might be a diagnostic tool as well. This one is kind of a mixed bag. There is a tool for tagging but I'm not sure what the rest of the tools do yet. I'll keep you posted.
Autodesk Extensions: Freeze Drawings
ease of use: easy
results: This is very useful for creating static details.
Autodesk Extensions: Text Generator
ease of use: easy
results: A good stop-gap until more tools are added to the Text tool.
Autodesk Extensions: Excel Based model Generation
ease of use: haven't used it yet
results:
Autodesk Extensions: Grids Generator
ease of use: medium
results: creates some 3D lines so you can see where your grids are in 3D. I think it would be nice to toggle ref-planes in 3D.
Autodesk Subscription: Worksharing Monitor
ease of installation: easy, once you find it on the subscription site maze.
ease of use: easy
results: a little buggy at times but useful.
price: included with subscription
Autodesk Subscription: Import/Export Google Earth
ease of installation: easy, once you find it on the subscription site maze.
ease of use: easy
results: A 'cool' tool but also somewhat useful.
price: included with subscription
Autodesk Subscription: Batch Print
ease of installation:easy, once you find it on the subscription site maze.
ease of use: Haven't used it yet.
results:Haven't used it yet.
price:included with subscription
Autodesk Labs: STL Exporter
ease of installation: Haven't used it yet.
ease of use:
results:
price:
BIM Content Manager
http://www.bimcontentmanager.com/
ease of installation: fairly easy
ease of use: kind of complex
results: Autodesk intends to buy the parent company so hopefully a refined version of this lands inside of Revit (not an add-on through subscription).
price: $150 for now...
StrucSoft Metal Wood Framer
http://www.strucsoftsolutions.com/products.asp
"First wall panelizer running on Autodesk Revit Platform for wood and Light Guage metal construction."
Although I haven't used this yet it's very presence is encouraging.
Ideate Explorer for Revit
http://www.ideatexplorer.com/index.php
I haven't used this yet but it looks like a very useful tool.
price: $95
Autodesk Navisworks
Exports a Revit model to Navisworks.
You need to buy Navisworks to get this plugin.
Many macro samples are also available in the SDK (Software Development Kit)
ease of installation: medium-hard, you need to edit the revit.ini
ease of use: medium
results: although they are samples there are some useful tools ie. change case, find-replace etc.
price: free
Affinity for Revit
http://www.trelligence.com/affinity_revit.php
Trelligence Affinity™, Affinity for ArchiCAD™, and Affinity for Revit™ is software focused on enhancing the early architectural design process with a unique programming, space planning and schematic design solution. Targeted at the worldwide architectural, engineering, construction and owner/developer (AECO) market, the Trelligence Affinity patent-pending software integrates with ArchiCAD from Graphisoft, Revit Architecture from Autodesk, and other design tools to extend the benefits of Building Information Modeling (BIM) - faster planning, less rework and better team collaboration - to the early design phases of complex building projects.
ease of installation: ?
ease of use: ?
results:?
price: ?
Tuesday, November 25, 2008
Elevation Depth Line Quality
Here's a typical question:
We have been working with some elevation views on a couple of our projects in Revit and it seems that in terms of line weights the depth of the buildings do not read well. Is there a setting to control how Revit handles the line weights of different parts of the building particularly those that are further back in the distance? The building I am working on happens to have several parts to the building that are in the mid ground background plane so any help would be much appreciated.
This is a good question which has potential to be a good built in automatic utility. For now, though, here's how to address this.
Right-click on object or objects....
Override Graphics in View...
By Element...

Then adjust projection lines as required.

This will do in most scenarios.
There are times when you may have to break down and use the 'linework' tool. You don't want to use this tool too often though since it could be time consuming to keep updated.
We have been working with some elevation views on a couple of our projects in Revit and it seems that in terms of line weights the depth of the buildings do not read well. Is there a setting to control how Revit handles the line weights of different parts of the building particularly those that are further back in the distance? The building I am working on happens to have several parts to the building that are in the mid ground background plane so any help would be much appreciated.
This is a good question which has potential to be a good built in automatic utility. For now, though, here's how to address this.
Right-click on object or objects....
Override Graphics in View...
By Element...

Then adjust projection lines as required.

This will do in most scenarios.
There are times when you may have to break down and use the 'linework' tool. You don't want to use this tool too often though since it could be time consuming to keep updated.
Thursday, October 16, 2008
Rendering with Best Setting
From practice, I have noticed that for the visual difference between the 'Best' and 'High' is not usually worth the time difference. I have also noticed that 'Best' will sometimes even crash the machine.
Let me know if you have seen the same.
Let me know if you have seen the same.
Tuesday, October 07, 2008
Relative vs Absolute Links

The difference between these two settings (found under File-Manage Links) is the following:
Relative: If you move the Revit file you will need to move the dwg link into the same folder. If you don't do this the link will be broken, although it may still display the file in a static state.
Absolute: You can move the Revit file without moving the linked dwg. The only issue with this is if you were to move it to a location that can't access the path, the link will be broken.

Date: Wednesday October 29, 2008
Time: 6:30 PM to 9:00 PM.
Location: Alice Fazooli's, 294 Adelaide St W, Toronto ON, M5V 1P6.
For those taking the TTC, it is conveniently located near both Osgoode and St. Andrew stations on the Yonge-University-Spadina line.
ORUG is proud to announce its 2-year anniversary. To celebrate, we're holding our first annual EXPO! Members are encouraged to bring and showcase their projects to the group. Participants will be entered to win prizes. Any ORUG member can bring and show their projects but we would like to request that expositions to the Expo have the following minimum criteria to be eligible for the draw:
Revit Model
One exterior rendering that will be submitted to Jay Polding prior to Wednesday October 29. This rendering will act as registration for the prize draw
One interior rendering
One floorplan
One elevation
One section
Brief explanation to the group about the project and the Revit Model
Laptop with the files mentioned above
We are looking for 3 eligible entrants to do "pecha kucha" presentations about their projects. Pecha Kucha presentations require each presenter to use a slideshow of 20 images, each shown for 20 seconds. This results in a total presentation time of 6 minutes 40 seconds.If you are interested in entering and participating, please email jpolding@cadmicro.com.
Exhibition - ORUG EXPO 2008
Jay will provide a brief introduction of the exhibitions in slideshow format.
Our 3 “Pecha Kucha” entrants will then present.
Our 3 “Pecha Kucha” entrants will then present.
Exhibitors will then set up at individual tables and be able to discuss projects with other members.
Finally, we will be conducting a draw from registered participants. The draw will include two seats of 3dsMAX Design 2009 (Not For Resale version).
Autodesk University 2008Are you attending Autodesk University this year?
If you would like to become an ORUG member or attend this meeting as a guest, please contact Jay Polding at jpolding@cadmicro.com. There is no charge to attend.
Monday, October 06, 2008
New Service Pack Technology
This is good news to a lot of people.
"For the first time in the Revit product line history, we have implemented Service Pack technology similar to the AutoCAD based products. This will greatly reduce the effort needed to update the Revit products to the newest build by allowing our users to update their existing installations without having to reinstall Revit. Because of this change, we recommend that you read the Service Pack Readme before installing. "
Web Update 2 is available at this location:
http://usa.autodesk.com/adsk/servlet/item?siteID=123112&id=11017599
"For the first time in the Revit product line history, we have implemented Service Pack technology similar to the AutoCAD based products. This will greatly reduce the effort needed to update the Revit products to the newest build by allowing our users to update their existing installations without having to reinstall Revit. Because of this change, we recommend that you read the Service Pack Readme before installing. "
Web Update 2 is available at this location:
http://usa.autodesk.com/adsk/servlet/item?siteID=123112&id=11017599
Tuesday, September 30, 2008
Revit 64 is Out!
Just to let every one know, if you don't already. Revit 64bit is now available for download for Architecture, Structure and MEP. You need to log in to the Autodesk Subscription site to get this. Here's a press release from Autodesk...
SAN RAFAEL, Calif., Sept. 30 /PRNewswire-FirstCall/ -- Autodesk, Inc.,(NASDAQ: ADSK) today announced that versions of its Revit software applications for Building Information Modeling (BIM) specifically designed for personal computers using Windows 64-bit operating systems are now available. This marks the company's first venture into 64-bit BIM applications and applies to Revit Architecture 2009, Revit Structure 2009 and Revit MEP 2009. The 64-bit versions are now available to existing Revit platform software subscribers. Customer beta testers reported that the newsoftware applications offer significantly improved performance and stabilityfor memory intensive tasks such as rendering, printing, model upgrading andfile importing and exporting. Some examples of their experience include:
"In every single test I threw at the Revit Structure for the 64-bit system it beat the 32-bit system," said Ken Murphy, BIM manager, Thornton Tomasetti. "On average, we observed approximately a 20 percent performance gain on operations such as saving files and exporting models to other formats for outside consultants. And when it comes to rendering images of large project models, such as an American football stadium with thousands of members, we saw up to a 50 percent performance improvement over the 32-bit platform."
"With 64-bit Revit Architecture we can completely load a very large project into a session and work on it at one time; and that is something that represents a significant efficiency improvement over the 32-bit environment,"said Lonnie Cumpton, Revit task force manager for the Friedmutter Group. "For example, we have a large project that consists of 2.9 gigabytes of Revit data contained in 22 individual files. With 64-bit Revit Architecture we can link all the pieces together into one big model and cut an entire building section to gain an understanding from a section elevation standpoint of the entireproject at one time. Using 32-bit Revit Architecture we'd have to cut individual pieces of sections in each model and then piece them back together. It took us a day to do that. Now we can do it in less than an hour."
"We've been beta testing the 64-bit Revit Structure software and the increases in efficiency and productivity are impressive," said Jamie Richardson, Associate & CAD manager, Ericksen Roed & Associates. "Cutting sections and switching between views is much faster. Moving within the viewsand rotating the model in a 3D view is also noticeably faster and smoother.With what we have seen in our beta testing, and what we're hearing from userstesting the beta on their current projects, we see no reason not to go to the64-bit version of Revit Structure."
The English language versions of new 64-bit Revit software applications areavailable now to existing Revit Architecture 2009, Revit Structure 2009 andRevit MEP 2009 subscribers via the online Subscription Center. The 64-bit software will release in other languages at a later date.
"We're very excited to hear our beta testers report stunning performance gains with the native 64-bit versions of the Revit software applications,"said Jay Bhatt, senior vice president, Autodesk AEC Solutions. "Breaking the four gigabytes RAM barrier is an important milestone, which helps ourcustomers experience the power of BIM in even their largest projects."
SAN RAFAEL, Calif., Sept. 30 /PRNewswire-FirstCall/ -- Autodesk, Inc.,(NASDAQ: ADSK) today announced that versions of its Revit software applications for Building Information Modeling (BIM) specifically designed for personal computers using Windows 64-bit operating systems are now available. This marks the company's first venture into 64-bit BIM applications and applies to Revit Architecture 2009, Revit Structure 2009 and Revit MEP 2009. The 64-bit versions are now available to existing Revit platform software subscribers. Customer beta testers reported that the newsoftware applications offer significantly improved performance and stabilityfor memory intensive tasks such as rendering, printing, model upgrading andfile importing and exporting. Some examples of their experience include:
"In every single test I threw at the Revit Structure for the 64-bit system it beat the 32-bit system," said Ken Murphy, BIM manager, Thornton Tomasetti. "On average, we observed approximately a 20 percent performance gain on operations such as saving files and exporting models to other formats for outside consultants. And when it comes to rendering images of large project models, such as an American football stadium with thousands of members, we saw up to a 50 percent performance improvement over the 32-bit platform."
"With 64-bit Revit Architecture we can completely load a very large project into a session and work on it at one time; and that is something that represents a significant efficiency improvement over the 32-bit environment,"said Lonnie Cumpton, Revit task force manager for the Friedmutter Group. "For example, we have a large project that consists of 2.9 gigabytes of Revit data contained in 22 individual files. With 64-bit Revit Architecture we can link all the pieces together into one big model and cut an entire building section to gain an understanding from a section elevation standpoint of the entireproject at one time. Using 32-bit Revit Architecture we'd have to cut individual pieces of sections in each model and then piece them back together. It took us a day to do that. Now we can do it in less than an hour."
"We've been beta testing the 64-bit Revit Structure software and the increases in efficiency and productivity are impressive," said Jamie Richardson, Associate & CAD manager, Ericksen Roed & Associates. "Cutting sections and switching between views is much faster. Moving within the viewsand rotating the model in a 3D view is also noticeably faster and smoother.With what we have seen in our beta testing, and what we're hearing from userstesting the beta on their current projects, we see no reason not to go to the64-bit version of Revit Structure."
The English language versions of new 64-bit Revit software applications areavailable now to existing Revit Architecture 2009, Revit Structure 2009 andRevit MEP 2009 subscribers via the online Subscription Center. The 64-bit software will release in other languages at a later date.
"We're very excited to hear our beta testers report stunning performance gains with the native 64-bit versions of the Revit software applications,"said Jay Bhatt, senior vice president, Autodesk AEC Solutions. "Breaking the four gigabytes RAM barrier is an important milestone, which helps ourcustomers experience the power of BIM in even their largest projects."
Friday, September 26, 2008
Caution: Import DWG Lines Move
I read this on Steve Stafford's blog and wanted to spread the word. I have sent this to Autodesk as a support issue. I would recommend for you to do the same!
"Revit alters the lines in a imported cad file if they are very nearly horizontal or vertical. It has done this for quite some time. It isn't clear if it isn't a problem very often or if it isn't noticed very often. I'm reminded of this issue by a recent post at AUGI naturally.In this instance a member wrote that a property line (in a cad import) whose bearing is 89 degrees 57 minutes and 56 seconds is altered by Revit to simply 90 degrees even. The cad file isn't "changed" but what we see of it in Revit is."
Complete article...http://revitoped.blogspot.com/2008/09/dwg-import-lines-nearly.html
"Revit alters the lines in a imported cad file if they are very nearly horizontal or vertical. It has done this for quite some time. It isn't clear if it isn't a problem very often or if it isn't noticed very often. I'm reminded of this issue by a recent post at AUGI naturally.In this instance a member wrote that a property line (in a cad import) whose bearing is 89 degrees 57 minutes and 56 seconds is altered by Revit to simply 90 degrees even. The cad file isn't "changed" but what we see of it in Revit is."
Complete article...http://revitoped.blogspot.com/2008/09/dwg-import-lines-nearly.html
Model Lines to Detail Lines and back
Thanks to Yogesh Ishwar for this tip...
If you have Model lines and want to change them to Detail Lines do the following:
Cut Model Lines
Start Filled Region Command
Paste Aligned-Same Place
Cut Lines again
Close Filled Region Command without saving
Paste Aligned-Same Place. These lines will now be Detail Lines
If you want to go the other way just replace Filled Region command with the Floor command.
If you have Model lines and want to change them to Detail Lines do the following:
Cut Model Lines
Start Filled Region Command
Paste Aligned-Same Place
Cut Lines again
Close Filled Region Command without saving
Paste Aligned-Same Place. These lines will now be Detail Lines
If you want to go the other way just replace Filled Region command with the Floor command.
Monday, September 22, 2008
Tagging and Scheduling Nested Families
Challenge: You want a door and a window to be inserted as one, but you want to tag and schedule them individually.

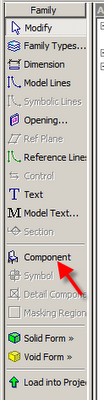
This can be done the following way.
Open window family.
Make sure the shared button is checked. Under Settings, Family Category and Parameters.

Open the door family.
Insert the window as a component.

Make sure the shared button is checked. Under Settings, Family Category and Parameters.
When you insert the nested family you will be able to tag and schedule each object.
Friday, September 19, 2008
Metric and Imperial Units in Tags and Schedules
Metric and Imperial Units in Tags: 

Open the Tag family.
Add the Area label.
Edit the unit format.

Metric and Imperial Units in Schedules:
Add a calculated value
Type: Area
Formula: Area
Go to the Formatting tab and adjust the units format for the new parameter.

Wednesday, September 10, 2008
Using IES Files in revit Architecture 2009
Thanks to Yogesh Ishwar for this one.
To specify an IES file for a light source
Obtain the desired IES file.
You can obtain an IES file directly from the manufacturer, or use an IES file provided by Revit Architecture. The Revit IES files reside in the following location, by default:
C:\Program Files\\Data\Electrical Components\IES
Specify Photometric Web light distribution, as follows:
Open the lighting fixture family in the Family Editor.
In the drawing area, select the light source.
On the Options Bar, click Light Source Definition.
For Emit from Shape, select the desired shape.
For Light distribution, select (Photometric Web).
Click OK.
Save changes to the lighting fixture family.
Specify the IES file to use, as follows:
If you want the IES file to define light distribution for the entire lighting fixture family, keep the lighting fixture family open in the Family Editor. Click Family Types. For Name, select the family type to modify.
If you want the IES file to define light distribution for selected instances of the lighting fixture family, open a project that uses it, and select a lighting fixture in the project. Right click, and click Element Properties. Click Edit/New. Click Duplicate, specify a name for the new family type, and click OK.
In the list of type parameters, scroll down to Photometric.
For Photometric Web File, click in the Value column.
Click (Browse).
Note: The Browse button displays after you click in the field.
Navigate to the desired IES file, select it, and click Open.
Click OK.
Save changes to the project or the lighting fixture family.
In the drawing area, the shape of the light source reflects the specified IES file. To see the light source in a project view, you must make light sources visible.
To specify an IES file for a light source
Obtain the desired IES file.
You can obtain an IES file directly from the manufacturer, or use an IES file provided by Revit Architecture. The Revit IES files reside in the following location, by default:
C:\Program Files\
Specify Photometric Web light distribution, as follows:
Open the lighting fixture family in the Family Editor.
In the drawing area, select the light source.
On the Options Bar, click Light Source Definition.
For Emit from Shape, select the desired shape.
For Light distribution, select (Photometric Web).
Click OK.
Save changes to the lighting fixture family.
Specify the IES file to use, as follows:
If you want the IES file to define light distribution for the entire lighting fixture family, keep the lighting fixture family open in the Family Editor. Click Family Types. For Name, select the family type to modify.
If you want the IES file to define light distribution for selected instances of the lighting fixture family, open a project that uses it, and select a lighting fixture in the project. Right click, and click Element Properties. Click Edit/New. Click Duplicate, specify a name for the new family type, and click OK.
In the list of type parameters, scroll down to Photometric.
For Photometric Web File, click in the Value column.
Click (Browse).
Note: The Browse button displays after you click in the field.
Navigate to the desired IES file, select it, and click Open.
Click OK.
Save changes to the project or the lighting fixture family.
In the drawing area, the shape of the light source reflects the specified IES file. To see the light source in a project view, you must make light sources visible.
Tuesday, September 09, 2008

Friday, August 08, 2008
Always Name Views - use F2
You should always name new views. To that end...
When renaming a view just click on the view name in the Project Browser and then press the F2 key on the keyboard.
When renaming a view just click on the view name in the Project Browser and then press the F2 key on the keyboard.
Tuesday, July 29, 2008
Revit Architecture 2009 Extensions
You can now download Revit Architecture 2009 Extensions from the Autodesk Subscription Center. Some impressions:
Freeze Drawings: create a 2D drafting view of a plan, elevation or section view.
Text Generator: A few more bells and whistles for text. A temporary solution I hope.
Grids Generator: This is a step in the right direction for creating and editing levels and grids.
One thing of note, you can choose to display your grids in 3D. This will draw unconstrained model lines on top of the grids.While I like the idea of these extensions, and in some cases they are badly needed, I find them disappointing. They seem incomplete as compared to the Revit Structure extensions.
Freeze Drawings: create a 2D drafting view of a plan, elevation or section view.
Text Generator: A few more bells and whistles for text. A temporary solution I hope.
Grids Generator: This is a step in the right direction for creating and editing levels and grids.
One thing of note, you can choose to display your grids in 3D. This will draw unconstrained model lines on top of the grids.While I like the idea of these extensions, and in some cases they are badly needed, I find them disappointing. They seem incomplete as compared to the Revit Structure extensions.
Wednesday, July 23, 2008
Curtain Wall Louvres
The easiest way to make louvres on/in curtain panels is to do the following:
Make a mullion profile of the shape and offset desired. Load into project.
Make a (louvre) curtain wall type which includes above mentioned mullion profile and desired spacing.
Using the TAB key Insert louvre curtain wall type in place of panel at desired locations.
Credit to Daniel Friesen from the AUGI forum.
I would like to add one more thing to this...
If you would like to have a single panel of glass behind the louvres you may need to do this:
Make a curtain wall with the conventional mullions and glass panels.
Make a curtain wall that only contains a modified mullion that acts as a louvre. Its panel will be the empty panel type.
Draw this curtain wall in front of panels that need louvres. You may lock/constrain it to the backing curtain wall.
Make a mullion profile of the shape and offset desired. Load into project.
Make a (louvre) curtain wall type which includes above mentioned mullion profile and desired spacing.
Using the TAB key Insert louvre curtain wall type in place of panel at desired locations.
Credit to Daniel Friesen from the AUGI forum.
I would like to add one more thing to this...
If you would like to have a single panel of glass behind the louvres you may need to do this:
Make a curtain wall with the conventional mullions and glass panels.
Make a curtain wall that only contains a modified mullion that acts as a louvre. Its panel will be the empty panel type.
Draw this curtain wall in front of panels that need louvres. You may lock/constrain it to the backing curtain wall.
Tuesday, July 22, 2008
IES Plugin and Phases
You can now set the phase to export to the IES plugin analysis. Here's how:
Settings-Project Information-Energy Data-Project Phase
Settings-Project Information-Energy Data-Project Phase
Monday, July 14, 2008
Show Light Cone
Nice post from Mike Hardy-Brown's blog...
http://reviteer.blogspot.com/2008/07/revit-arch-2009-lights.html
Neat little trick with lights.
Instead of rendering to see where your light source definition will render lit portions, go to your visibility graphics (VG), show the lights on in shaded or hidden line views. Switch on Light Source. Also nice to have an override here. I used a blue overhead line. Sectional Elevation representation of light source definition.
http://reviteer.blogspot.com/2008/07/revit-arch-2009-lights.html
Neat little trick with lights.
Instead of rendering to see where your light source definition will render lit portions, go to your visibility graphics (VG), show the lights on in shaded or hidden line views. Switch on Light Source. Also nice to have an override here. I used a blue overhead line. Sectional Elevation representation of light source definition.
Thursday, July 03, 2008
Export as Polylines

When exporting to AutoCAD you can export Room and Area boundaries as polylines.
1. File-Export CAD Formats
2. Options
3. Click Export Rooms and Areas as polylines
Wednesday, July 02, 2008
3D Details
To make a 3D Detail of an existing section or elevation:
1. Make a 3D view and name it
2. Turn on Section Box in the View Properties
3. View(drop down menu)-Orient-To Other View...-Pick your view
4. Orbit 3D view to desired location
1. Make a 3D view and name it
2. Turn on Section Box in the View Properties
3. View(drop down menu)-Orient-To Other View...-Pick your view
4. Orbit 3D view to desired location
Thursday, June 26, 2008
Autodesk News...
Don't ask me what the big picture is with all of these aquisitions, but I thought you might want to know...
Autodesk Enhances Sustainable Design Capabilities with Acquisitions of Ecotect and Green Building Studio Analysis Tools
Autodesk Enhances Sustainable Design Capabilities with Acquisitions of Ecotect and Green Building Studio Analysis Tools
Autodesk Completes Acquisition of Assets of Square One Research and Green Building Studio
SAN RAFAEL, Calif., June 26, 2008 — As part of its on-going commitment to support the practice of sustainable design and green building in the architecture, engineering and construction (AEC) industries, Autodesk, Inc. (NASDAQ: ADSK) today announced two acquisitions to improve building performance analysis in the building information modeling (BIM) process. Autodesk announced that it has completed the acquisition of substantially all the assets related to the Ecotect software tools for conceptual building performance analysis from both Square One Research Ltd. and Dr. Andrew Marsh. Autodesk also announced that it has completed the acquisition of substantially all the assets of Green Building Studio, Inc., a provider of web-based whole building energy, water and carbon-emission analysis software. Terms of the acquisitions were not disclosed.
“Buildings are a leading contributor to greenhouse gas emissions, so to combat climate change it is critical for the building industry to rapidly adopt sustainable design practices that will lead to buildings which are appreciably more efficient and eventually carbon neutral,” said Jay Bhatt, senior vice president, Autodesk AEC solutions. “The addition of these tools to our technology portfolio will help make it easier for architects, engineers and designers to understand the impact of their design decisions on building performance earlier in the design process so they can optimize for reduced environmental impact.”
The acquisitions of Ecotect and the Green Building Studio assets will support Autodesk’s vision to deliver software that enables architects and engineers to design more sustainable projects. With improved building performance analysis capabilities, Autodesk will be uniquely positioned to offer a comprehensive suite of software solutions for sustainable design and analysis, enabling a BIM process that can facilitate cost-effective design and delivery of high-performing, resource-efficient buildings and infrastructure.
Square One Research, Ltd. and Dr. Andrew Marsh, creator of the Ecotect environmental design and analysis tools, are based in Isle of Man. The Ecotect tools can measure how fundamental criteria, such as solar, thermal, shading, lighting, and airflow, will affect building performance in the conceptual and detailed phases of design. Their capability to forecast building performance over time better equips architects and engineers to deliver more energy efficient and sustainable building designs.
“Square One Research and Autodesk share a commitment to using technology to make the design and construction of sustainable, high-performance buildings easier and more efficient,” said Dr. Andrew J. Marsh, Co-Founder and Head of Research & Development, Square One Research. “We are pleased to join Autodesk and look forward to helping develop and deliver simple and effective building performance analysis to architects and engineers around the world.”
The Autodesk Green Building Studio analysis tools, now available at http://www.autodesk.com/greenbuildingstudio, provide improved design insight through whole building energy, water and carbon-emission analysis, helping architects and designers to maximize building economic and environmental performance. The tools are compatible with Autodesk design software as well as software from other industry providers through the Green Building XML (gbXML) schema and can now be directly accessed from within the Revit platform for BIM with a new plug-in now available for download. Green Building Studio Inc. launched the Green Building Studio web service in 2004.
To read more about how Autodesk and its customers are addressing sustainable design, please visit www.autodesk.com/green.
Safe Harbor Statement
Further information on potential factors that could affect the financial results of Autodesk are included in the company's reports on Form 10-K for the year ended January 31, 2008, and Form 10-Q for the quarter ended April 30, 2008 which are on file with the Securities and Exchange Commission.
Revit Resource
http://offers.autodesk.com/8/87216/
This is what you will find...
This is what you will find...
“Voices of Architecture Podcast Library” where you’ll find a series of podcast interviews including:
Bob Berkebile, BNIM – Bob discuss the topic of Architecture and Public Identity and why it is a hot topic in the industry. Bob also describes one of the most interesting projects his firm is currently working on today, what he sees as a key trend in global architecture and the importance of BIM knowledge as a key factor when evaluating employee prospects.
Mark Dietrick, Burt Hill – Mark comments about the biggest new trends in the architecture industry, and what Burt Hill looks for in terms of BIM knowledge when searching for new employees.
John Moebes, Director of Construction for Crate & Barrel - Mark discusses how the Revit platform helps his company improve the design and build process, what Revit platform solutions they use, how Crate & Barrel has adopted integrated project management, and what he sees as the biggest new trend in architecture today.
Wednesday, June 04, 2008
Render Hotfix
Please see this article if you are having crashing issues when rendering...
http://usa.autodesk.com/adsk/servlet/ps/dl/item?siteID=123112&id=11294295&linkID=9240618
ps, this applies to the AutoCAD renderer.
http://usa.autodesk.com/adsk/servlet/ps/dl/item?siteID=123112&id=11294295&linkID=9240618
ps, this applies to the AutoCAD renderer.
Tuesday, June 03, 2008
The Revit Wave Has Hit!
I haven't been posting as much as I would like. It's not for lack of content but a huge wave of Revit implementations, training, support etc. Here's something....
IES Plugin for 2009
Some (including me) could not find the latest page for the IES plugin download for Revit Arch 2009.http://www.iesve.com/content/default.asp?page=s97_2Just download install and restart and you will see the IES toolbar right there.
IES Plugin for 2009
Some (including me) could not find the latest page for the IES plugin download for Revit Arch 2009.http://www.iesve.com/content/default.asp?page=s97_2Just download install and restart and you will see the IES toolbar right there.
Thursday, April 24, 2008
Revit 2009 Thank You
I would like to thank the development team for producing an excellent new release. The rendering is an instant improvement and even easier to use. There are many other smaller fixes and enhancements which have been on my list for a while. I even have heard rumors of a 64bit version coming out this year which is sorely needed. Revit structure has too many enhancements to mention along with the amazing extensions from Robobat. Revit MEP continues to add and refine. Looks like it's going to be another fun year with Revit.
Tuesday, April 08, 2008
Revit 2009 Shipping Date
An update on shipping dates for the entire Revit 2009 line of products:
April 15, 2008
April 15, 2008
Subscribe to:
Posts (Atom)

 Posts
Posts


